

Docs directory
Table of contents
MicoAir743v2 User Manual
Product Overview
MicoAir743v2 is a high-performance H743 flight controller designed by MicoAir for multirotors and autonomous flight platforms. It uses a STM32H743VIT6 running at 480 MHz and includes dual BMI088 + BMI270 IMUs, an SPL06 barometer, an onboard QMC5883L magnetometer, an AT7456E analog OSD, and a microSD card slot for log storage.
The flight controller provides 8 UARTs, 11 PWM outputs, 1 I²C bus, dual high-current BECs, a DJI O3/O4 HD video transmitter interface, and onboard Bluetooth telemetry. It can run open-source firmware including ArduPilot, PX4, INAV, and Betaflight.
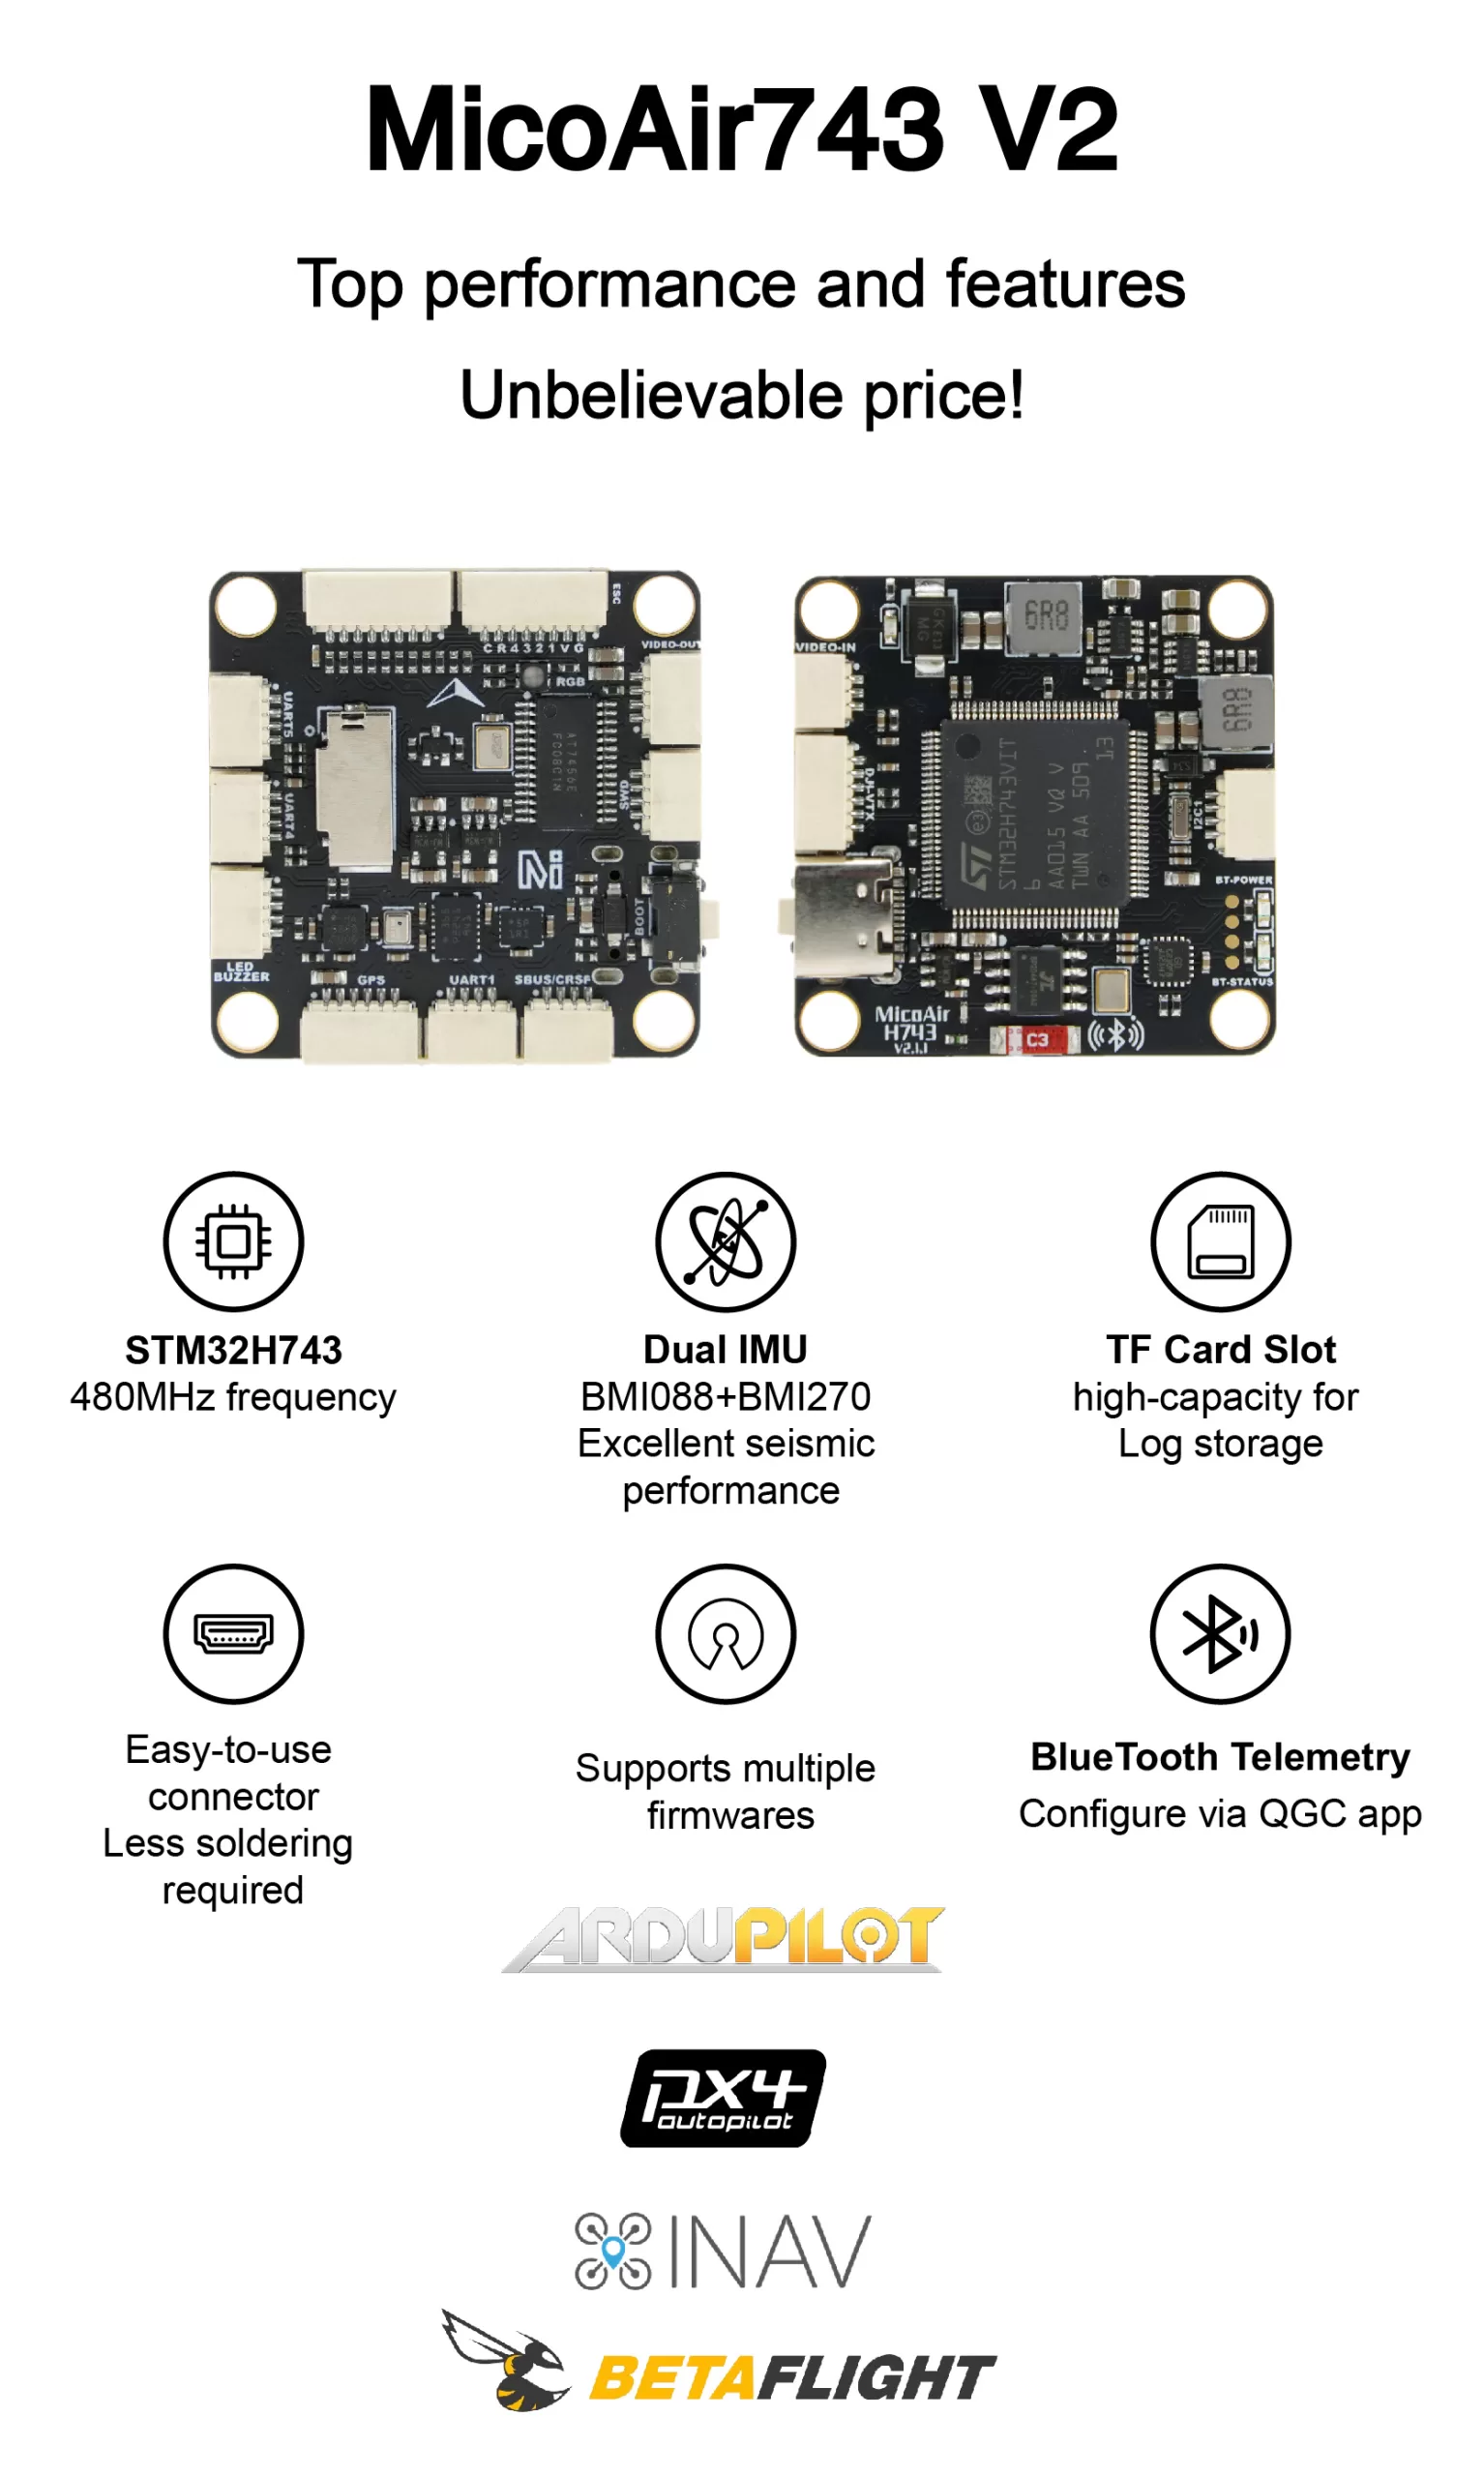
Key Features
STM32H743VIT6, 480 MHz, 2 MB Flash- Dual
BMI088 + BMI270IMUs SPL06barometer and onboardQMC5883LmagnetometerAT7456Eanalog OSD and DJI O3/O4 DisplayPort interface- 8 UARTs, 11 PWM outputs, 1 I²C bus, and 1 SWD interface
- microSD card slot for flight-log storage
- Onboard Bluetooth telemetry, internally connected to UART8, with a default baud rate of
115200 - Dual 5 V / 3 A and 12 V / 3 A BECs
- 2–6S lithium-battery input, supporting 6–27 V
- Supports ArduPilot, PX4, INAV, and Betaflight
Purchase
Hardware Specifications
Processor and Sensors
| Item | Specification |
|---|---|
| Main MCU | STM32H743VIT6, 480 MHz, 2 MB Flash |
| IMU | Dual BMI088 + BMI270 IMUs |
| Barometer | SPL06 |
| Onboard magnetometer | QMC5883L |
| Analog OSD | AT7456E (note that current PX4 firmware does not yet support the OSD function) |
| Log storage | microSD card slot |
Interfaces and Outputs
| Item | Quantity / Description |
|---|---|
| UART | 8 |
| PWM | 11; PWM1–PWM8 support DShot and bidirectional DShot; actual capability depends on the firmware |
| I²C | 1 |
| SWD | 1 |
| ADC | 2: battery-voltage and current sensing |
| USB | USB Type-C |
| HD video transmitter | DJI O3/O4-compatible interface with DisplayPort support |
| Receiver | UART6 is the default RC input; other UARTs can also be used with ArduPilot |
| Other | Buzzer, serial LED, and BOOT button/pad |
Power and Mechanical Design
| Item | Specification |
|---|---|
| Battery input | 2–6S, 6–27 V |
| 5 V BEC | Maximum 3 A, for peripherals such as receivers, GPS modules, and optical-flow sensors |
| 12 V BEC | Maximum 3 A, for peripherals such as video transmitters and cameras |
| Mounting-hole pattern | 30.5 × 30.5 mm |
| Mounting-hole diameter | Φ4 mm |
| Dimensions | 36 × 36 × 8 mm |
| Weight | 10 g |
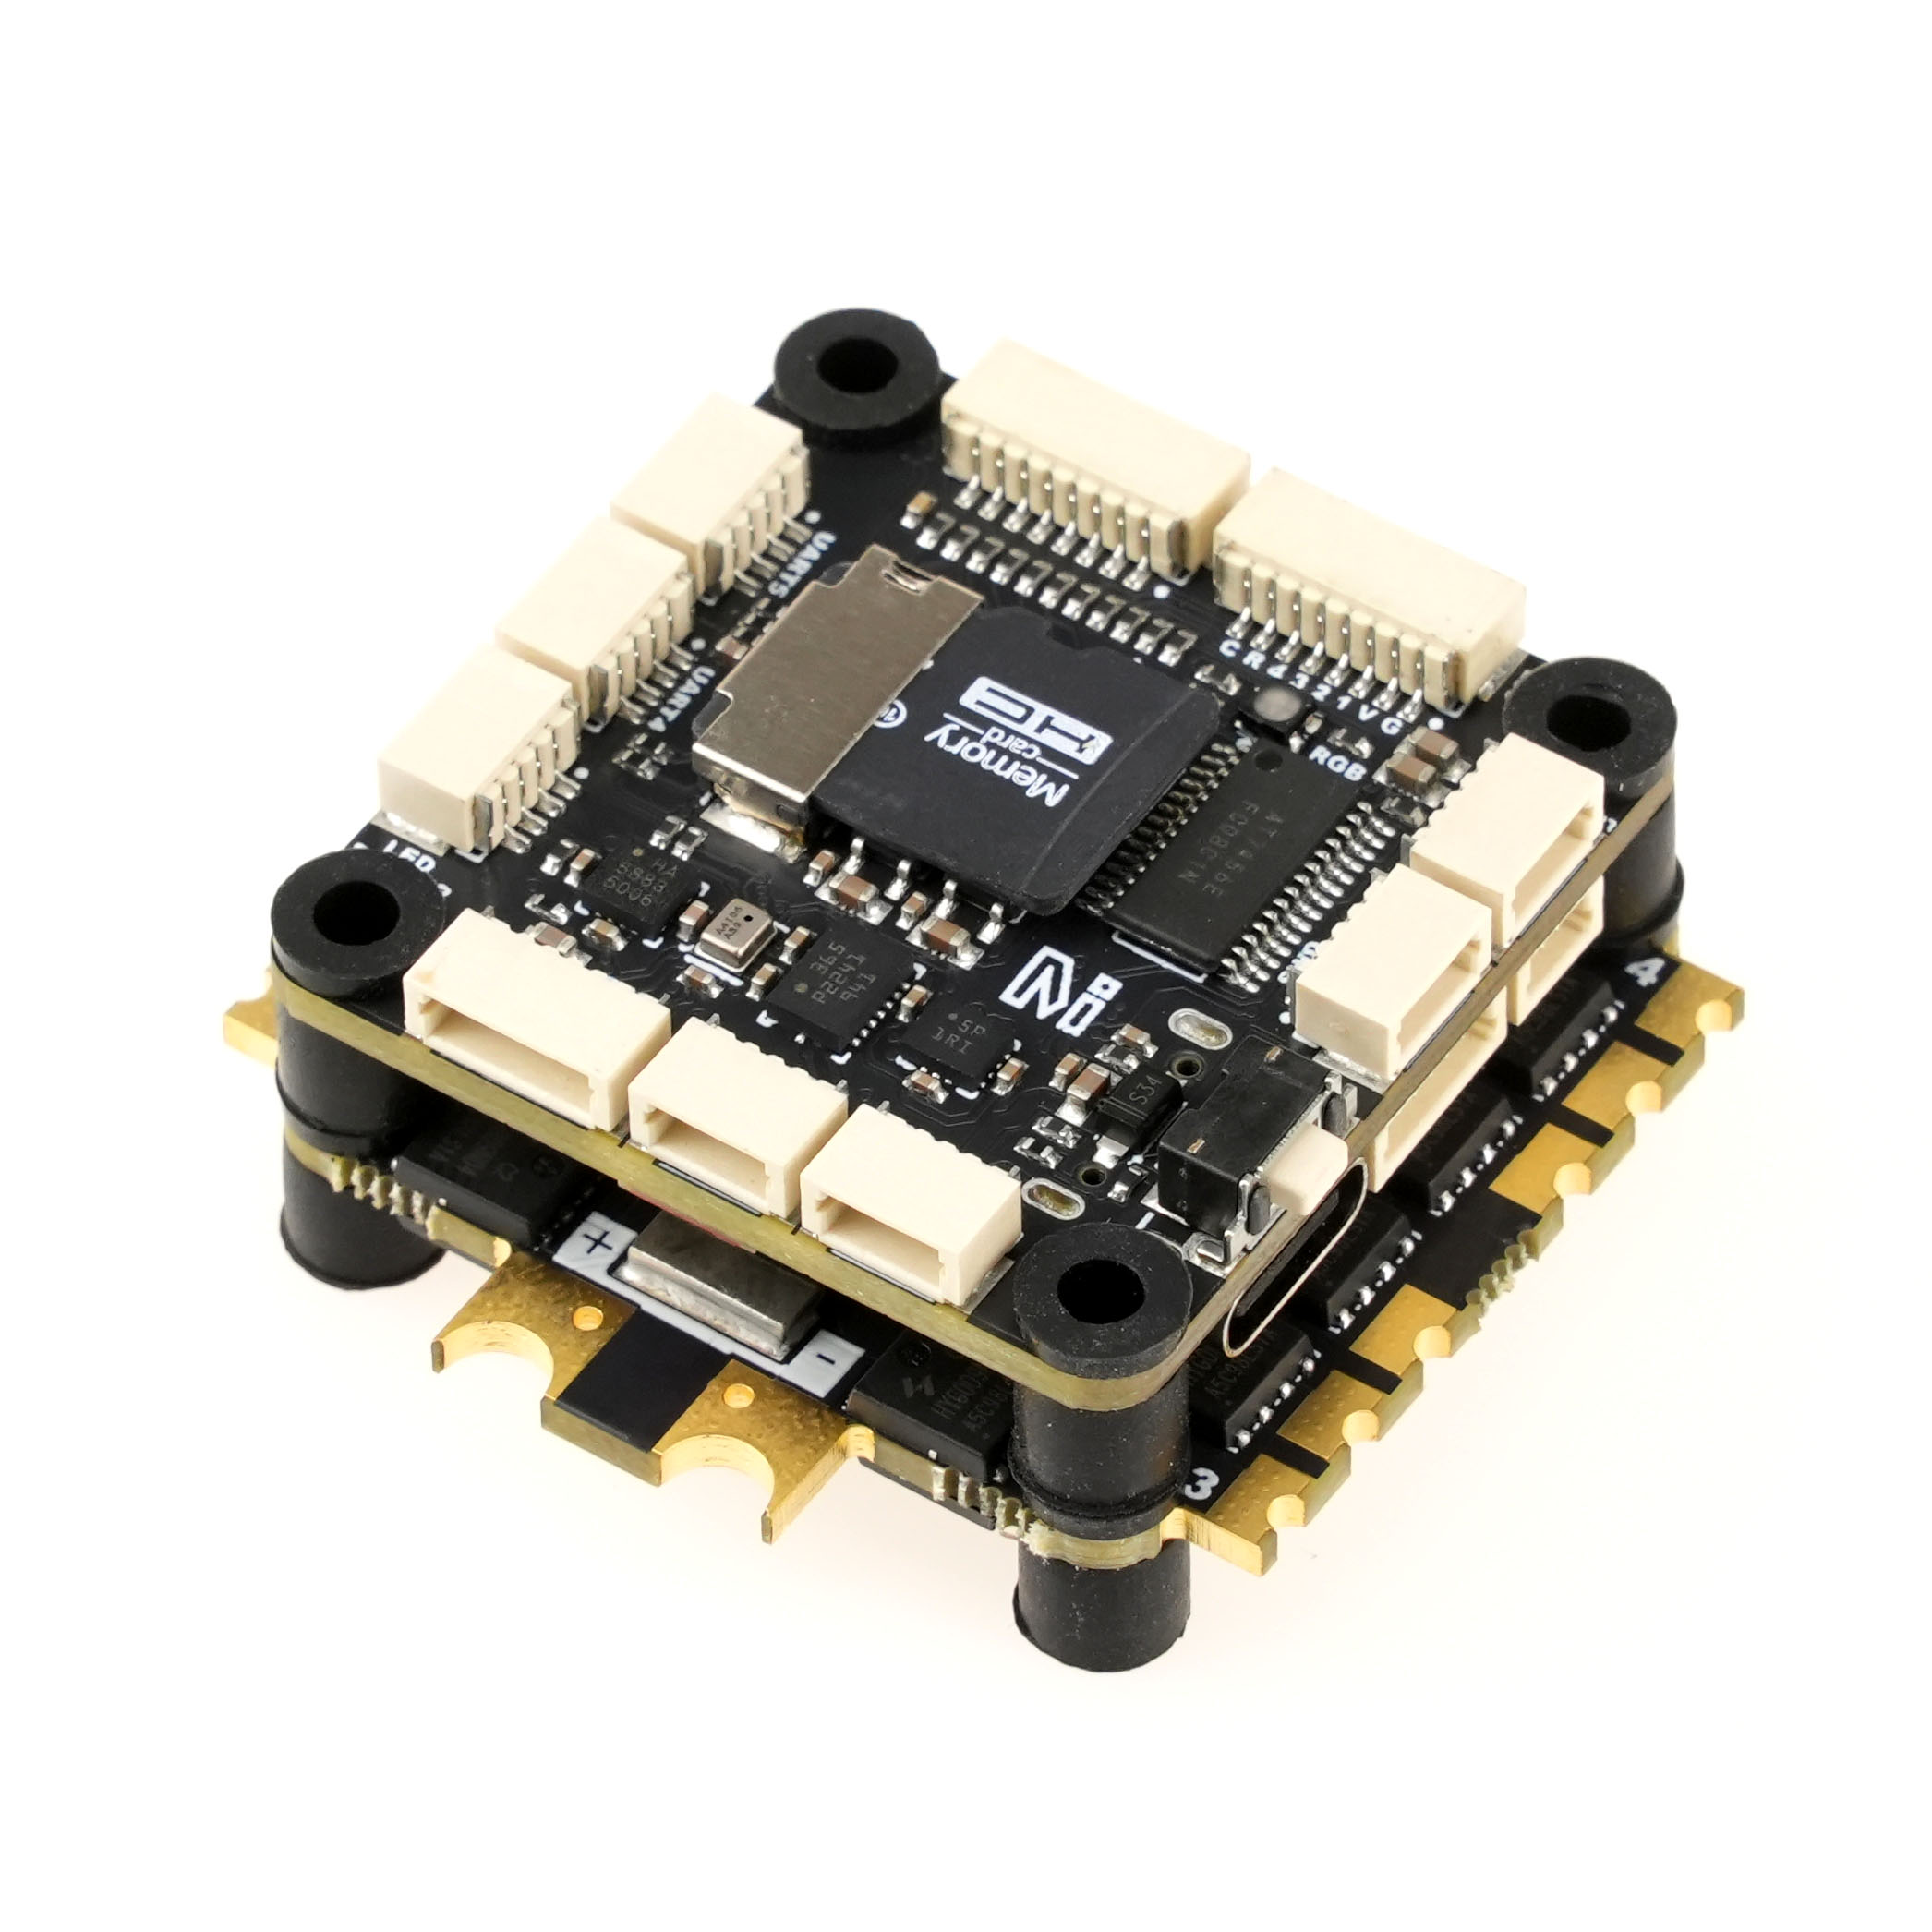
Dimensions and Installation
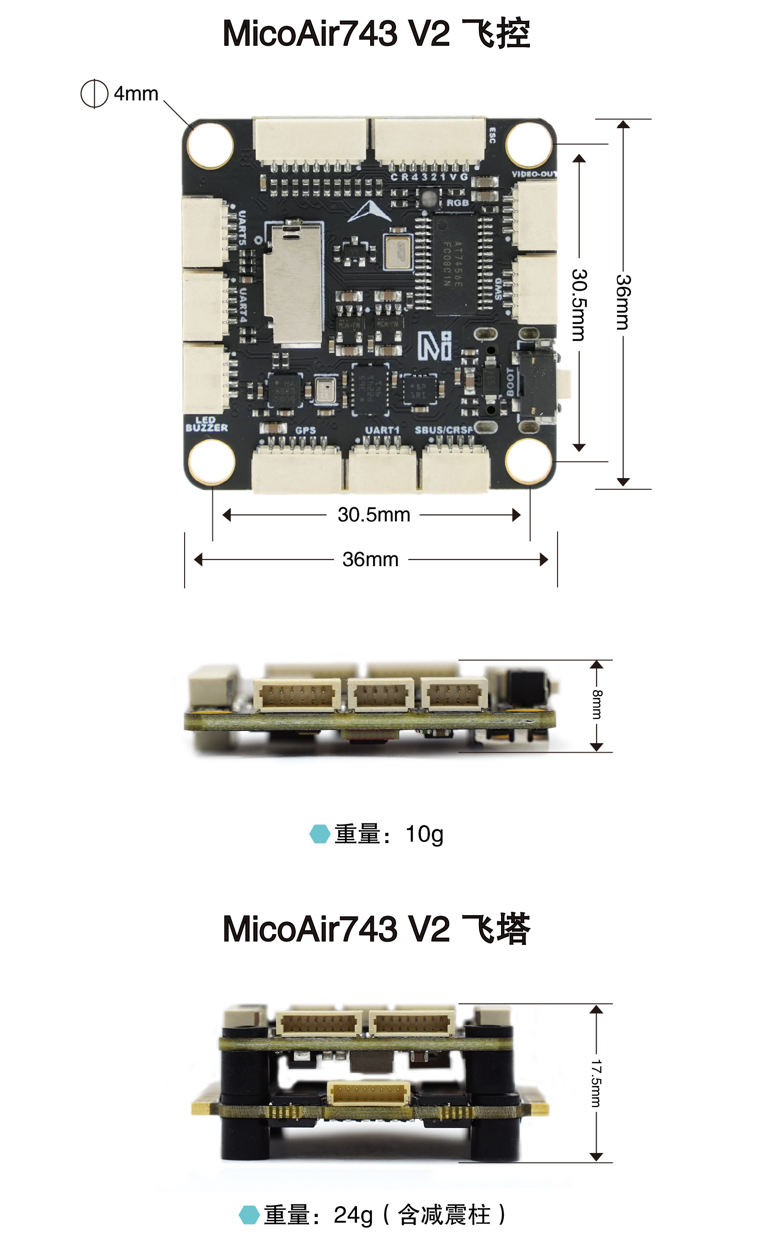
Follow these principles during installation:
- Secure the flight controller using the 30.5 × 30.5 mm mounting pattern, and prevent screws or spacers from contacting components on the board.
- Vibration-damping standoffs are recommended. Tighten them evenly to avoid bending the flight-controller board.
- Keep the flight-controller arrow pointing toward the nose. If the board must be rotated because of mechanical constraints, set the correct orientation parameter in the firmware.
Interfaces and Power
Pin Definition
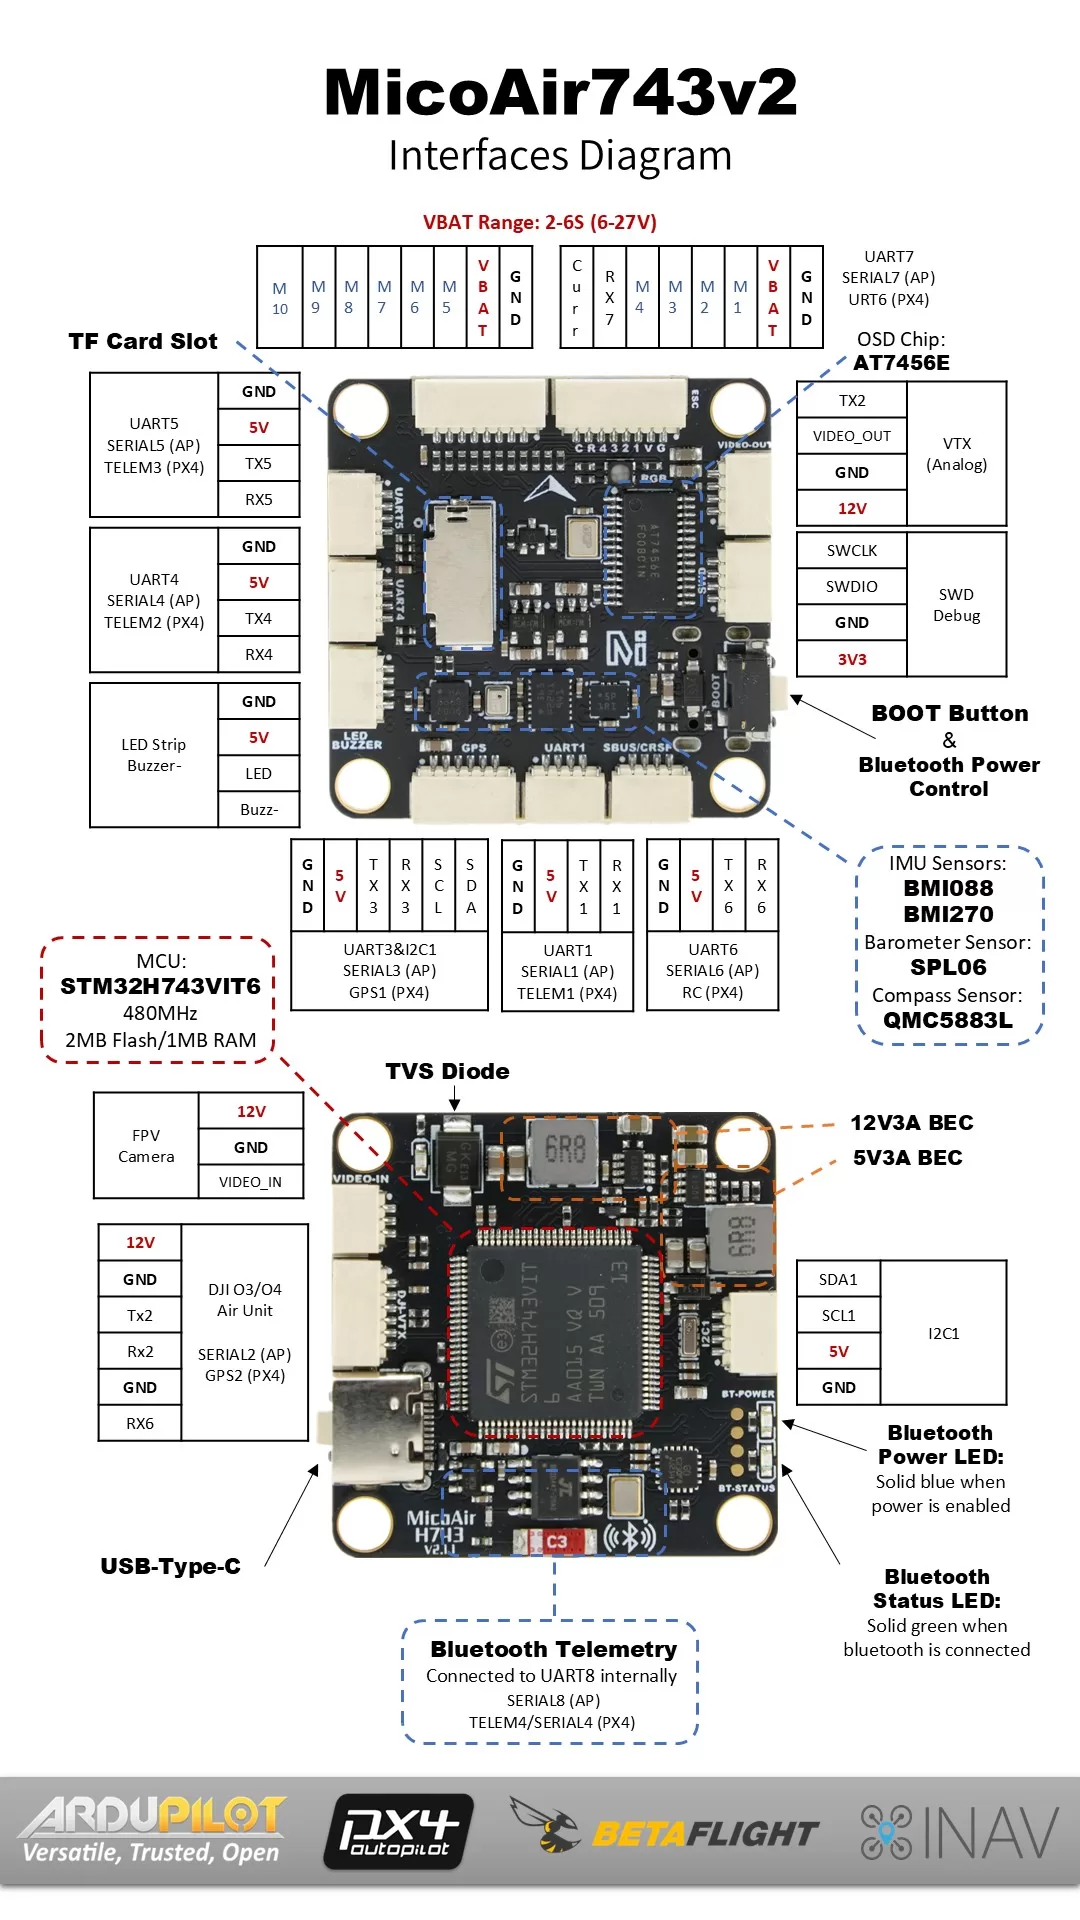
Typical Wiring
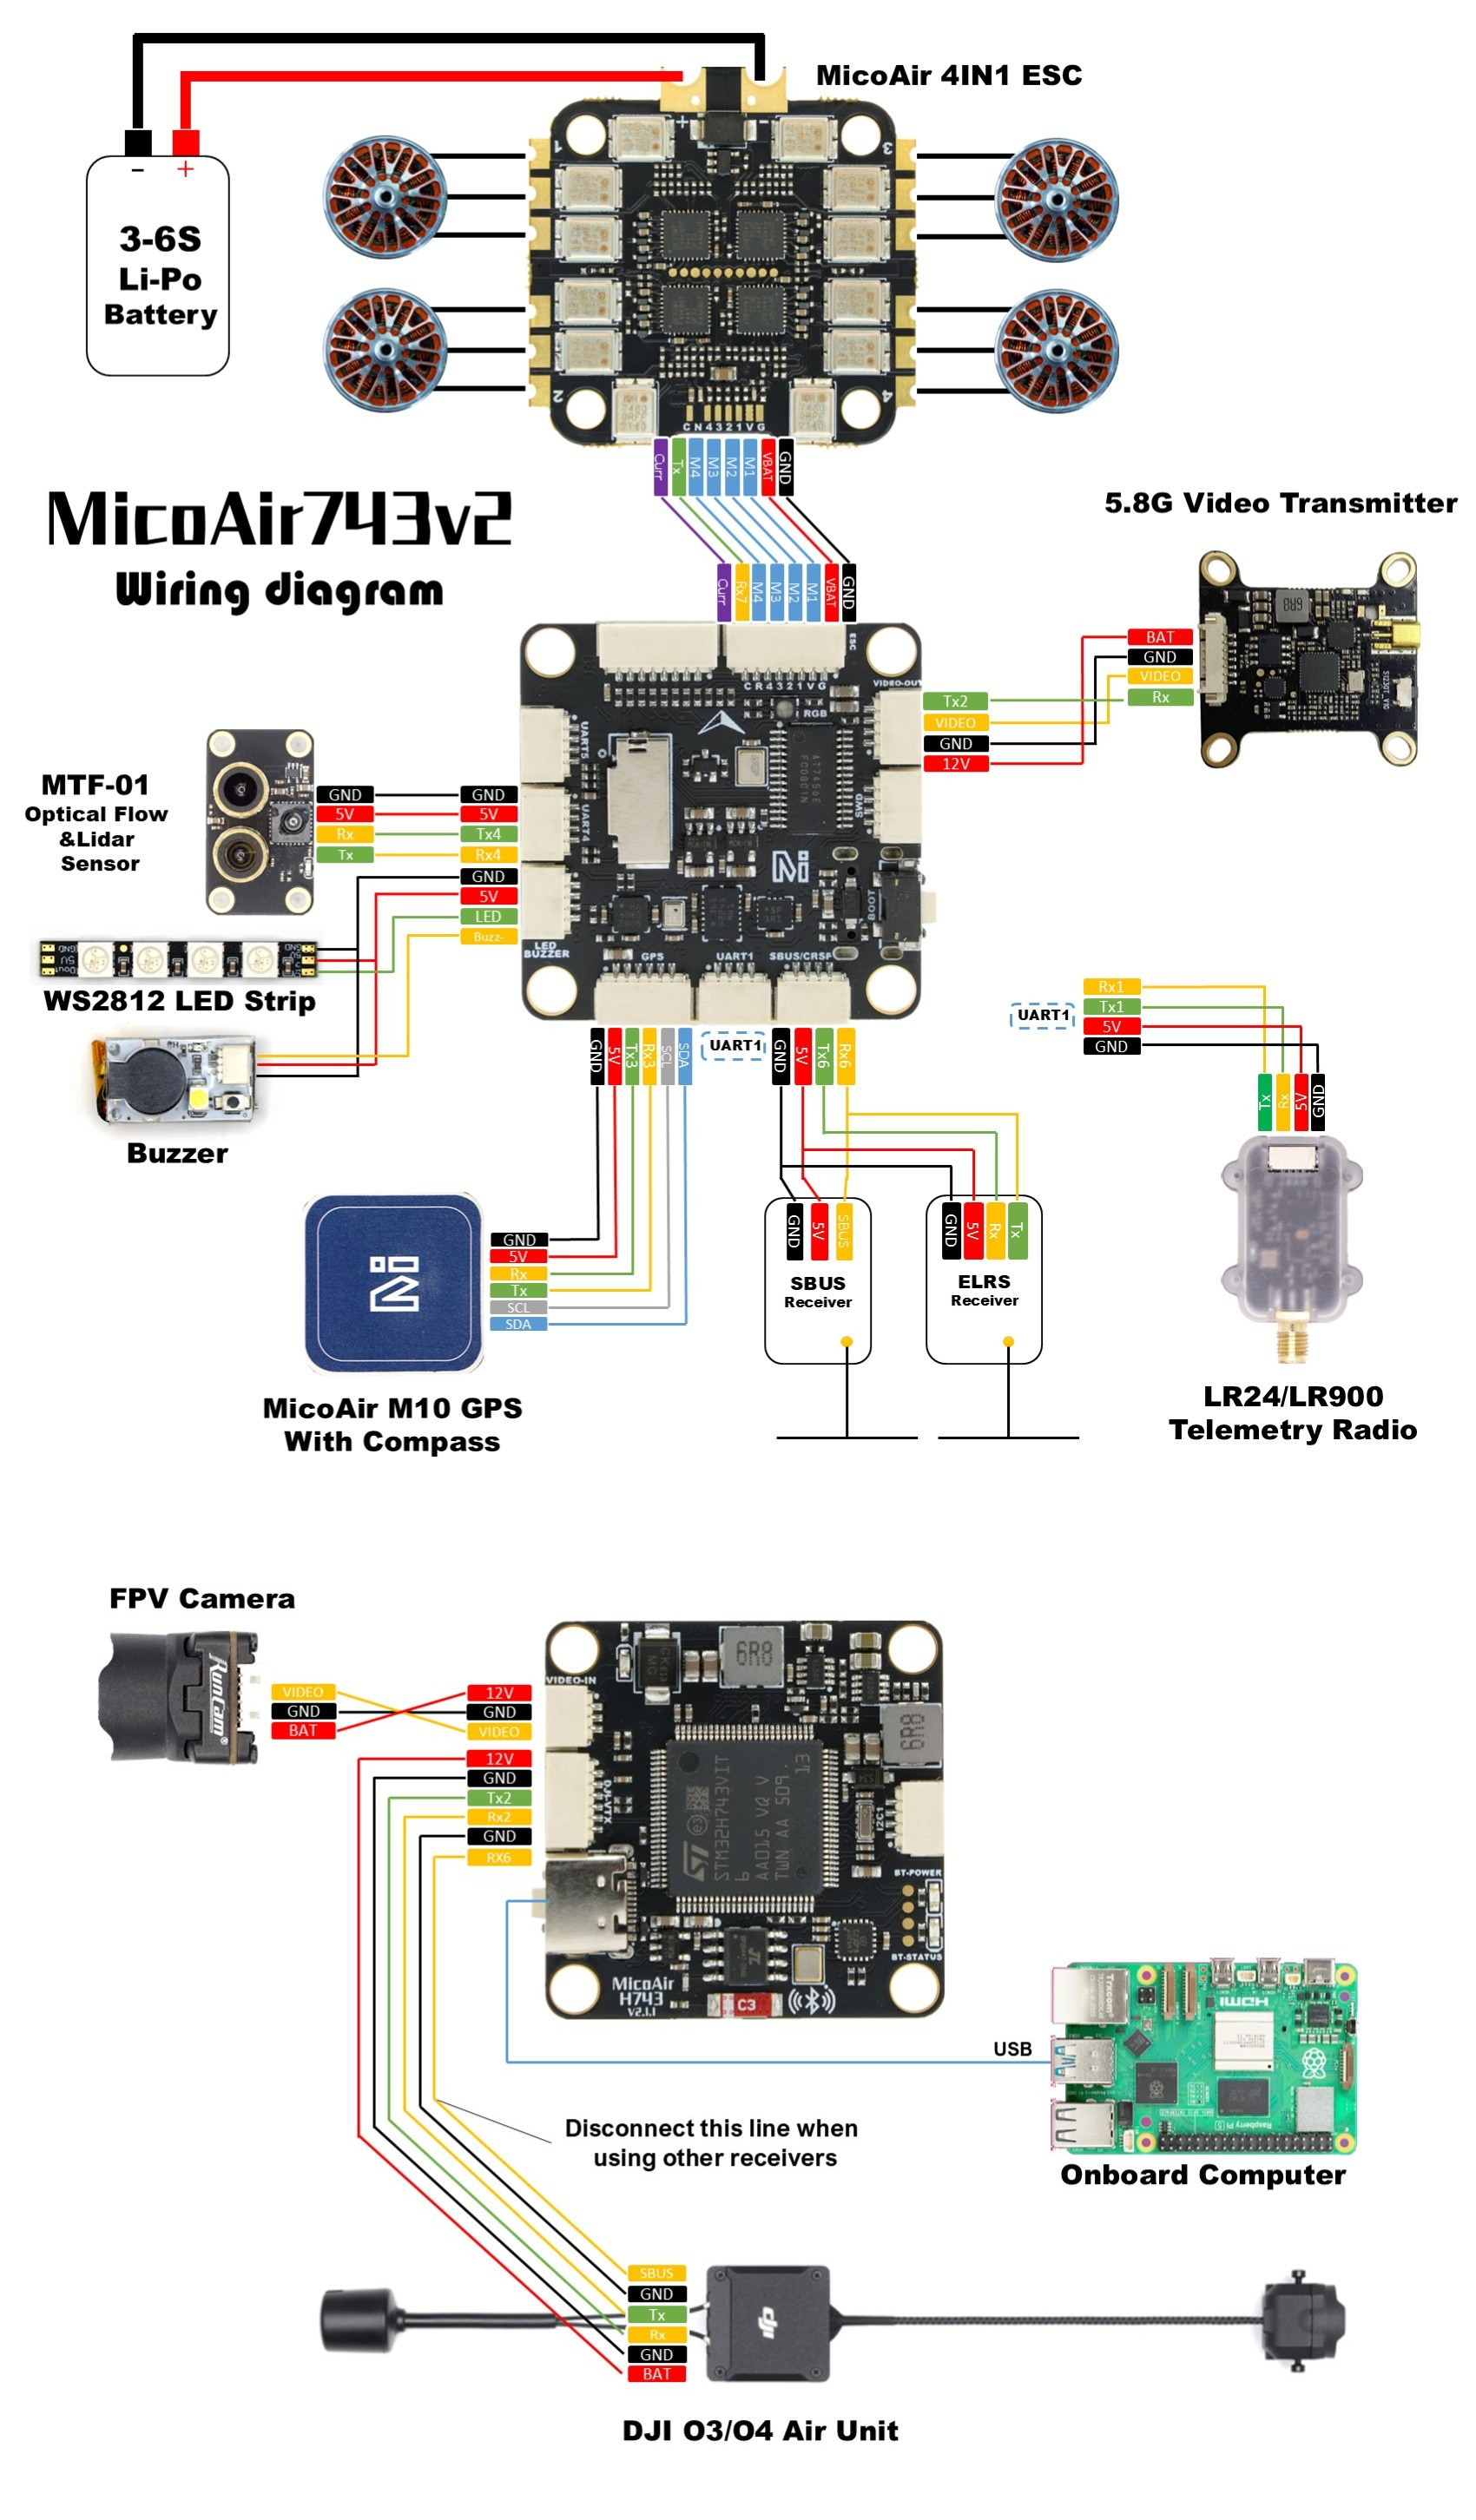
Power Rules
| Interface | Voltage | Typical use | Precautions |
|---|---|---|---|
VBAT | 6–27 V | Main flight-controller power input | Connect only a 2–6S battery or equivalent power supply |
5V | 5 V | Power for receivers, GPS modules, optical-flow sensors, rangefinders, and other peripherals | Confirm that the peripheral accepts 5 V input before wiring |
12V | 12 V | Power for DJI video transmitters, cameras, and other peripherals | Do not connect peripherals that support only 5 V |
GND | 0 V | Power and signal reference ground |
Pin 1 of the HD video transmitter interface is 12 V. Before connecting a DJI O3/O4 or another video transmitter, verify the pin order and the device's input voltage. Do not connect 12 V to a receiver, GPS module, or camera that supports only 5 V.
UART communication normally requires
TX,RX, andGND. Connect flight-controllerTXto peripheralRX, and flight-controllerRXto peripheralTX. For a one-way protocol, connect only the signal line required by the protocol.
Serial Port Mapping
ArduPilot Serial Port Mapping
| ArduPilot port | Physical interface | Default use / Features |
|---|---|---|
SERIAL0 | USB | USB virtual serial port |
SERIAL1 | UART1 | MAVLink2, DMA supported |
SERIAL2 | UART2 | DisplayPort, DMA supported |
SERIAL3 | UART3 | GPS, DMA supported |
SERIAL4 | UART4 | MAVLink2, DMA supported |
SERIAL5 | UART5 | DMA supported |
SERIAL6 | UART6 | RC input, DMA supported |
SERIAL7 | UART7 | ESC telemetry, DMA supported |
SERIAL8 | UART8 | Onboard Bluetooth telemetry, DMA supported |
PX4 Serial Port Mapping
| PX4 device | PX4 interface name | Physical interface |
|---|---|---|
ttyACM0 | USB | USB virtual serial port |
ttyS0 | TELEM1 | UART1 |
ttyS1 | GPS2 | UART2 |
ttyS2 | GPS1 | UART3 |
ttyS3 | TELEM2 | UART4 |
ttyS4 | TELEM3 | UART5 |
ttyS5 | RC | UART6 |
ttyS6 | URT6 | UART7 |
ttyS7 | TELEM4 / SERIAL4 | UART8 |
UART8 is used by the onboard Bluetooth module and has a default baud rate of
115200.
PWM Outputs
MicoAir743v2 provides up to 11 PWM outputs. PWM1–PWM8 support DShot and bidirectional DShot in hardware; whether these features can ultimately be used depends on the installed flight-control firmware and its version.
PWM Timer Groups
| Group | Channels | Description |
|---|---|---|
| Group 1 | PWM1, PWM2, PWM3, PWM4 | Channels in the same group normally need to use compatible output protocols/frequencies |
| Group 2 | PWM5, PWM6 | Same-group constraints |
| Group 3 | PWM7, PWM8, PWM11 | PWM11 is also used for the serial LED function |
| Group 4 | PWM9, PWM10 | Same-group constraints |
Channels in the same timer group normally cannot use arbitrary combinations of different output protocols. When changing a PWM protocol, frequency, or serial LED configuration, check all channels in that group together.
When PWM11 is configured as a serial LED output, PWM7 and PWM8 are subject to the same group constraints and may also be limited to serial-LED-compatible settings. Refer to the output-group rules for the current firmware.
ESC Protocol Recommendations
- Standard PWM ESC: Select a standard PWM protocol supported by the firmware.
- DShot ESC:
DShot300is normally preferred for a balance of reliability and bandwidth. - Bidirectional DShot: Both the flight-controller firmware and ESC firmware must support it.
- PX4 and INAV do not currently support bidirectional DShot. If this changes in a future version, refer to the latest release notes for the corresponding firmware.
Remove all propellers before motor testing. Install the propellers and conduct a low-risk ground test only after confirming the motor numbering, rotation directions, and failsafe behavior.
Receivers
UART6 is the default RC input, but another UART can be configured if required.
| Protocol | Recommended wiring | Notes |
|---|---|---|
| SBUS | Receiver signal → RX6 | Normally requires only the one-way signal line, GND, and power |
| DSM / SRXL | Receiver signal → RX6 | Supply power according to the receiver's voltage requirements |
| FPort | Receiver signal → TX6 | One-wire bidirectional protocol |
| CRSF / ELRS | Receiver TX → RX6; receiver RX → TX6 | Can transmit telemetry automatically |
| SRXL2 | Receiver signal → TX6 | Set SERIAL6_OPTIONS = 4 in ArduPilot |
| PPM | Not supported | Use a UART receiver protocol instead |
If CRSF/ELRS is not detected, first check that TX and RX are cross-connected, the supply voltage is correct, and UART6 is not being used by another function. Do not identify pins by wire color alone.
OSD and Video Transmitter Interfaces
MicoAir743v2 provides both an AT7456E analog OSD and a DisplayPort interface for HD video transmitters such as DJI O3/O4.
Analog OSD
- Onboard chip:
AT7456E - ArduPilot can enable the compatible MAX7456 driver with
OSD_TYPE = 1 - Before use, confirm the camera video standard, video input/output wiring, and firmware support
DisplayPort / DJI O3/O4
- The HD video transmitter connects through the SH1.0-6P interface
- UART2's DisplayPort function is used by default
- The video transmitter interface supplies 12 V
- OSD capability and configuration methods vary by firmware version; refer to the documentation for the current firmware
Before connecting a video transmitter, confirm again that pin 1 of the interface is 12 V. Incorrect pin order can damage both the video transmitter and flight controller.
Battery Monitoring, Magnetometer, and I²C
Battery Voltage and Current Monitoring
The flight controller integrates voltage sensing and receives the current-sensor signal through the ESC interface. It supports batteries up to 6S.
The default parameters in the official ArduPilot hardware definition are:
| Parameter | Default | Function |
|---|---|---|
BATT_VOLT_PIN | 10 | Voltage-sensing ADC |
BATT_CURR_PIN | 11 | Current-sensing ADC |
BATT_VOLT_MULT | 21.2 | Voltage-divider multiplier |
BATT_CURR_SCALE | 40.2 | Current scaling factor |
The current-sensor coefficient depends on the sensor circuit used by the ESC. The values in the table are the MicoAir743v2 defaults and do not apply to every ESC. Adjust them for the actual hardware.
Magnetometer
- Onboard magnetometer:
QMC5883L - An external magnetometer can be connected through I²C
SDA/SCL - High-current wires, buzzers, magnets, and motors introduce magnetic interference
When high heading accuracy is required, use an external combined GPS/magnetometer located away from the power system, and recalibrate the magnetometer after the aircraft is fully assembled.
Connect to the Flight Controller over Bluetooth
The onboard Bluetooth telemetry module is internally connected to UART8 and has a default baud rate of 115200. The official procedure uses QGroundControl for Android and works with ArduPilot or PX4 firmware.
Bluetooth can be used for ground-based parameter configuration and flight-controller status monitoring.
Turn On Bluetooth Power
- Power the flight controller normally and wait at least 3 seconds.
- Check the blue Bluetooth power indicator.
- If the indicator is off, press and hold the
BOOTbutton for approximately 2 seconds to turn on Bluetooth. - Press and hold it again to turn Bluetooth off. The switch state is retained after power is removed.
Add a Connection in QGroundControl
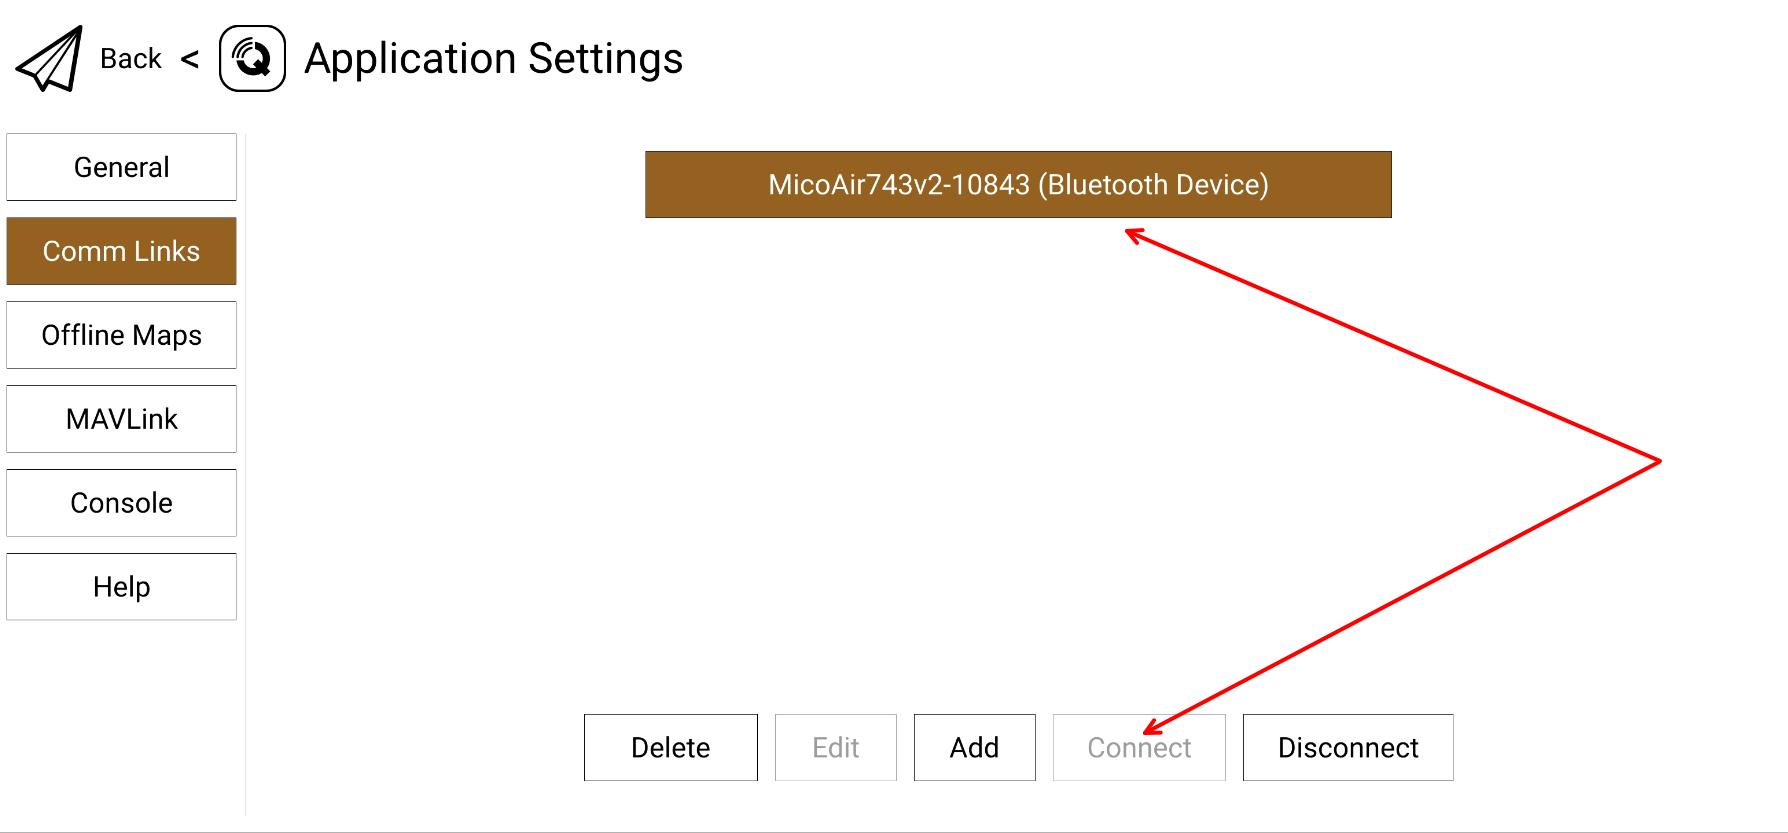
Open Application Settings → Comm Links, and click Add.
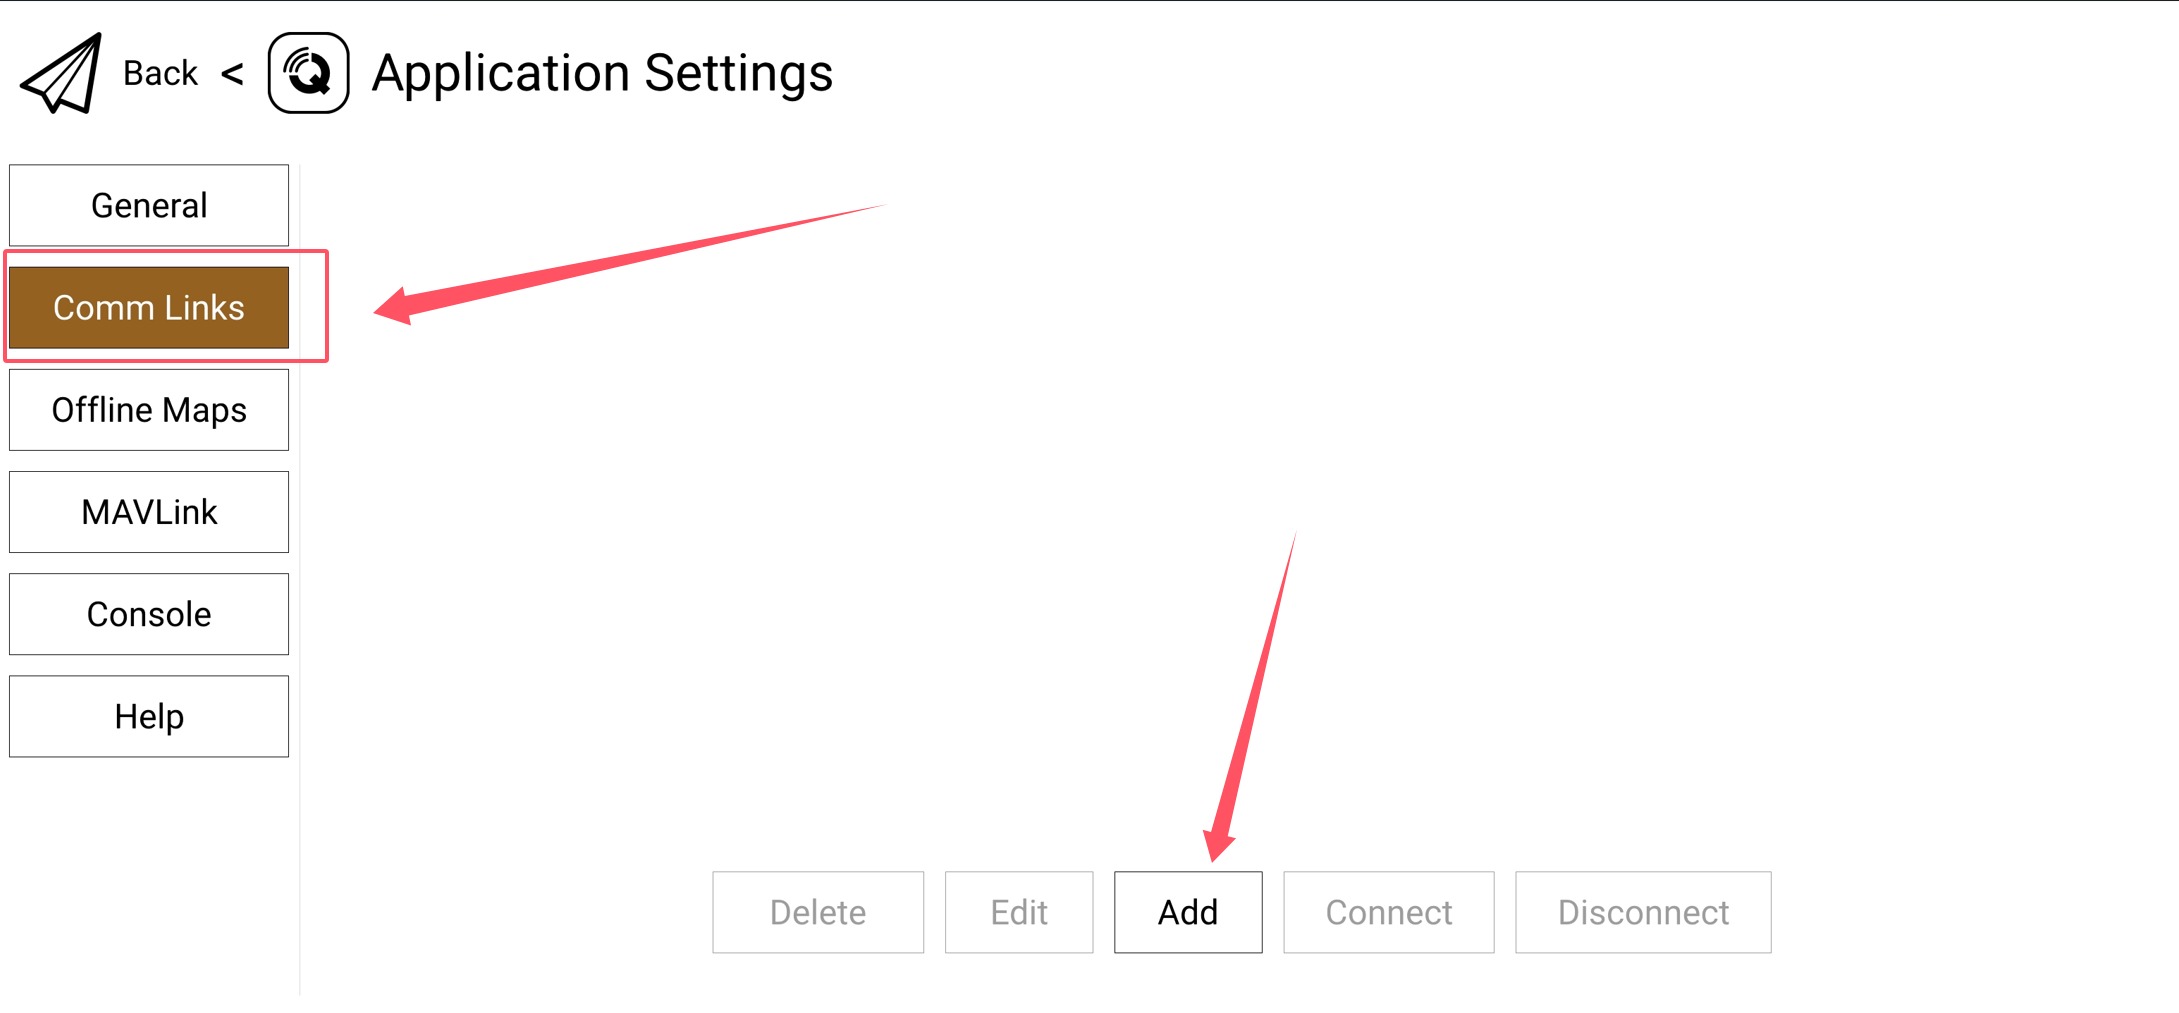
Set the connection type to Bluetooth.
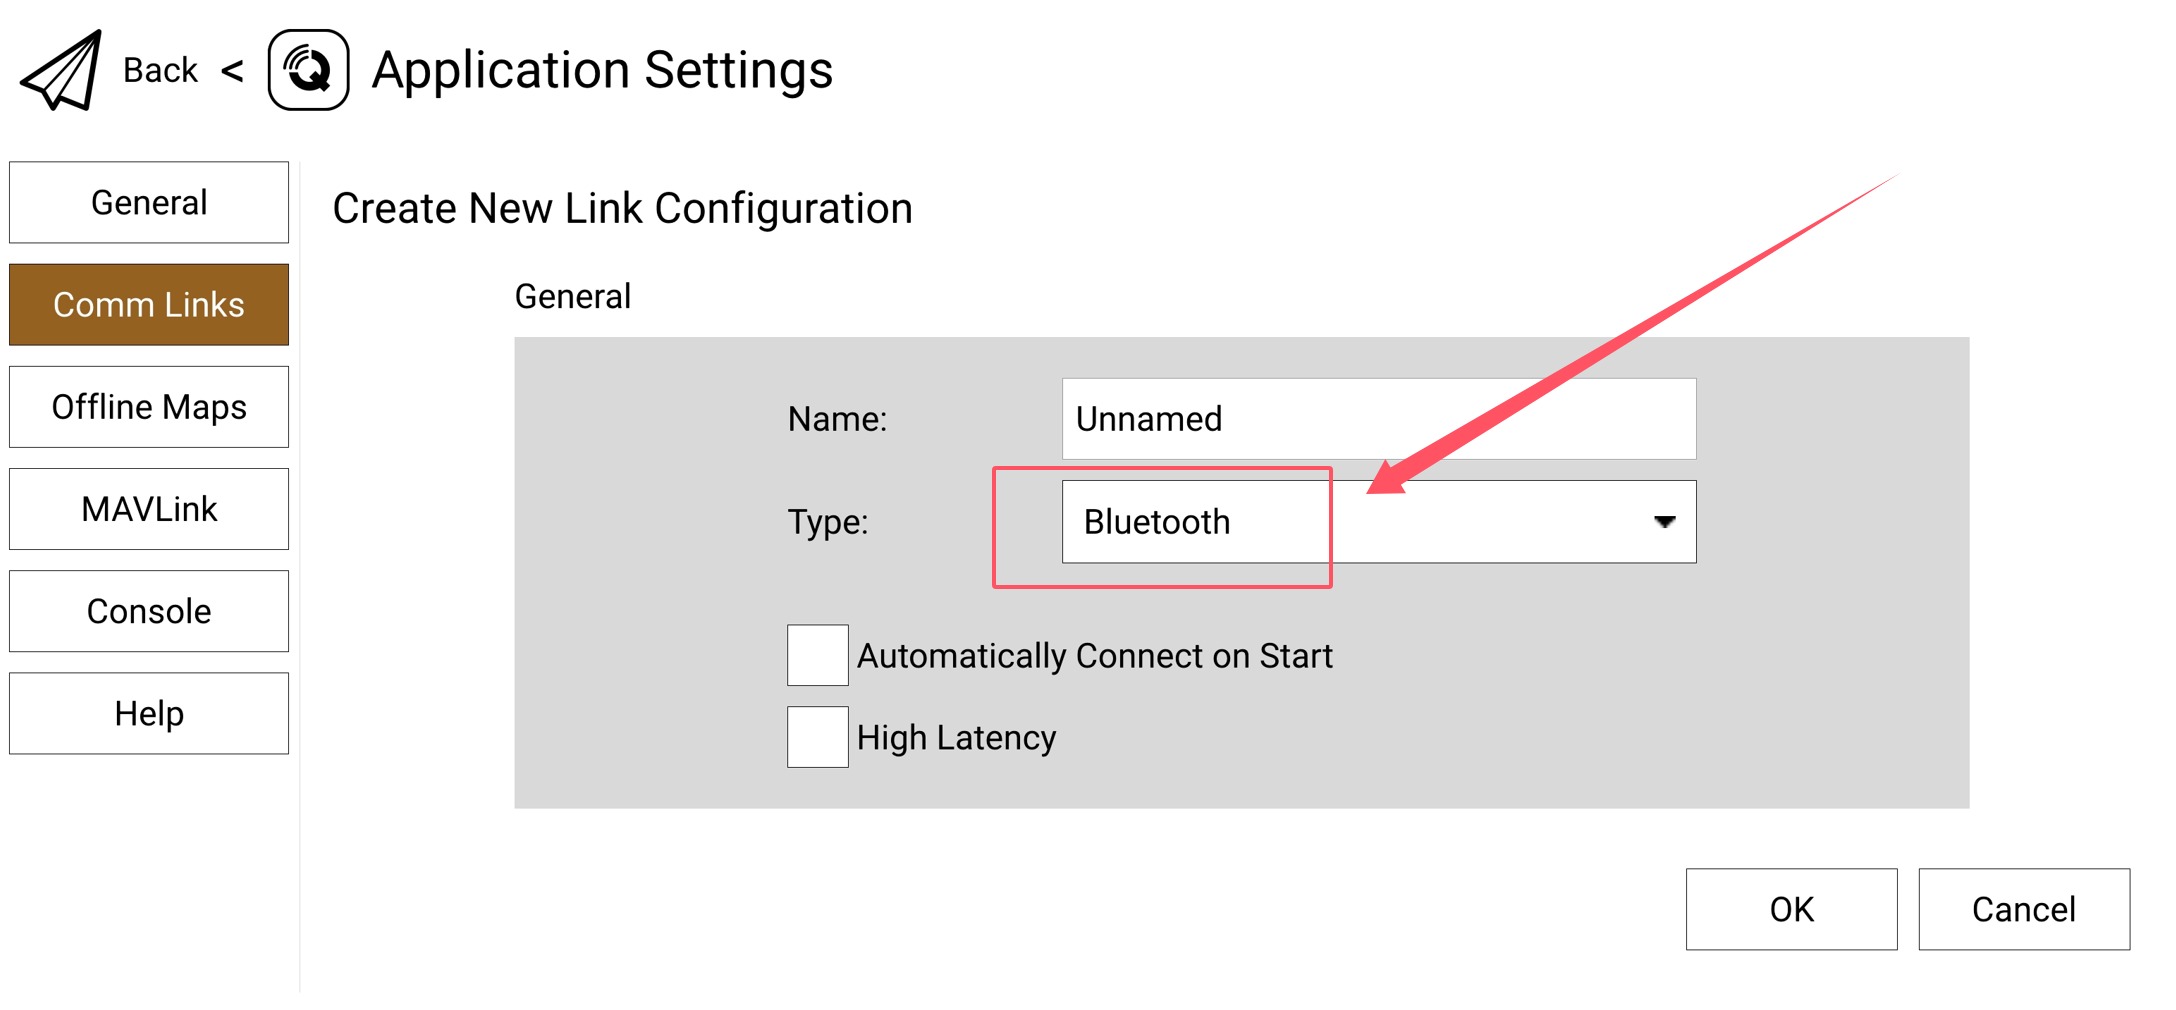
Scan for and Select the Flight Controller
Click Scan, select a device with a name similar to MicoAir743v2-xxxxx, and confirm.
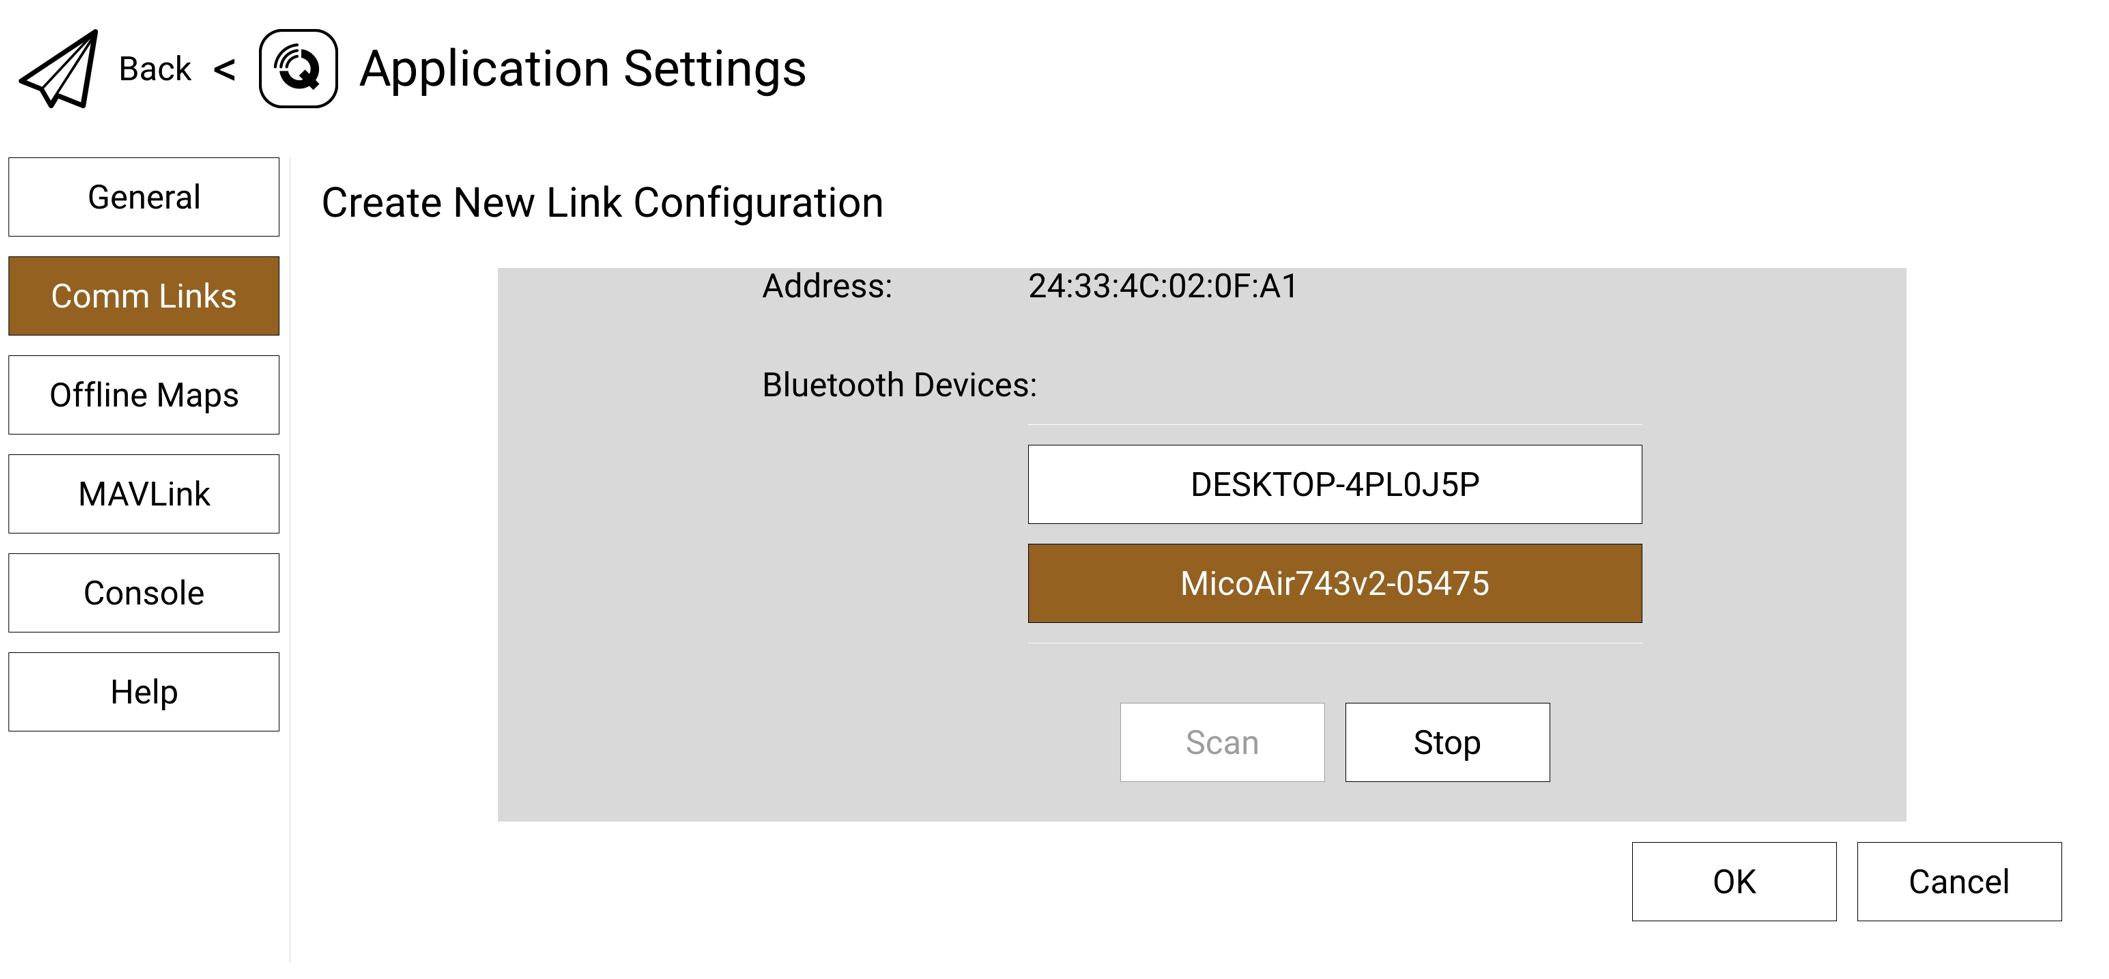
If no device is found, move the phone closer to the flight controller, confirm that the blue power indicator is on, and check that Android has granted QGroundControl Bluetooth and Nearby Devices permissions.
Establish the Connection
In Comm Links, select the device that was just added and click Connect. After a connection is established, the green Bluetooth status indicator on the flight controller remains on.
Wait for the Parameters to Load
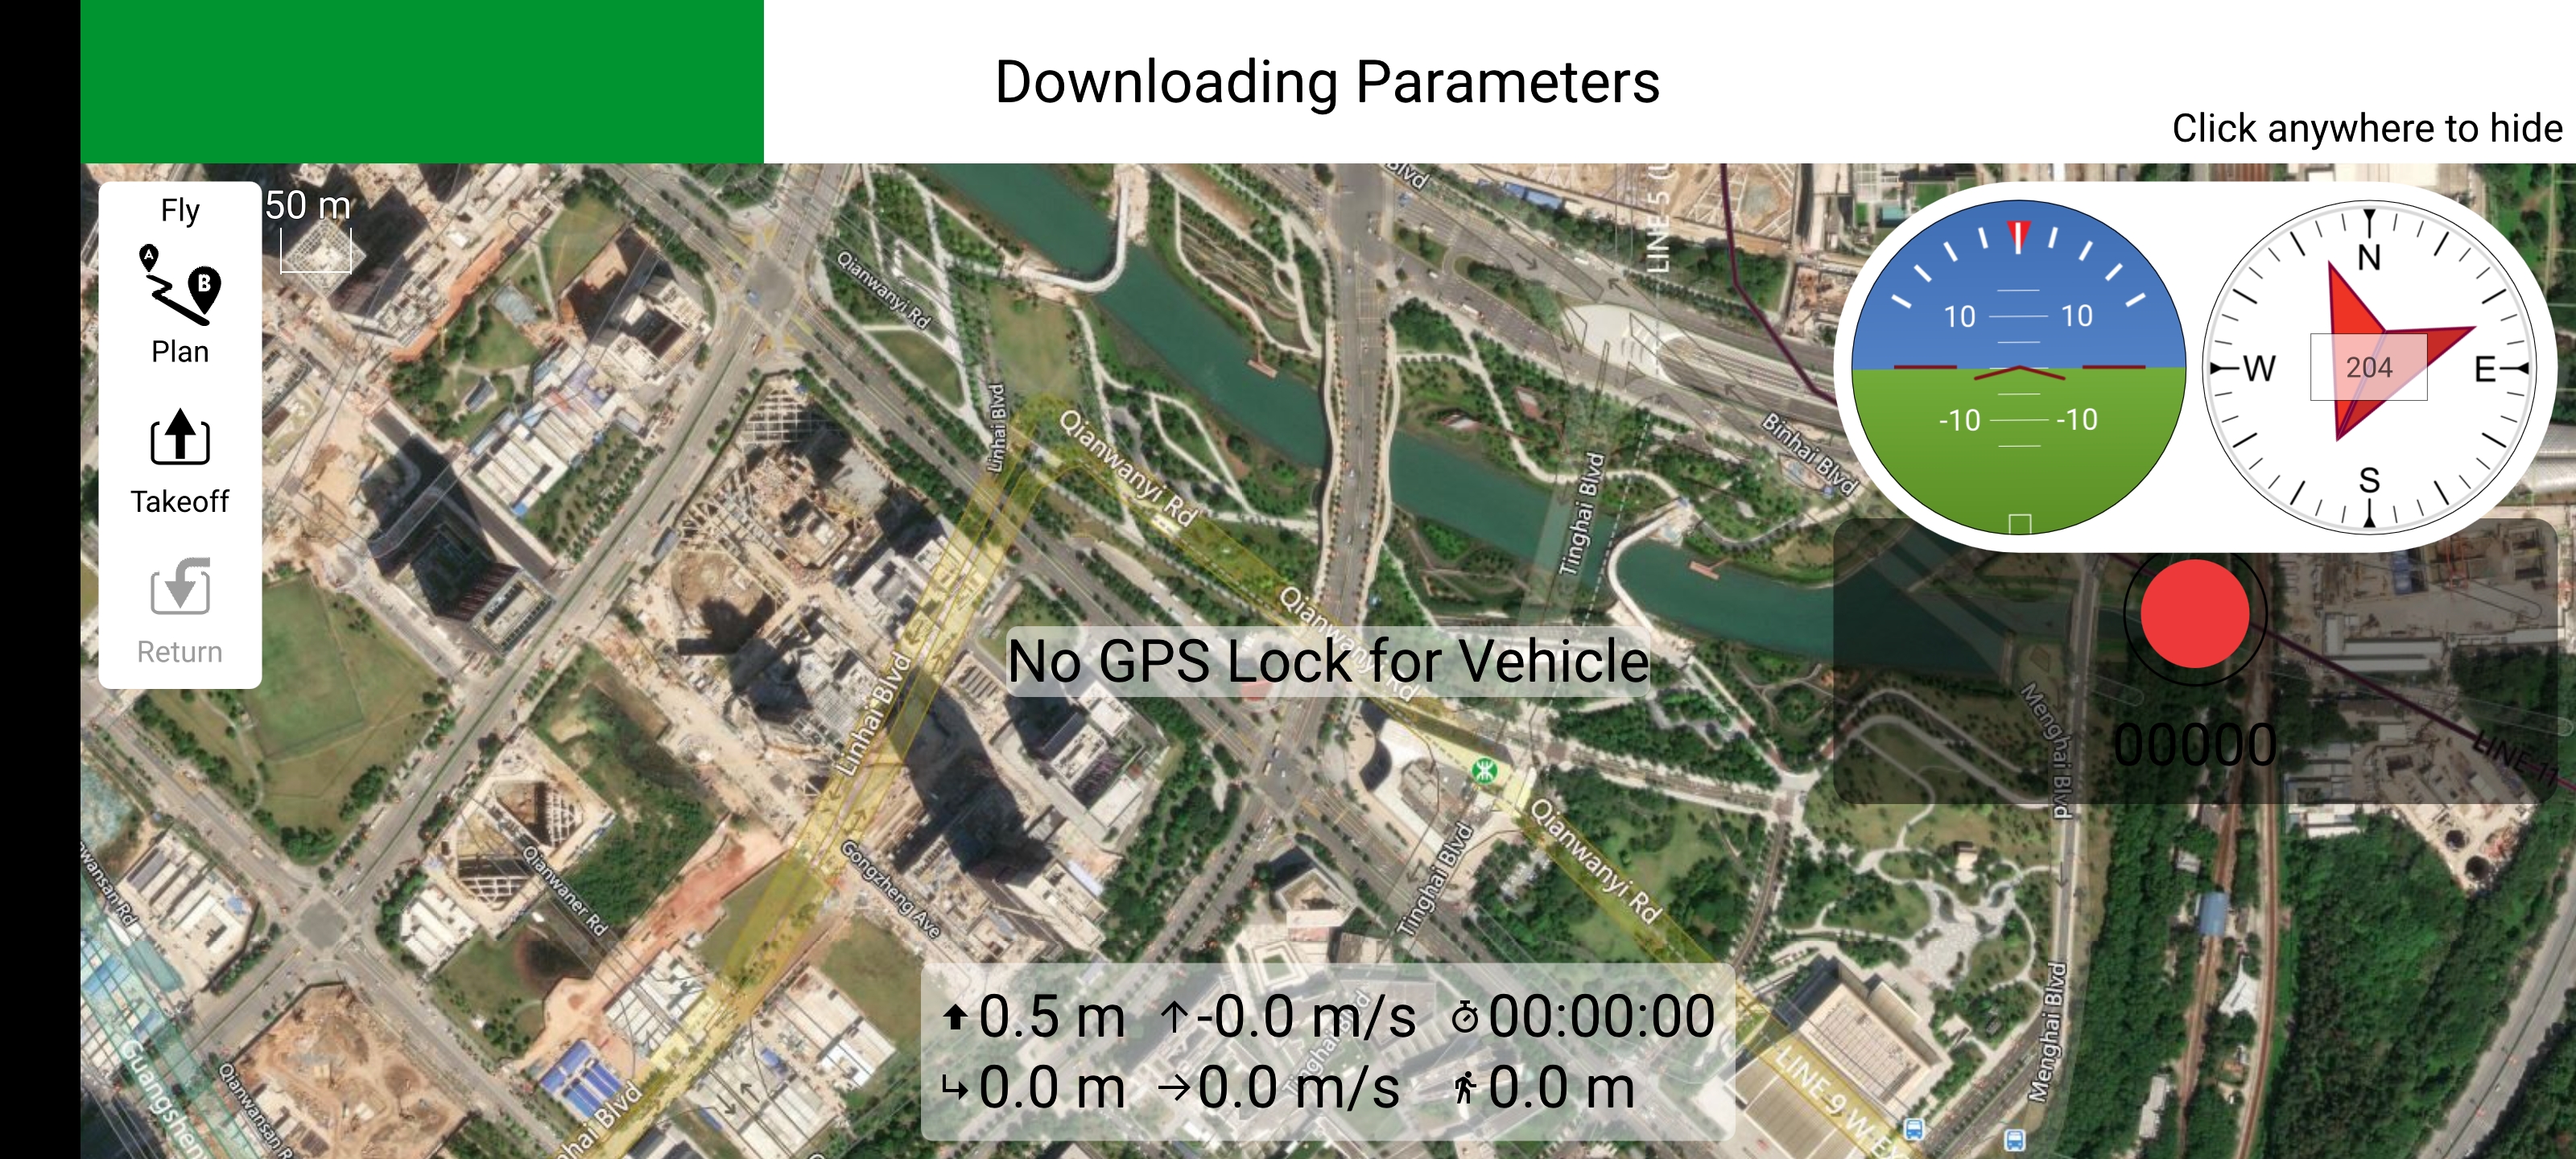
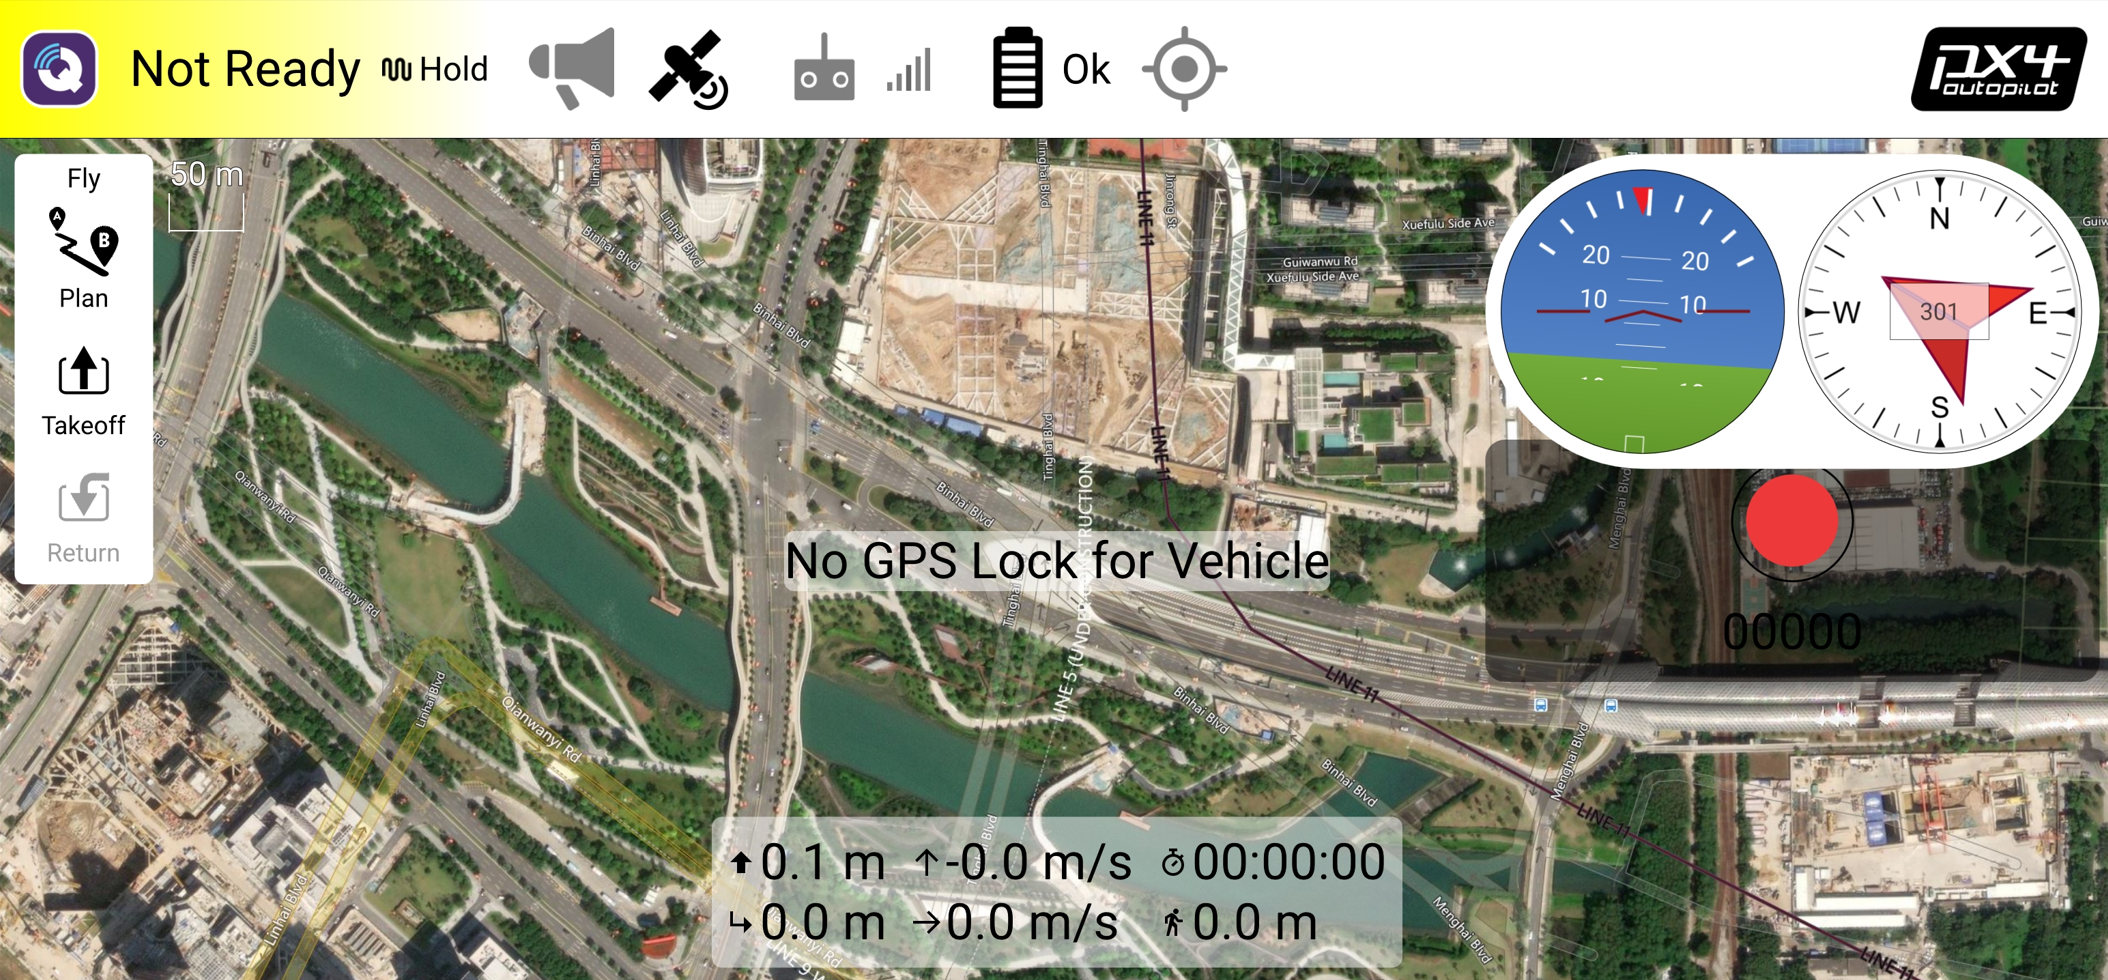
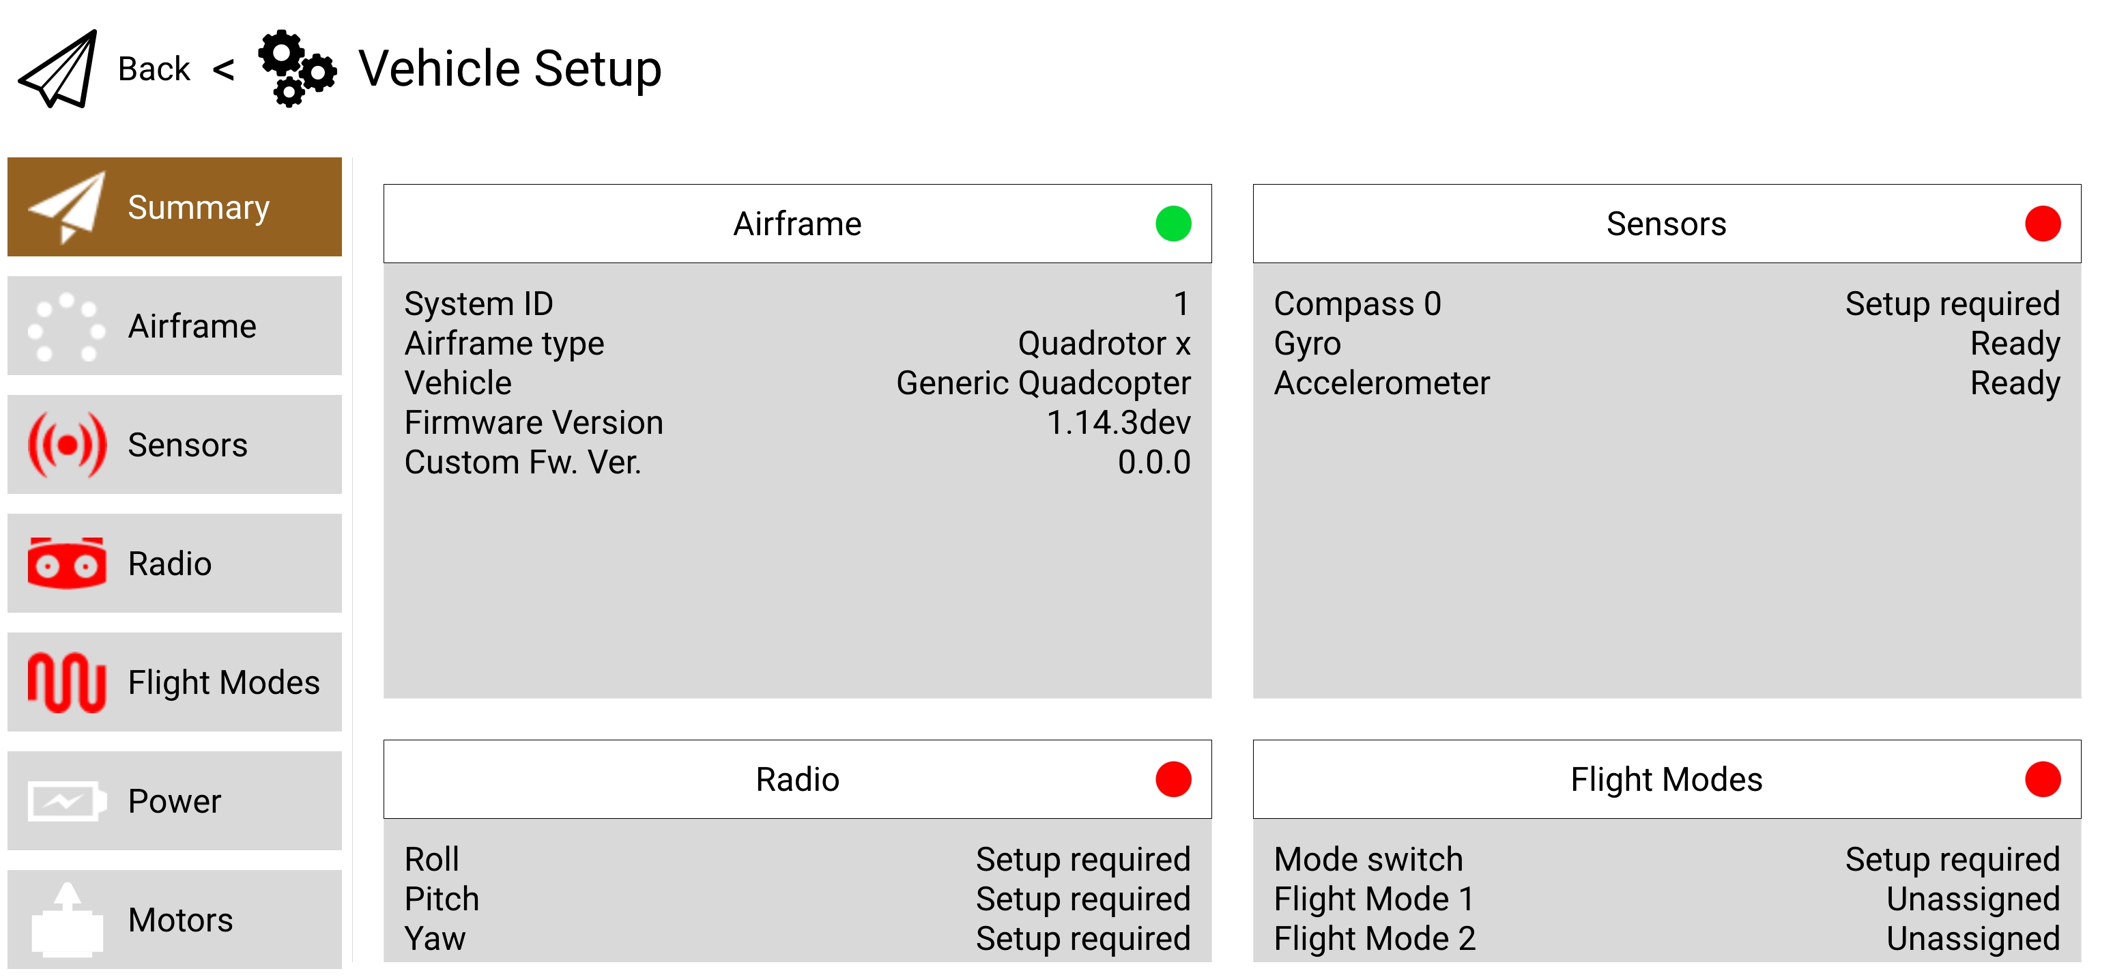
Return to the main interface. QGroundControl automatically reads the flight-controller parameters. This normally takes approximately 3–5 seconds; the actual time depends on the firmware version and wireless environment.
Firmware
MicoAir743v2 supports ArduPilot, PX4, INAV, Betaflight, and Skybrush.
MicoConfigurator is a browser-based flight-controller configuration tool for Windows, macOS, and Linux. It can configure and debug the flight controller and update firmware online, from a local file, or in DFU mode.
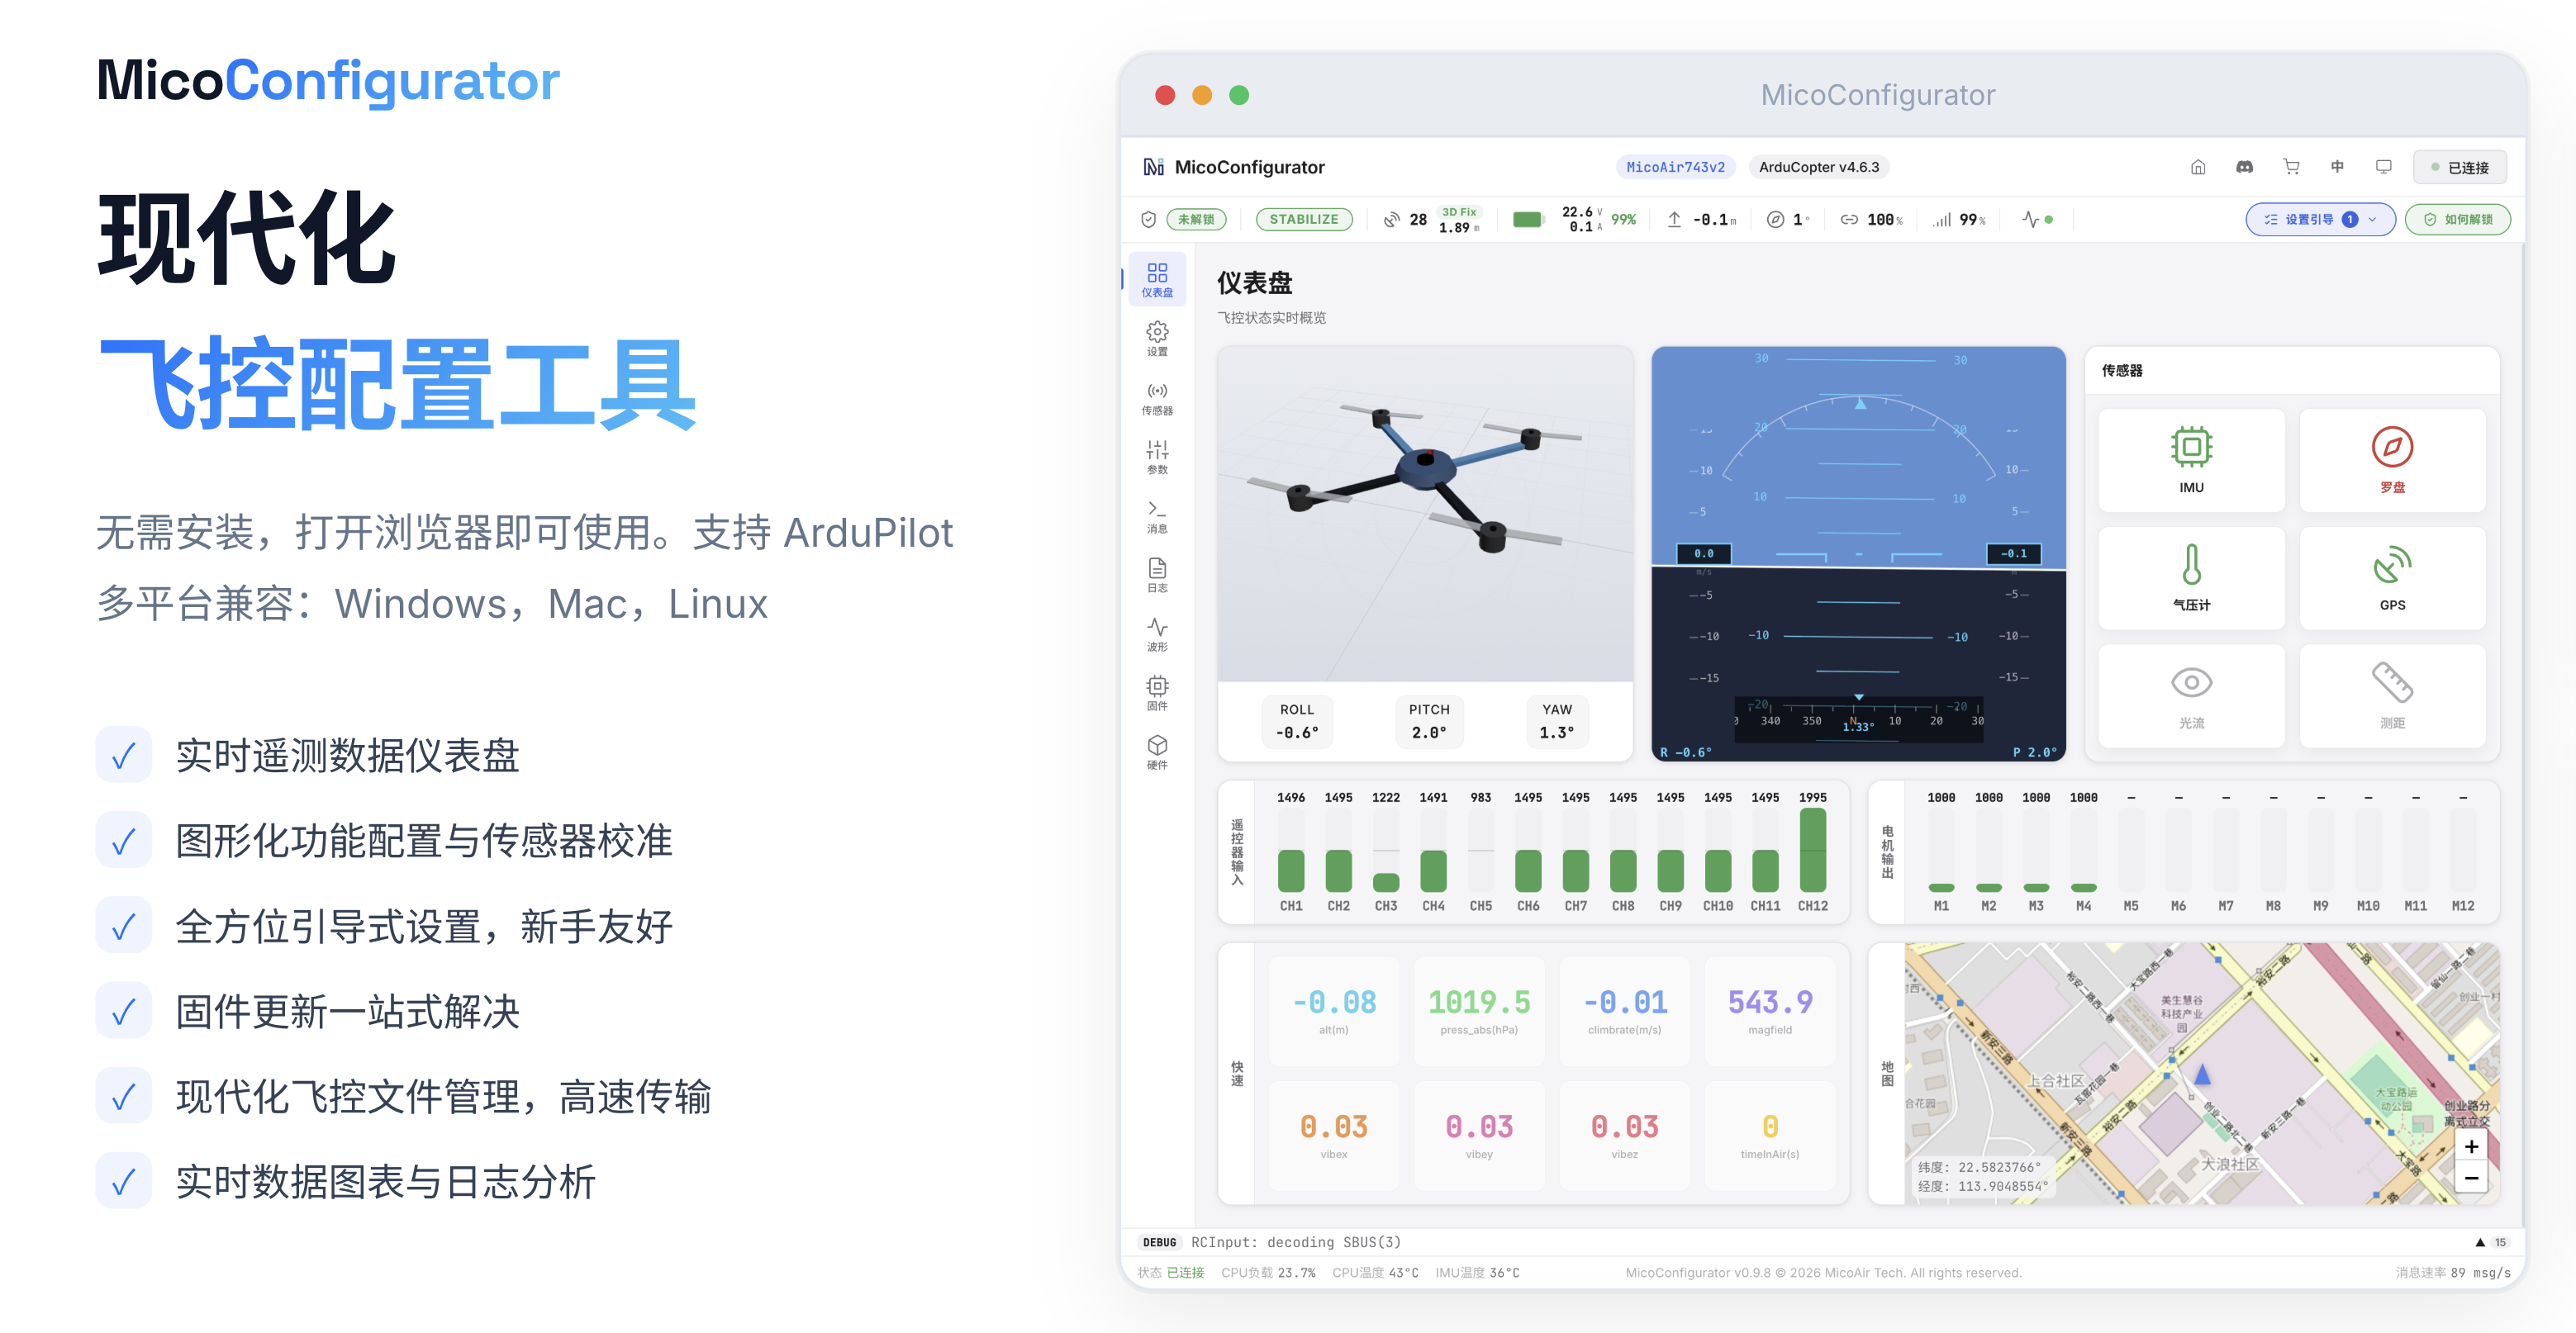
Open MicoConfigurator in Chrome or Edge. After entering DFU mode, select the model and firmware directly in the browser to complete flashing (the DFU driver must be installed on Windows).
ArduPilot
- Firmware target:
MicoAir743v2 - Included in the official hardware support list starting with ArduPilot 4.6.0
- Flight-controller firmware can be flashed online through MicoConfigurator or Mission Planner
Related links:
- Official ArduPilot hardware definition
- Official ArduPilot firmware downloads
- ArduPilot Custom Firmware Builder
- MicoAir ArduPilot 4.5.7 firmware
When downloading firmware from the ArduPilot website, select the
MicoAir743v2target. Do not select firmware for similarly named MicoAir743, Lite, or AIO models.
PX4
- Firmware target:
micoair_h743-v2 - Included in the official hardware support list starting with PX4 1.16.0
- Can be flashed through MicoConfigurator, downloaded from PX4 Releases, or compiled from source
Related links:
- Official PX4 hardware definition
- Official PX4 releases
- PX4 1.14.3 / 1.15.2 firmware provided by MicoAir
After entering DFU mode, online flashing is also available through MicoConfigurator:
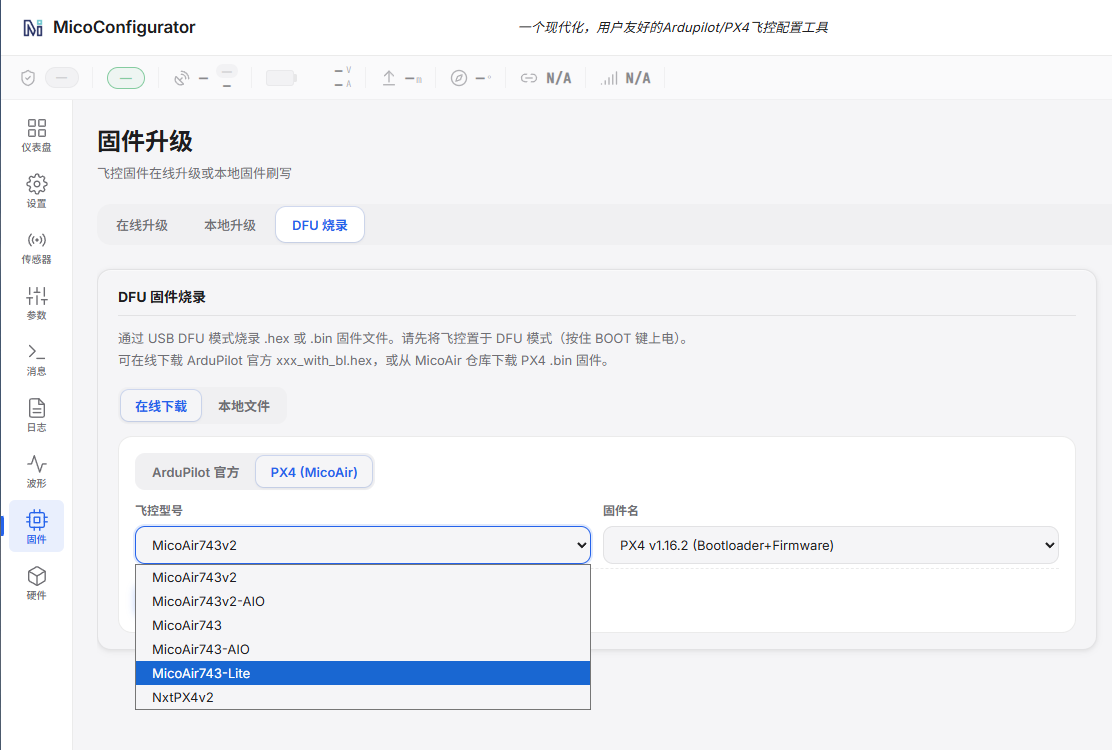
Official PX4 firmware compilation guide
Historical source code (1.14.3)
Compile the bootloader:
make micoair_h743-v2_bootloader
Compile the default firmware:
make micoair_h743-v2_default
INAV
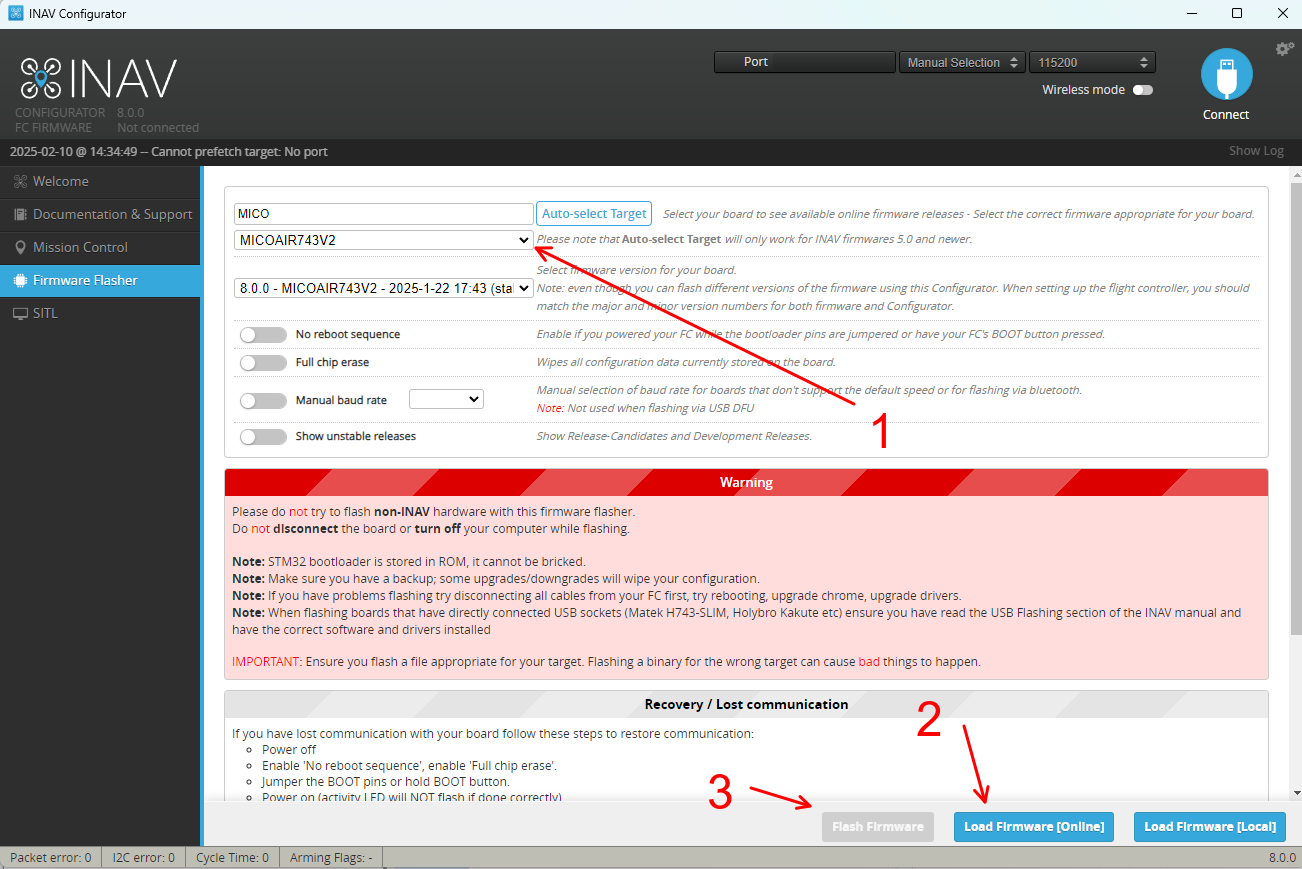
- Firmware target:
MICOAIR743V2 - Included in the official hardware support list starting with INAV 8.0.0
- Use an INAV Configurator version that matches the firmware version
- MicoAir743v2 INAV firmware
Betaflight
- Use the corresponding firmware and instructions provided in the MicoAir repository
- MicoAir743v2 Betaflight firmware
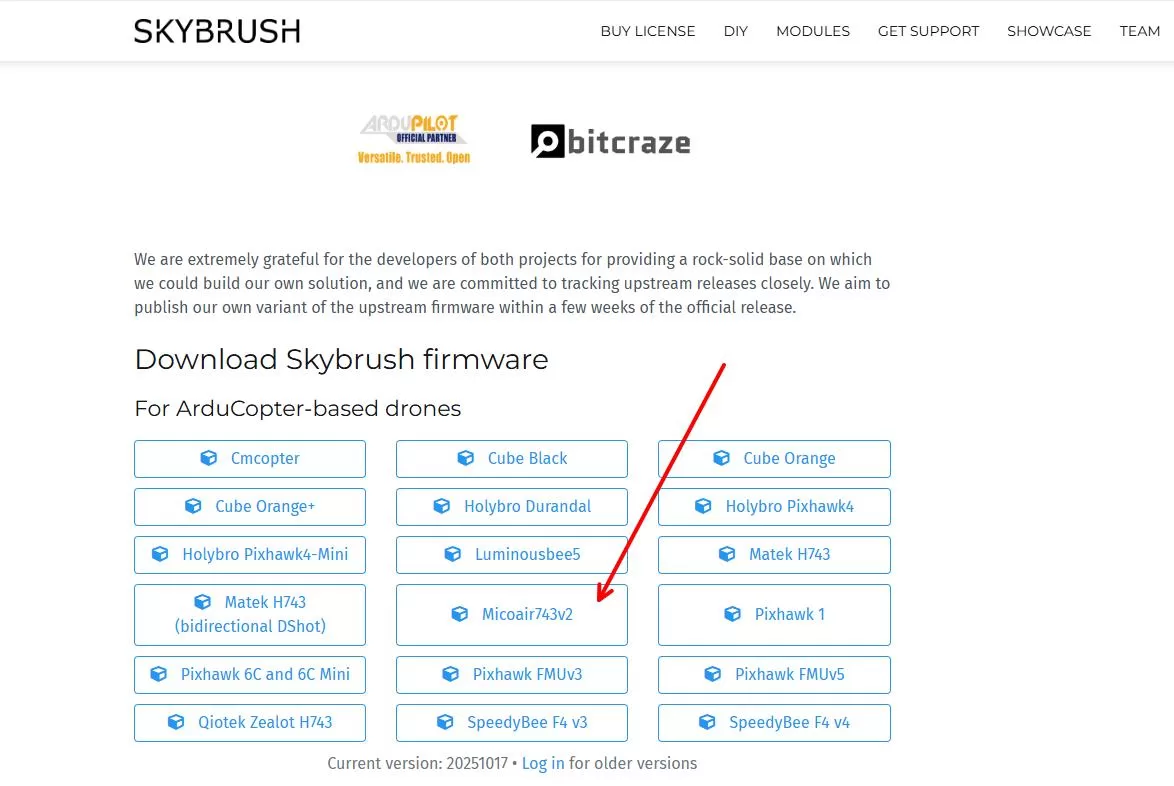
Skybrush
Firmware Flashing and Recovery
Normal Upgrade
- Back up the current parameters.
- Use MicoConfigurator or Mission Planner to upgrade to stable firmware online.
- Power-cycle the flight controller after flashing is complete.
Enter DFU Mode
- Disconnect power and USB from the flight controller.
- Press and hold the
BOOTbutton. - Keep it held while connecting USB Type-C.
- Release the button after the computer recognizes the DFU device.
- Select the correct target on MicoConfigurator's firmware/DFU page and flash it.
In DFU mode, the flight controller does not appear as a serial port in Device Manager as it does with normal firmware, and the LED indicators do not operate. This is normal.
Troubleshooting
Flight Controller Cannot Connect over USB
- Replace the USB Type-C cable with one confirmed to support data transfer.
- Try another USB port on the computer, and avoid hubs with insufficient power.
- Check whether a serial-port or DFU device appears in Device Manager or the system logs.
- Try entering DFU mode to determine whether the bootloader or hardware can be recognized.
- If the board is powered only by the battery, confirm that there is no abnormality between USB ground and system ground.
Bluetooth Cannot Be Found or Connected
- Wait at least 3 seconds after power-on, and then hold
BOOTfor approximately 2 seconds to turn on Bluetooth - Confirm that the blue power indicator is on
- Grant Android Bluetooth and Nearby Devices permissions
- Confirm that UART8 has not been reassigned to another function
- Check that the baud rate is
115200 - Delete the old connection record on the phone and scan again
Motor Does Not Rotate During Motor Test
- Confirm that propulsion power is connected during the test
- Check the motor output channels and frame configuration
- Verify the ESC protocol; for Bluejay/AM32 and similar firmware, try
DShot300first - Check the arming state and ground-station error messages
Battery Voltage or Current Reading Is Inaccurate
- Verify
BATT_VOLT_PIN,BATT_CURR_PIN, and the default coefficients; try restoring the default parameters - Compare the reading with the actual voltage measured using a multimeter
- Calibrate
BATT_CURR_SCALEaccording to the ESC current-sensor specifications - Confirm that the current-sensing signal wire and GND are connected
Flight Controller Cannot Start After the Wrong Firmware Was Flashed
- Hold
BOOTwhile connecting USB to enter DFU mode. - Select the target that exactly matches this board.
- After flashing, perform a complete parameter reset and calibration. Do not load a parameter file from another model.
Related Resources
- MicoConfigurator
- Flight Controller Firmware Flashing Tutorial
- ArduPilot Basic Configuration Tutorial
- Connect a Computer to MicoAir H743v2/Lite over Bluetooth
- Official ArduPilot documentation
- Official PX4 documentation
- QGroundControl download
- INAV Configurator
- Betaflight Configurator
Appendix A: Pinout Table
This table is mainly intended for low-level driver development and hardware debugging. These pin definitions are normally not needed for standard installation and parameter configuration.
| Function category | Device / Use | Bus / Peripheral | Signal | MCU pin |
|---|---|---|---|---|
| IMU | BMI270 | SPI3 | MOSI | PD6 |
| IMU | BMI270 | SPI3 | MISO | PB4 |
| IMU | BMI270 | SPI3 | SCLK | PB3 |
| IMU | BMI270 | SPI3 | BMI270_CS | PA15 |
| IMU | BMI270 | GPIO | BMI270_DR | PB7 |
| IMU | BMI088 | SPI2 | MOSI | PC3 |
| IMU | BMI088 | SPI2 | MISO | PC2 |
| IMU | BMI088 | SPI2 | SCLK | PD3 |
| IMU | BMI088 | SPI2 | BMI088_GYRO_CS | PD5 |
| IMU | BMI088 | SPI2 | BMI088_ACCEL_CS | PD4 |
| IMU | BMI088 | GPIO | BMI088_GYRO_DR | PC15 |
| IMU | BMI088 | GPIO | BMI088_ACCEL_DR | PC14 |
| Barometer | SPL06 | I2C2 | SCL | PB10 |
| Barometer | SPL06 | I2C2 | SDA | PB11 |
| Barometer | SPL06 | GPIO | SPL06_DR | PD0 |
| Magnetometer | QMC5883L | I2C2 | SCL | PB10 |
| Magnetometer | QMC5883L | I2C2 | SDA | PB11 |
| Motor output | PWM | TIM1/CH4 | M1 | PE14 |
| Motor output | PWM | TIM1/CH3 | M2 | PE13 |
| Motor output | PWM | TIM1/CH2 | M3 | PE11 |
| Motor output | PWM | TIM1/CH1 | M4 | PE9 |
| Motor output | PWM | TIM3/CH4 | M5 | PB1 |
| Motor output | PWM | TIM3/CH3 | M6 | PB0 |
| Motor output | PWM | TIM4/CH1 | M7 | PD12 |
| Motor output | PWM | TIM4/CH2 | M8 | PD13 |
| Motor output | PWM | TIM15/CH1 | M9 | PE5 |
| Motor output | PWM | TIM15/CH2 | M10 | PE6 |
| LED strip | PWM | TIM4/CH3 | — | PD14 |
| Buzzer | GPIO | — | — | PD15 |
| OSD | AT7456E | SPI1 | MOSI | PA7 |
| OSD | AT7456E | SPI1 | MISO | PA6 |
| OSD | AT7456E | SPI1 | SCLK | PA5 |
| OSD | AT7456E | SPI1 | OSD_CS | PB12 |
| External oscillator | External | 8 MHz | OSC_IN | PH0 |
| External oscillator | External | 8 MHz | OSC_OUT | PH1 |
| Status LED | GPIO_OUTPUT | RED | — | PE3 |
| Status LED | GPIO_OUTPUT | BLUE | — | PE4 |
| Status LED | GPIO_OUTPUT | GREEN | — | PE2 |
| Button | — | BOOT | — | BOOT0 |
| I2C | — | I2C1 | SDA | PB9 |
| I2C | — | I2C1 | SCL | PB8 |
| UART | — | UART1 | TX | PA9 |
| UART | — | UART1 | RX | PA10 |
| UART | VTX-HD | UART2 | TX | PA2 |
| UART | VTX-HD | UART2 | RX | PA3 |
| UART | GPS | UART3 | TX | PD8 |
| UART | GPS | UART3 | RX | PD9 |
| UART | — | UART4 | TX | PA0 |
| UART | — | UART4 | RX | PA1 |
| UART | — | UART5 | TX | PB6 |
| UART | — | UART5 | RX | PB5 |
| UART | RCIN | UART6 | TX | PC6 |
| UART | RCIN | UART6 | RX | PC7 |
| UART | ESC_Telemetry | UART7 | RX | PE7 |
| UART | Bluetooth Telemetry | UART8 | TX | PE1 |
| UART | Bluetooth Telemetry | UART8 | RX | PE0 |
| USB | — | USB | USB_DM | PA11 |
| USB | — | USB | USB_DP | PA12 |
| SD card | — | SDMMC1 | D0 | PC8 |
| SD card | — | SDMMC1 | D1 | PC9 |
| SD card | — | SDMMC1 | D2 | PC10 |
| SD card | — | SDMMC1 | D3 | PC11 |
| SD card | — | SDMMC1 | CLK | PC12 |
| SD card | — | SDMMC1 | CMD | PD2 |
| Debug interface | — | SWD | SWDIO | PA13 |
| Debug interface | — | SWD | SWCLK | PA14 |
| Battery sensing | 1:21 voltage divider | ADC | Voltage | PC0 |
| Battery sensing | — | ADC | Current | PC1 |