

文档目录
文章目录
微空 AI 智能无人机教程 3 - 机载电脑环境配置
本章目标
本章完成机载电脑(树莓派 5)的系统环境搭建,为后续的 VIO 视觉定位、轨迹规划和 AI 智能体功能提供软件基础。
完成本章后,MVD35 应达到以下状态:
- 机载电脑系统烧录完成,可通过 SSH 远程登录并操作。
- ROS 2 运行环境安装完成,节点通信功能正常。
- 双目相机驱动配置完成,机载电脑可正常获取红外图像数据。
- MAVROS 飞控通信配置完成,机载电脑可正常与飞控进行数据通信。
前期准备
硬件准备
- MVD35 智能版(机载电脑为:树莓派5 4GB RAM版本 + 主动散热器)
- TF 卡及读卡器(32GB 或以上,推荐高速卡)
- 电脑与良好的网络条件
软件准备
- 微空 Web 飞控配置器: MicoConfigurator
- 树莓派系统烧录工具:Raspberry Pi Imager
- SSH 终端工具:MobaXterm
软件架构概览
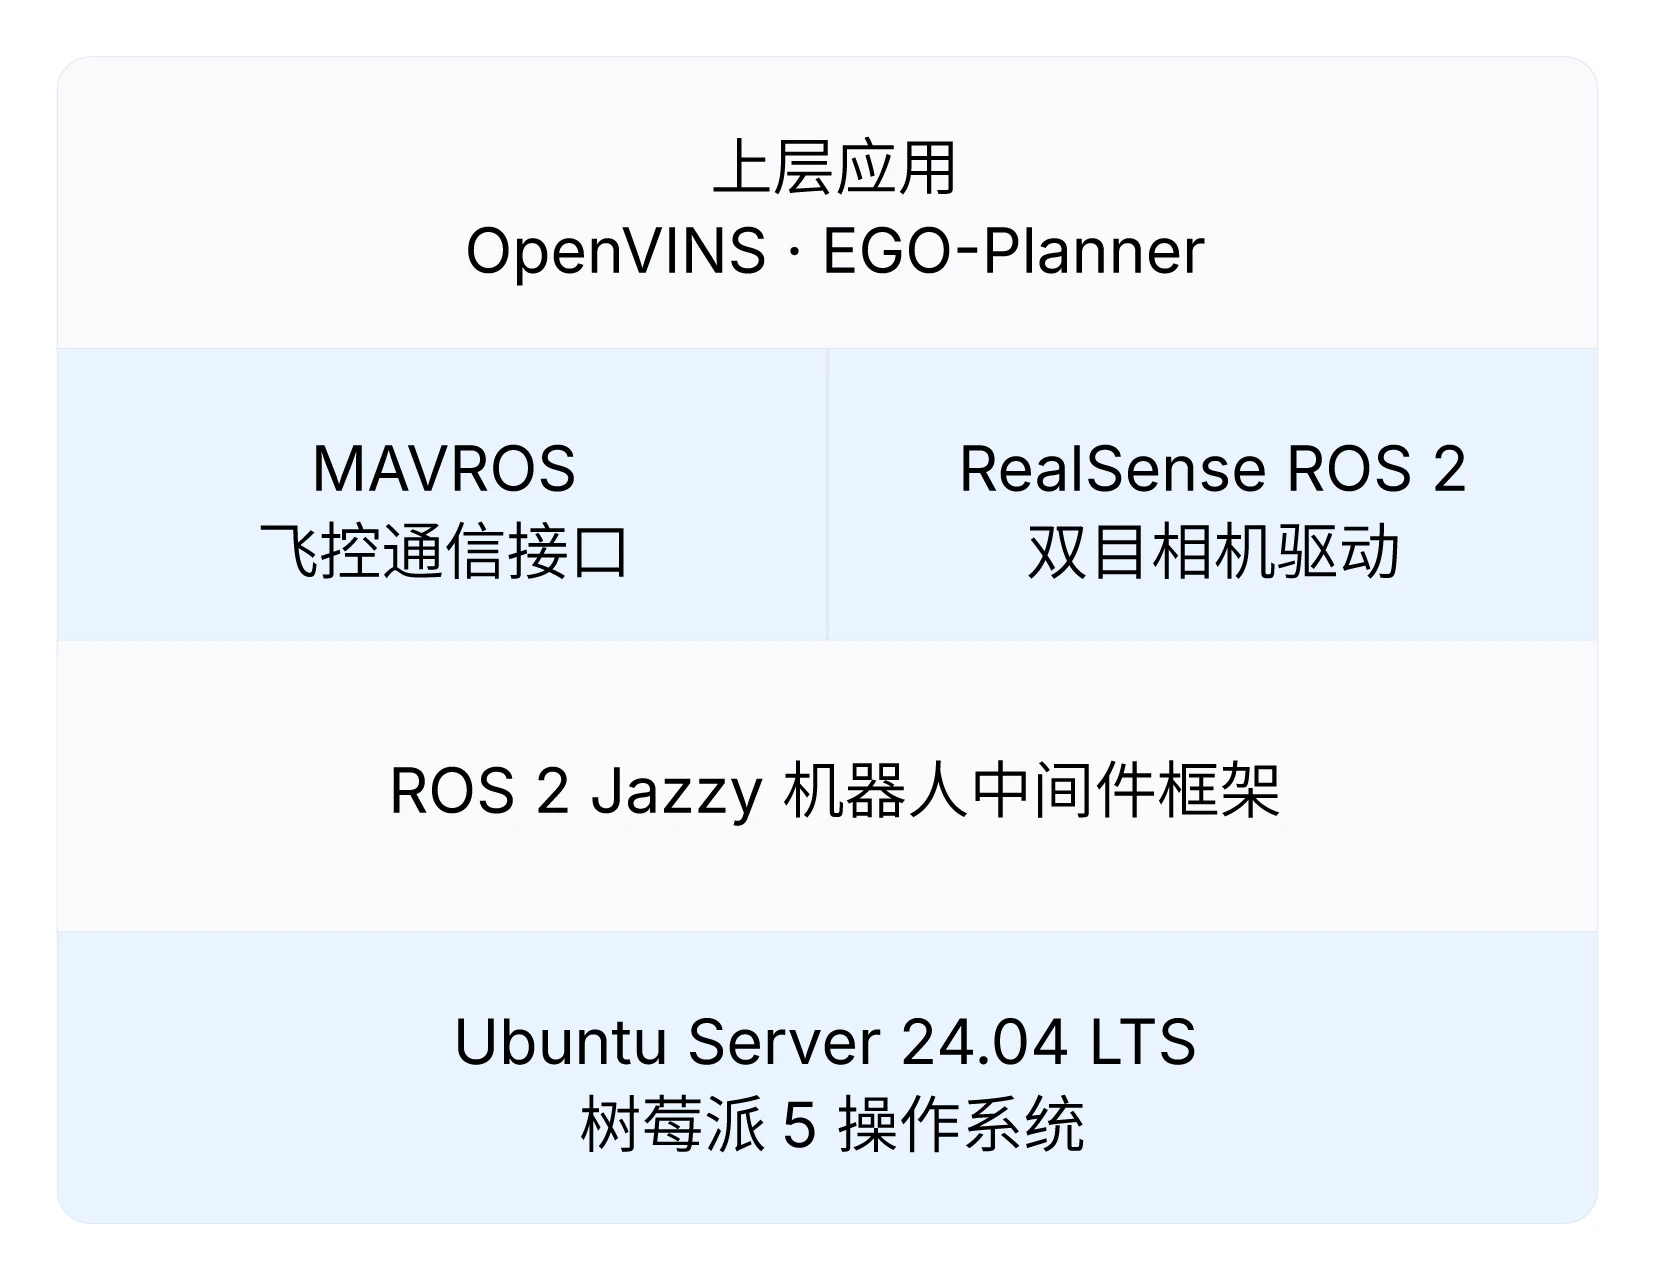
本章安装的软件形成以下层级关系,后续教程中的功能模块都将运行在这套环境之上:
| 组件 | 功能 |
|---|---|
| Ubuntu Server 24.04.4 LTS (64-bit) | 树莓派操作系统,ROS 2 Jazzy 的官方支持系统 |
| ROS 2 Jazzy | 机器人中间件框架,提供节点通信、话题发布订阅等基础能力 |
| Intel RealSense ROS 2 驱动 | D430 双目相机的 ROS 2 驱动,发布双目红外图像话题 |
| MAVROS | MAVLink 飞控通信桥接,将飞控数据封装为 ROS 2 话题和服务 |
操作技巧
粘贴命令:MobaXterm 中鼠标 右键 即为粘贴。粘贴后建议先检查命令内容再按回车执行。
中断操作:
Ctrl + C可终止正在运行的进程,也可在sudo密码输入提示时取消当前命令。vim 编辑器:按
i或Insert键进入编辑模式,按ESC返回命令模式,输入:wq保存并退出。sudo 密码:执行
sudo命令时会提示输入密码,输入过程中屏幕不会显示任何字符,按回车确认输入。
系统烧录与 SSH 连接
系统烧录
-
将 TF 卡通过读卡器接入电脑
-
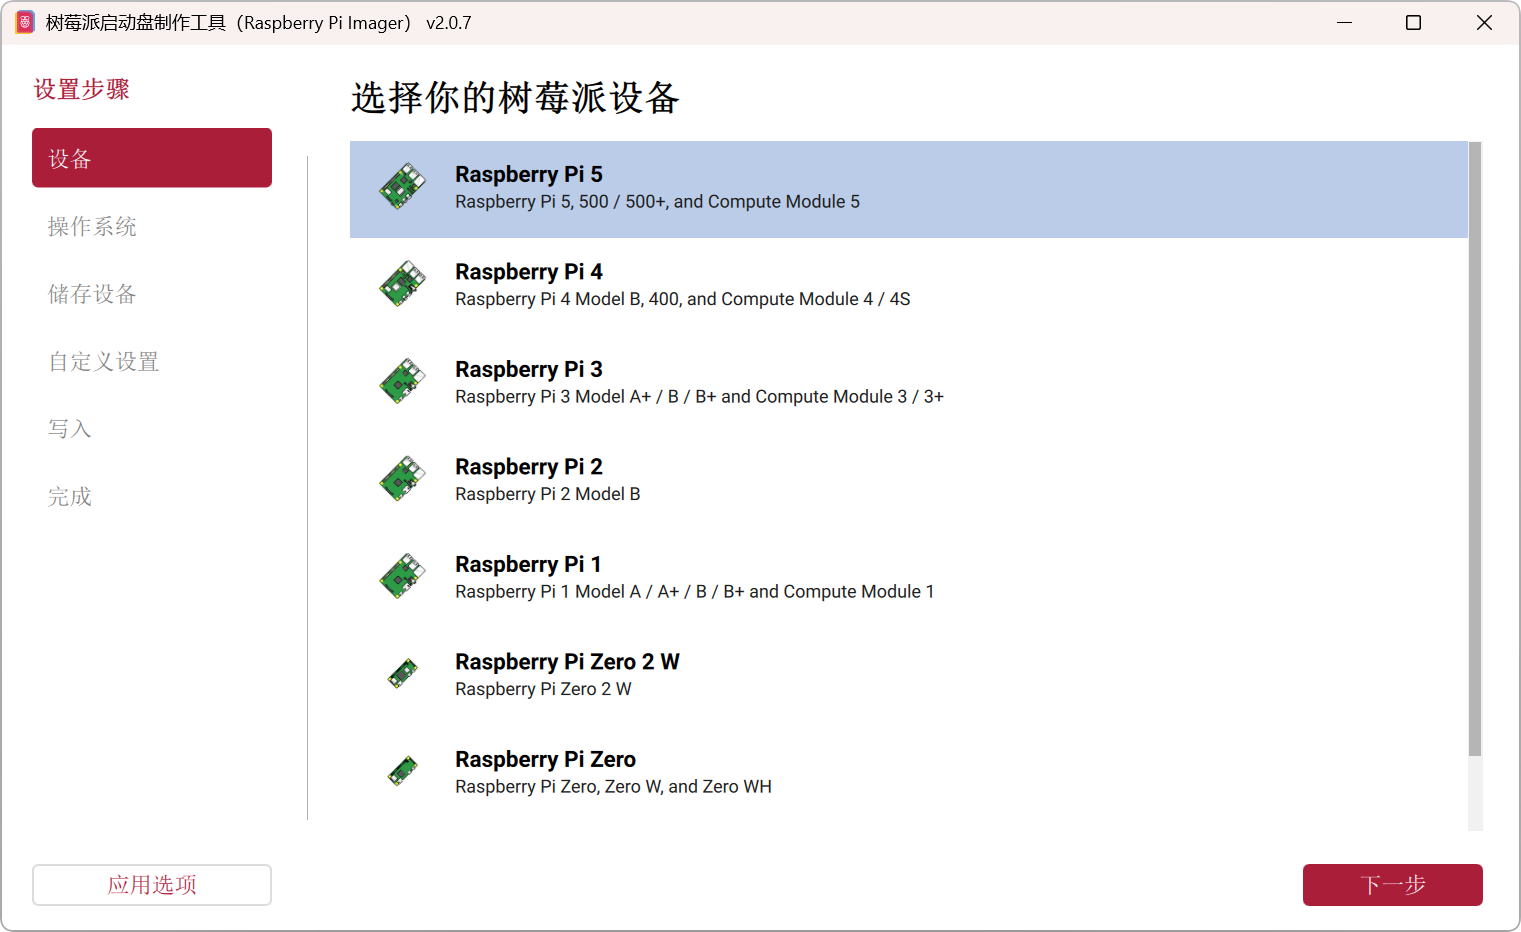
安装并打开 Raspberry Pi Imager
-
设备 选择
Raspberry PI 5 -
操作系统 选择
Other general-purpose OS->Ubuntu->Ubuntu Server 24.04.4 LTS (64-bit) -
储存设备 选择 TF 卡
-
自定义设置,按照个人偏好进行设置
- 配置主机名:MVD35-Raspi5
- 配置本地化:选择时区与键盘布局
- 配置用户账户:设置用户名和密码
- 配置 Wi-Fi:设置连接的网络名称和密码
- 启用 SSH:
开启 SSH;认证机制选择使用密码登录
-
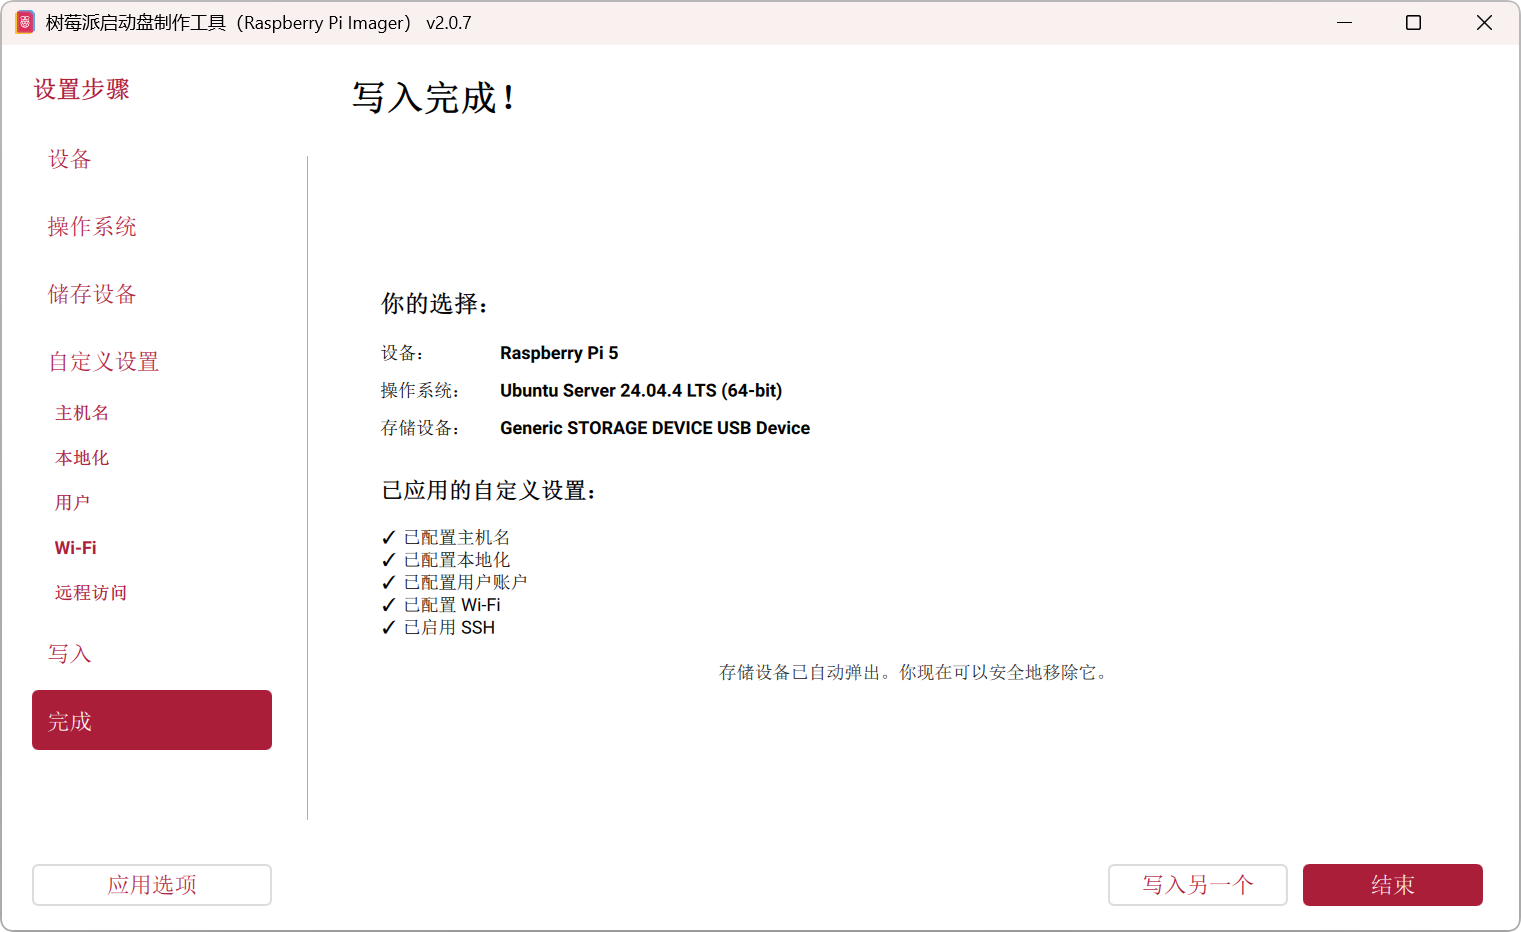
将镜像和设置写入 TF 卡。
首次启动与 SSH 连接
1. 启动树莓派
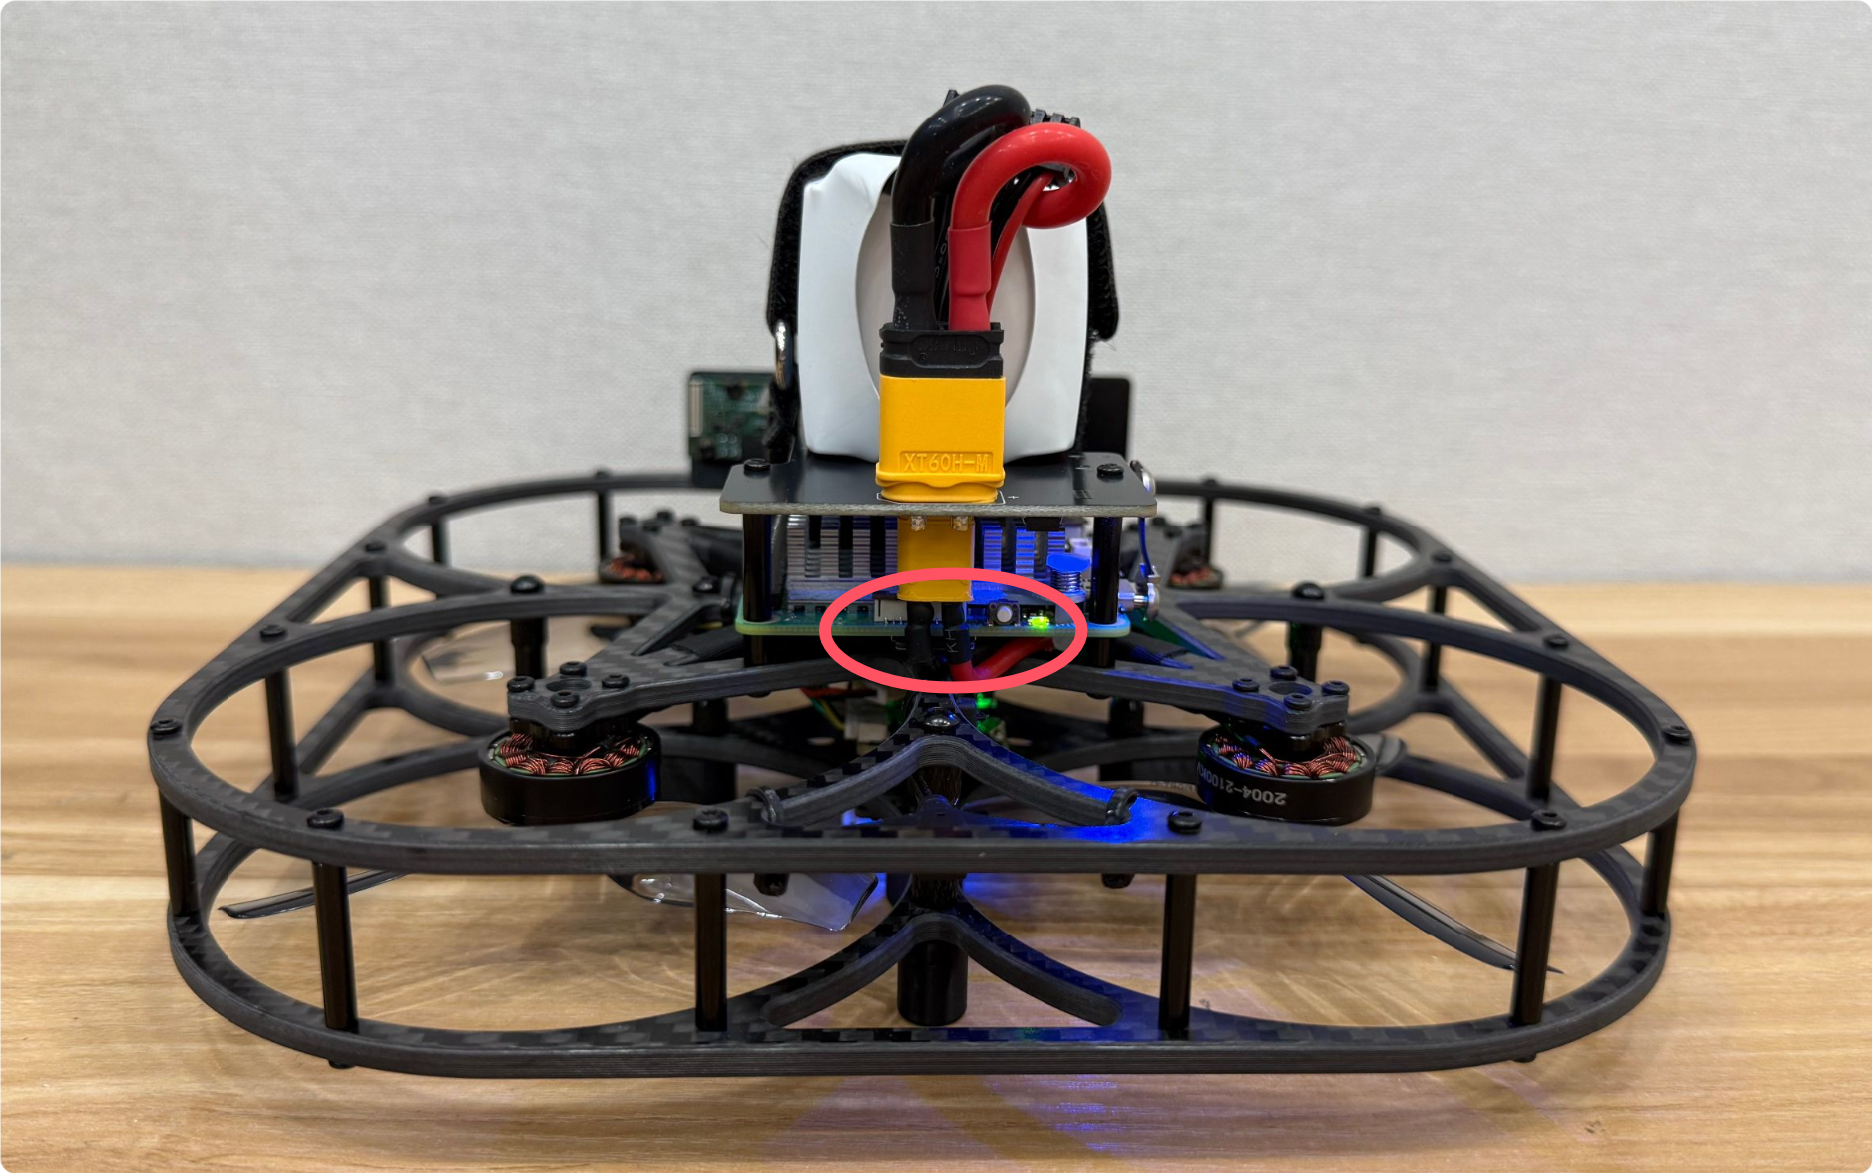
- 将烧录好镜像的 TF 卡插入树莓派,接入电池启动树莓派。
ℹ️ 树莓派启动后,电源绿色指示灯常亮,并会自动搜索并连接预先配置的 Wi-Fi。
2. 获取树莓派 IP 地址
- 登录路由器 Wi-Fi 管理后台,找到并记录下树莓派的 IP 地址。
ℹ️ 通过浏览器访问路由器底部标签上的管理地址可进入路由器管理后台
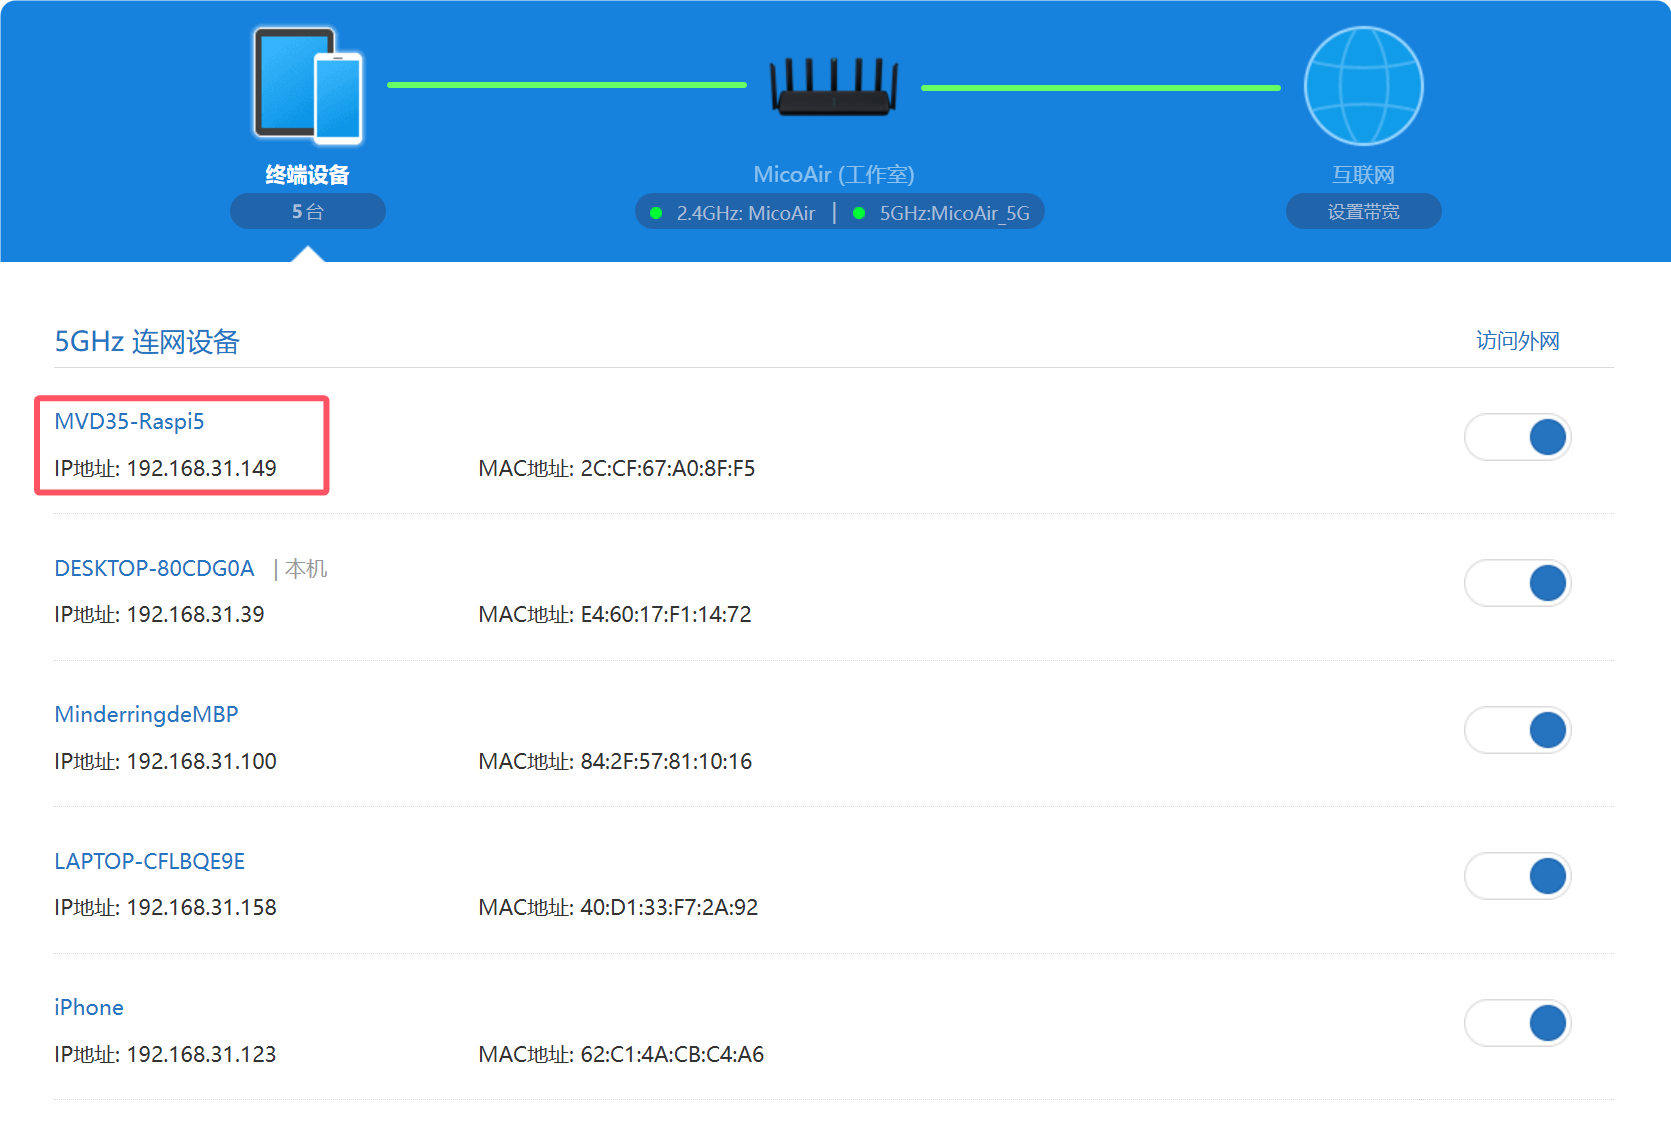
3. 通过 SSH 登录树莓派
-
安装并打开 MobaXterm。
-
选择
Session->SSH- Remote host 填入树莓派的 IP 地址
- 勾选 Specify username 并填入烧录镜像时设置的用户名
-
点击 OK 进行连接。
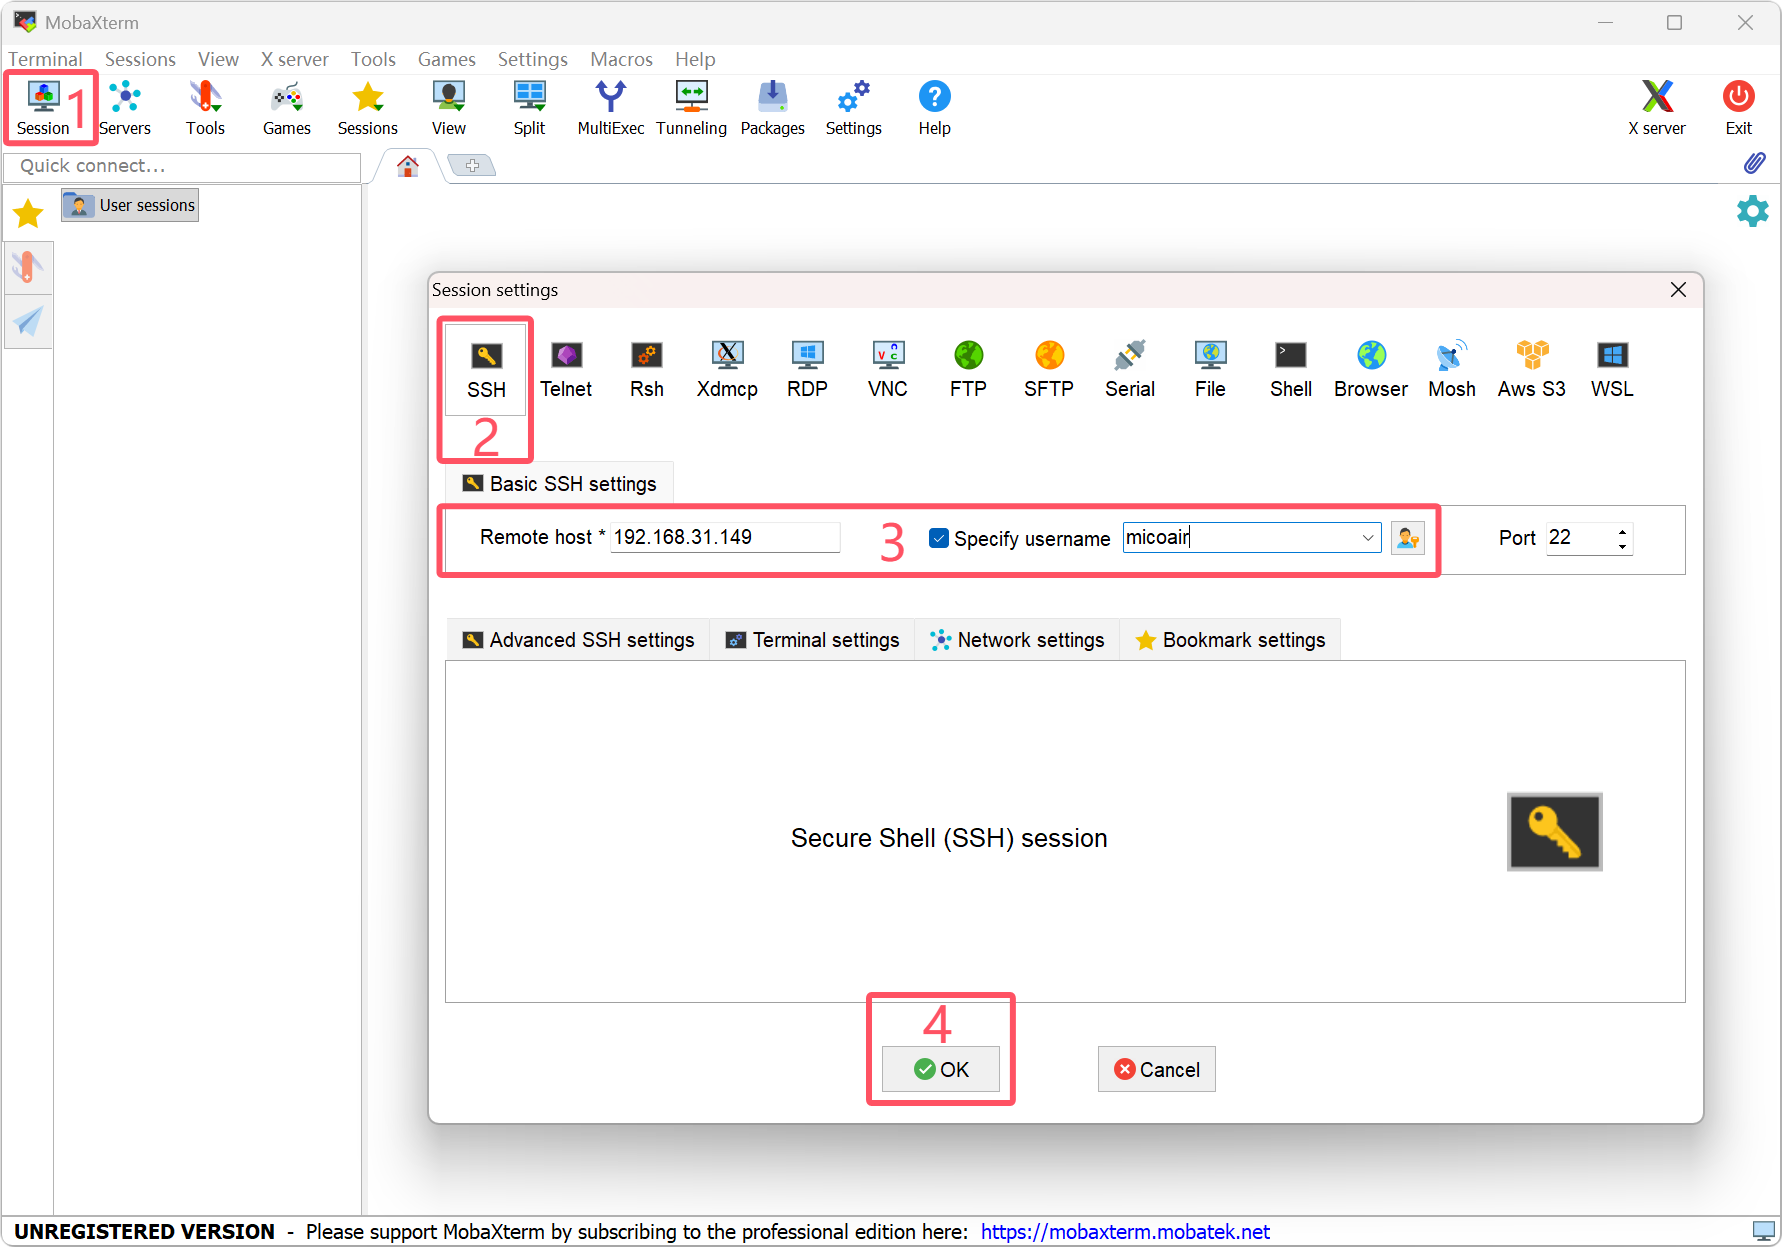
- 输入密码登录到树莓派。
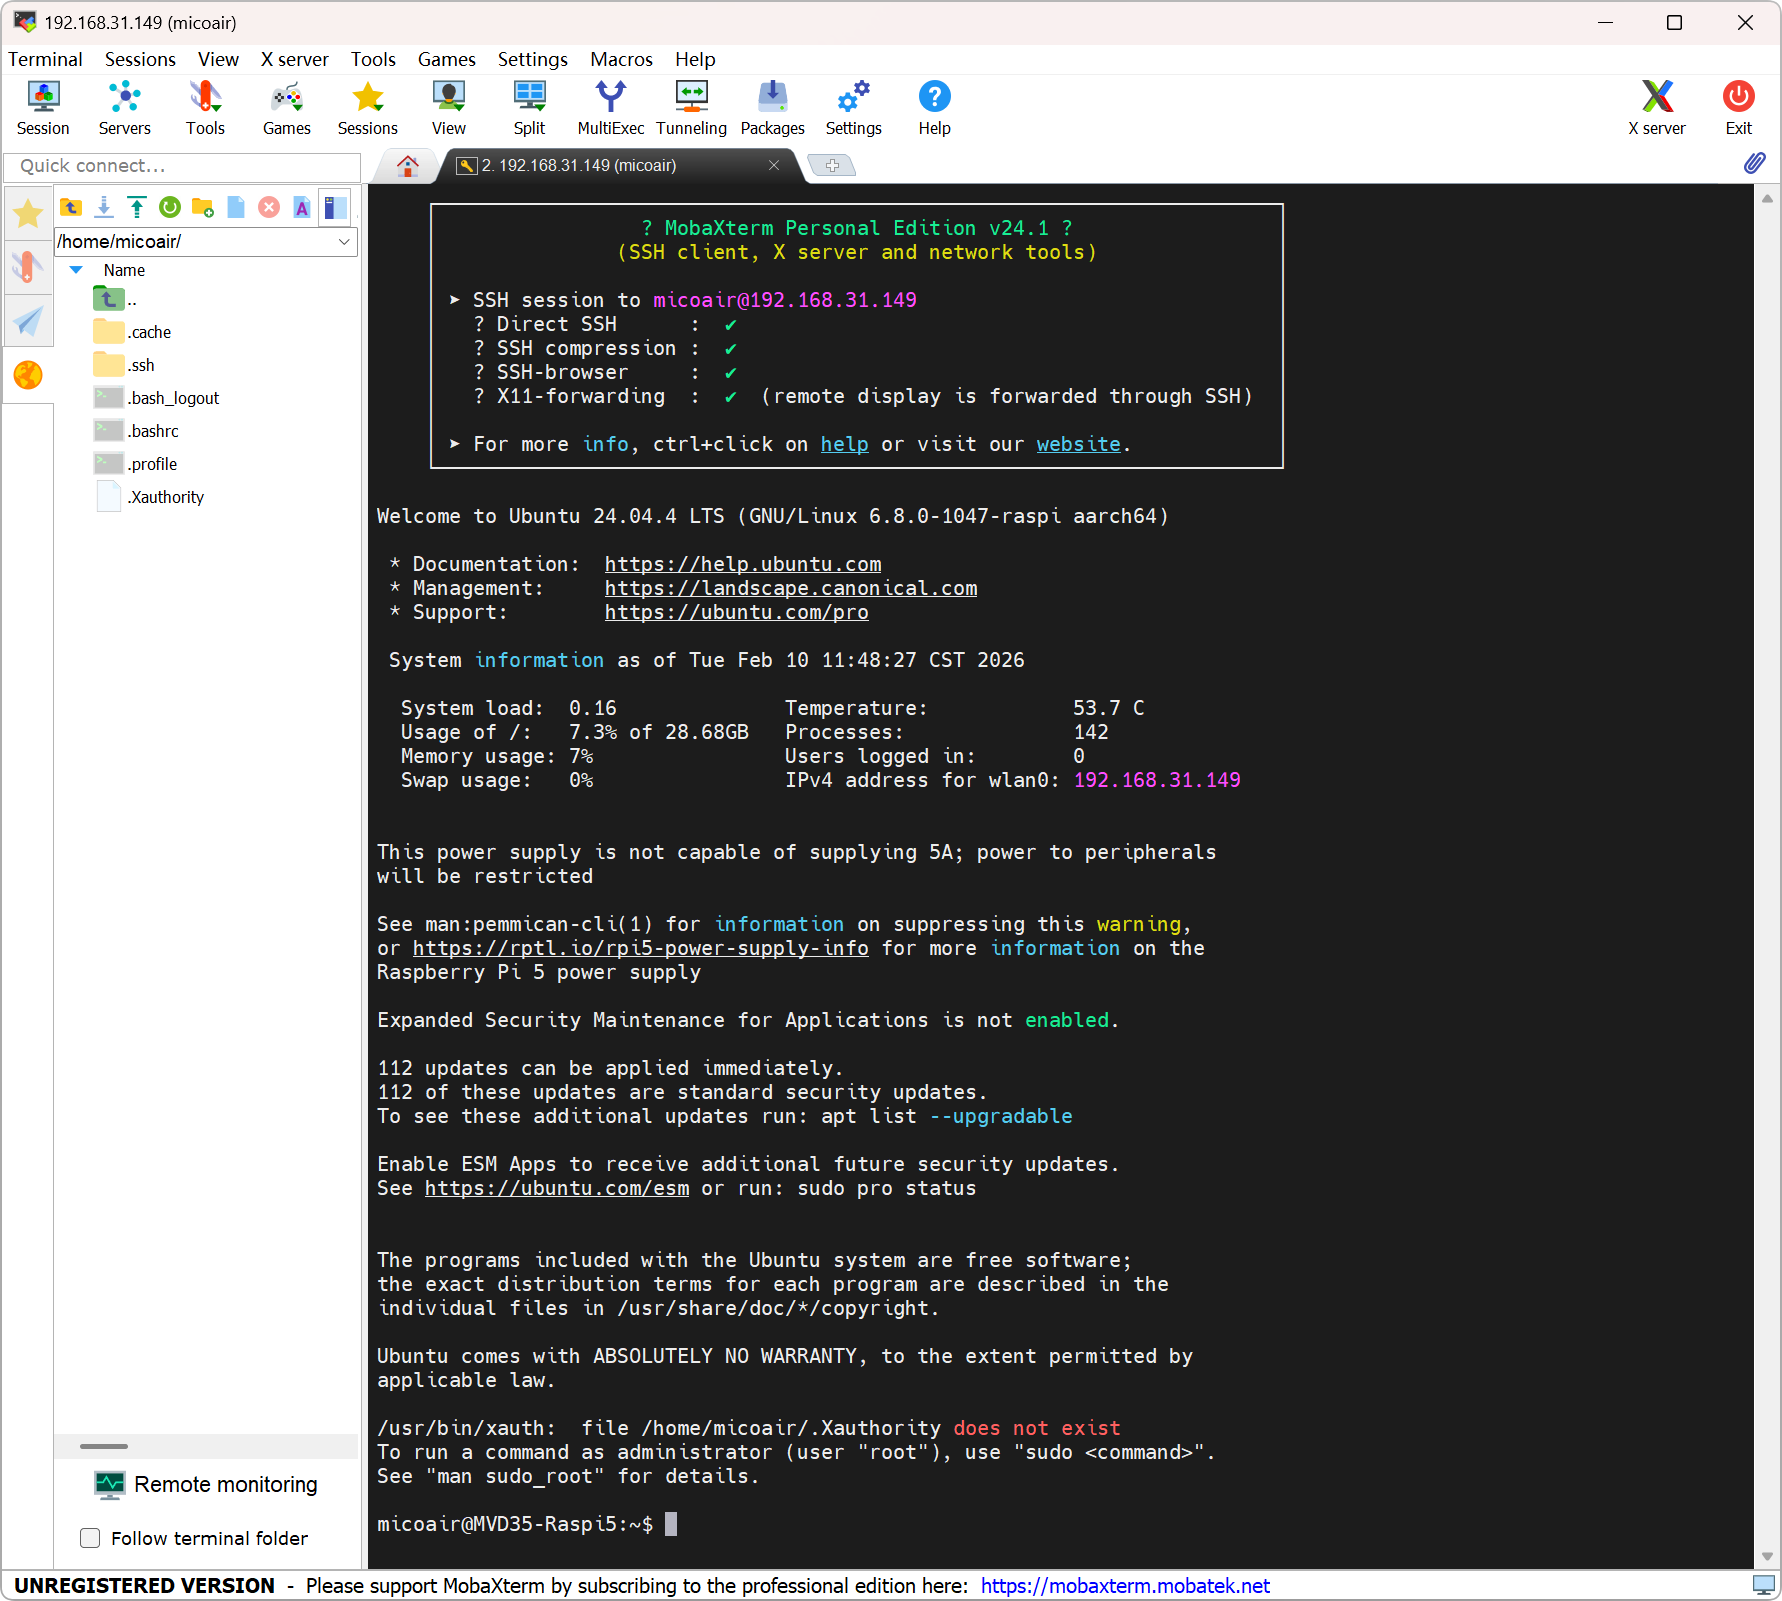
4. 更新系统库
sudo apt-get update
sudo apt-get upgrade -y
完成后检查
✅ SSH 能稳定连接树莓派,无频繁断连。
✅ 更新系统库 执行无报错,软件源可正常访问。
常见错误
⚠️ 无法找到树莓派 IP:确认树莓派已成功启动;确认烧录配置过程中 Wi-Fi 名称及密码填写无误。
⚠️ SSH 连接超时:确认电脑与树莓派在同一局域网内;确认树莓派是否已完成启动。
ROS 2 安装与验证
ROS 2(Robot Operating System 2)是目前最主流的开源机器人操作系统。后续的视觉里程计(OpenVINS)、轨迹规划以及飞控通信(MAVROS)都将以 ROS 2 节点的形式运行。本步骤完成 ROS 2 Jazzy 的完整安装与验证。
配置软件源
⚠️ 安装过程需要访问
raw.githubusercontent.com,如果网络不通,需先解决网络访问问题。
1. 启用 Ubuntu universe 仓库
sudo apt install software-properties-common
sudo add-apt-repository universe
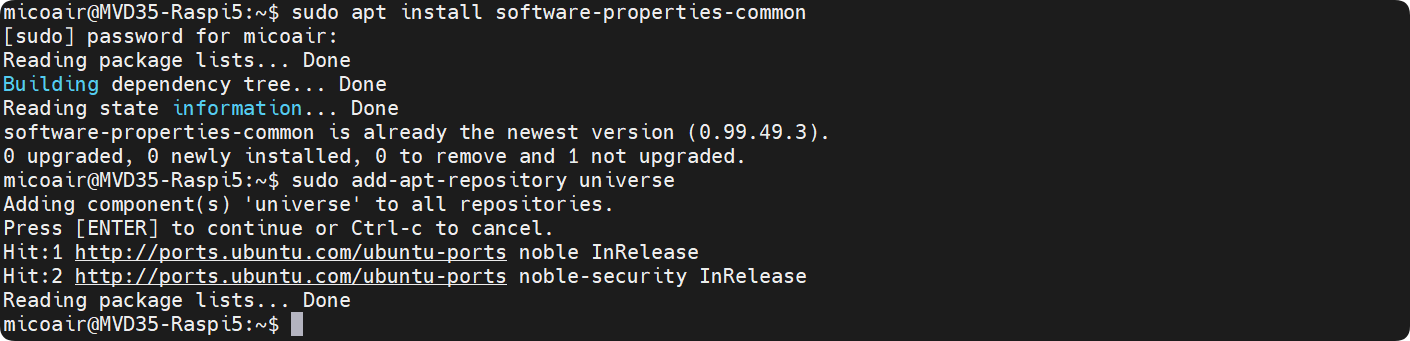
2. 修改 hosts 文件以连接 githubusercontent
- 打开 hosts 文件
sudo vim /etc/hosts
- 在末尾添加新行:
151.101.84.133 raw.githubusercontent.com
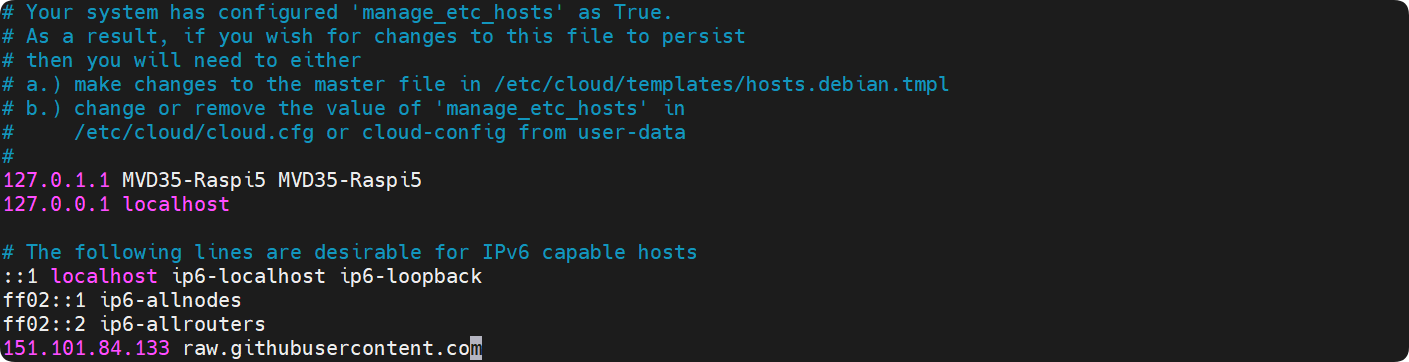
ℹ️ 此 IP 为 GitHub raw CDN 地址,可能随时间变化。如果无法访问,可通过 https://www.ipaddress.com 查询
raw.githubusercontent.com的最新 IP,或使用网络代理。
3. 修正系统时间
ℹ️ 系统时间不正确会导致 SSL 证书验证失败,curl 命令无法正常工作。
- 确认系统时间
date
- 手动设置系统时间,格式:YYYY-MM-DD HH:MM:SS
sudo date -s "2026-07-01 12:00:00"
- 修改成功后可再次执行
date确认

4. 添加 ROS 2 GPG 密钥
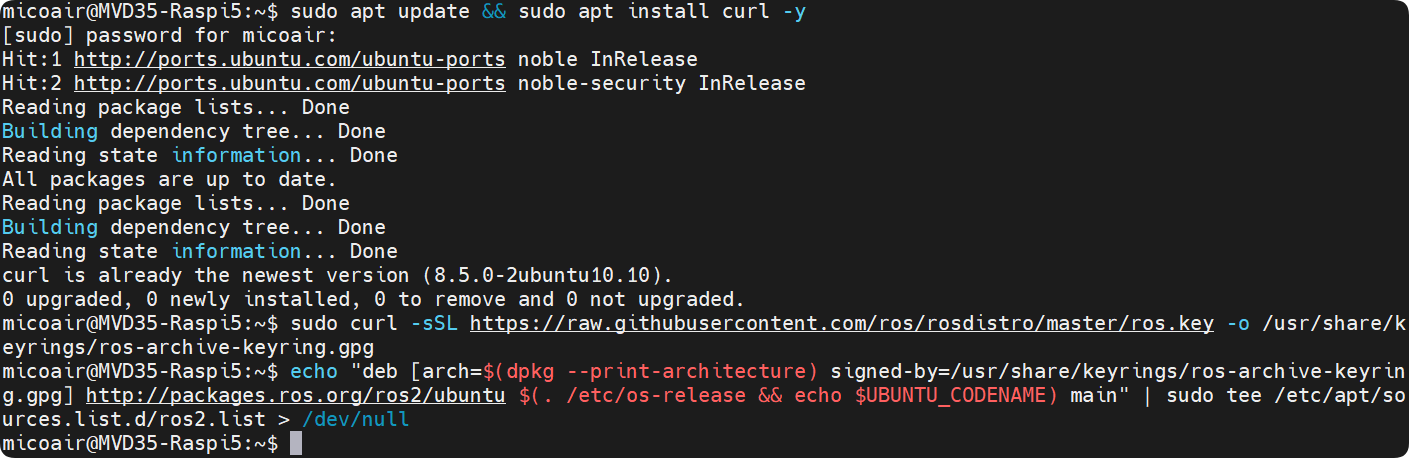
sudo apt update && sudo apt install curl -y
sudo curl -sSL https://raw.githubusercontent.com/ros/rosdistro/master/ros.key -o /usr/share/keyrings/ros-archive-keyring.gpg
echo "deb [arch=$(dpkg --print-architecture) signed-by=/usr/share/keyrings/ros-archive-keyring.gpg] http://packages.ros.org/ros2/ubuntu $(. /etc/os-release && echo $UBUNTU_CODENAME) main" | sudo tee /etc/apt/sources.list.d/ros2.list > /dev/null
5. 添加 noble-updates 软件源
ℹ️ ROS 2 Jazzy 的部分依赖包位于
noble-updates源中,需要将其添加到软件源配置。
sudo sed -i 's/Suites: noble$/Suites: noble noble-updates/' /etc/apt/sources.list.d/ubuntu.sources
安装 ROS 2 Jazzy
1. 安装开发工具
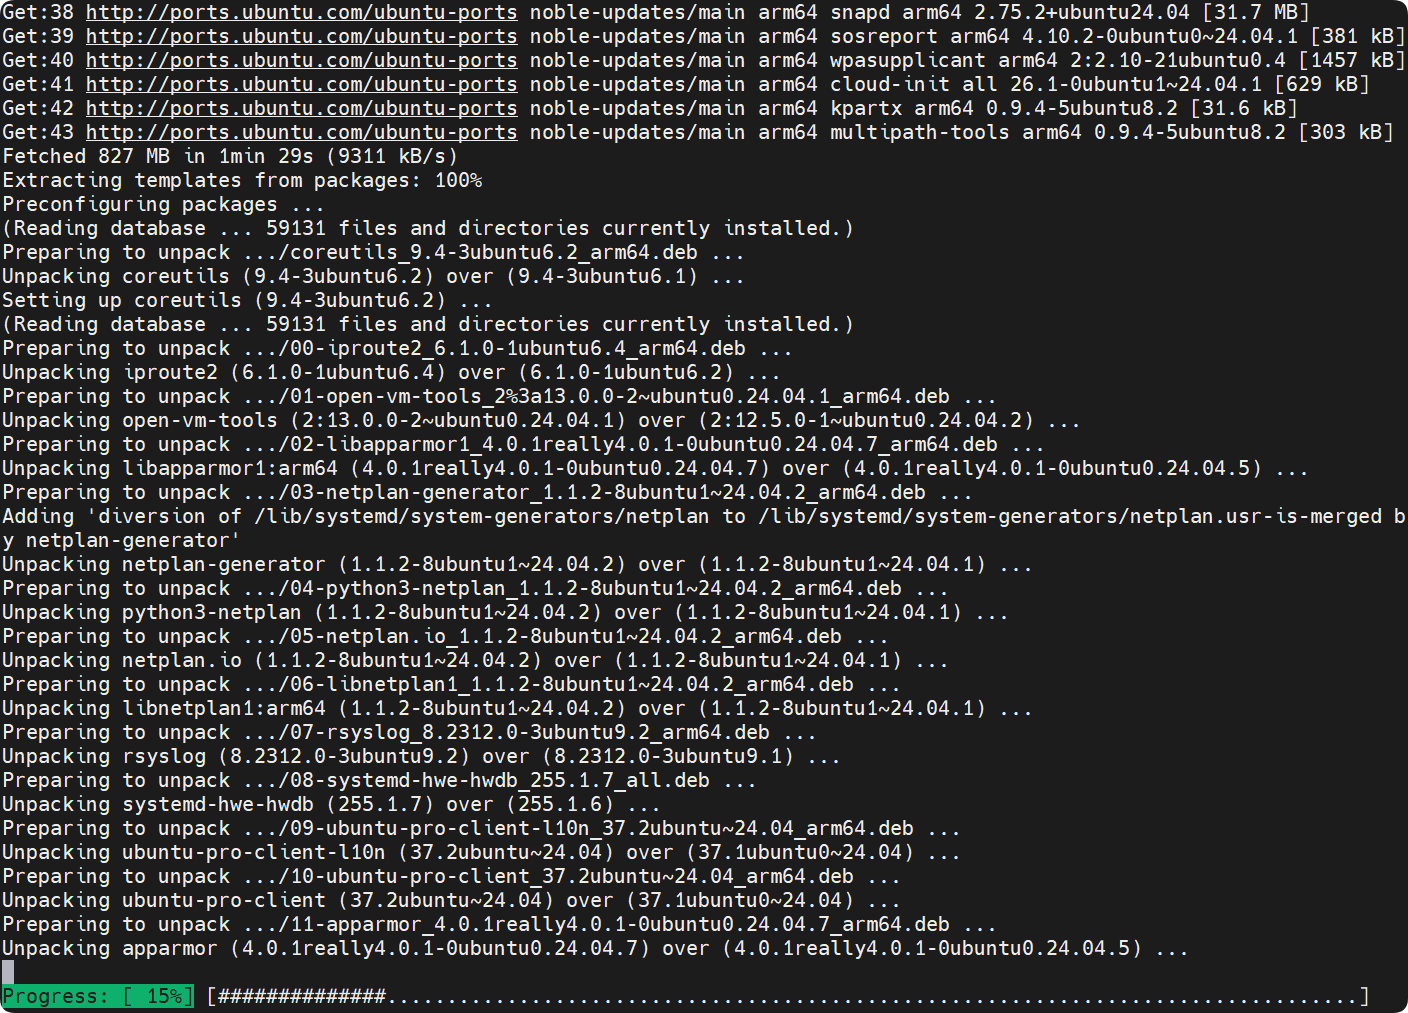
sudo apt update
sudo apt upgrade -y
sudo apt install ros-dev-tools -y
2. 安装 ROS 2 桌面版
ℹ️ 桌面版包含 RViz、rqt 等可视化工具,方便后续调试。
sudo apt-get install ros-jazzy-desktop -y
3. 配置终端环境
echo "source /opt/ros/jazzy/setup.bash" >> ~/.bashrc
source ~/.bashrc
4. 配置 rosdep
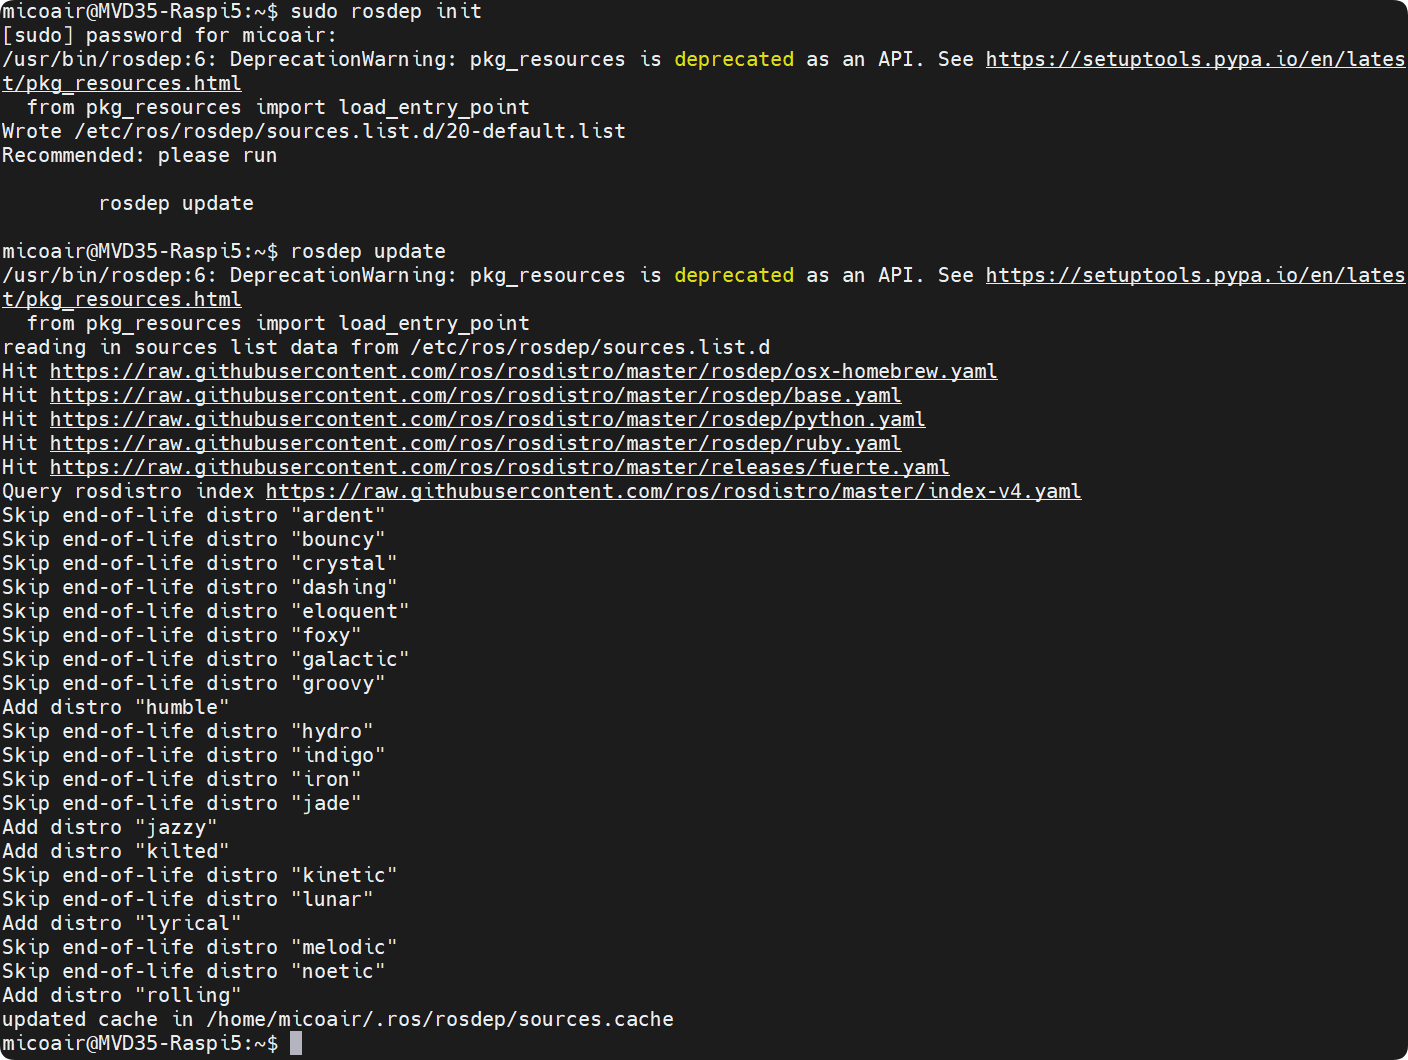
sudo rosdep init
rosdep update
验证通信节点
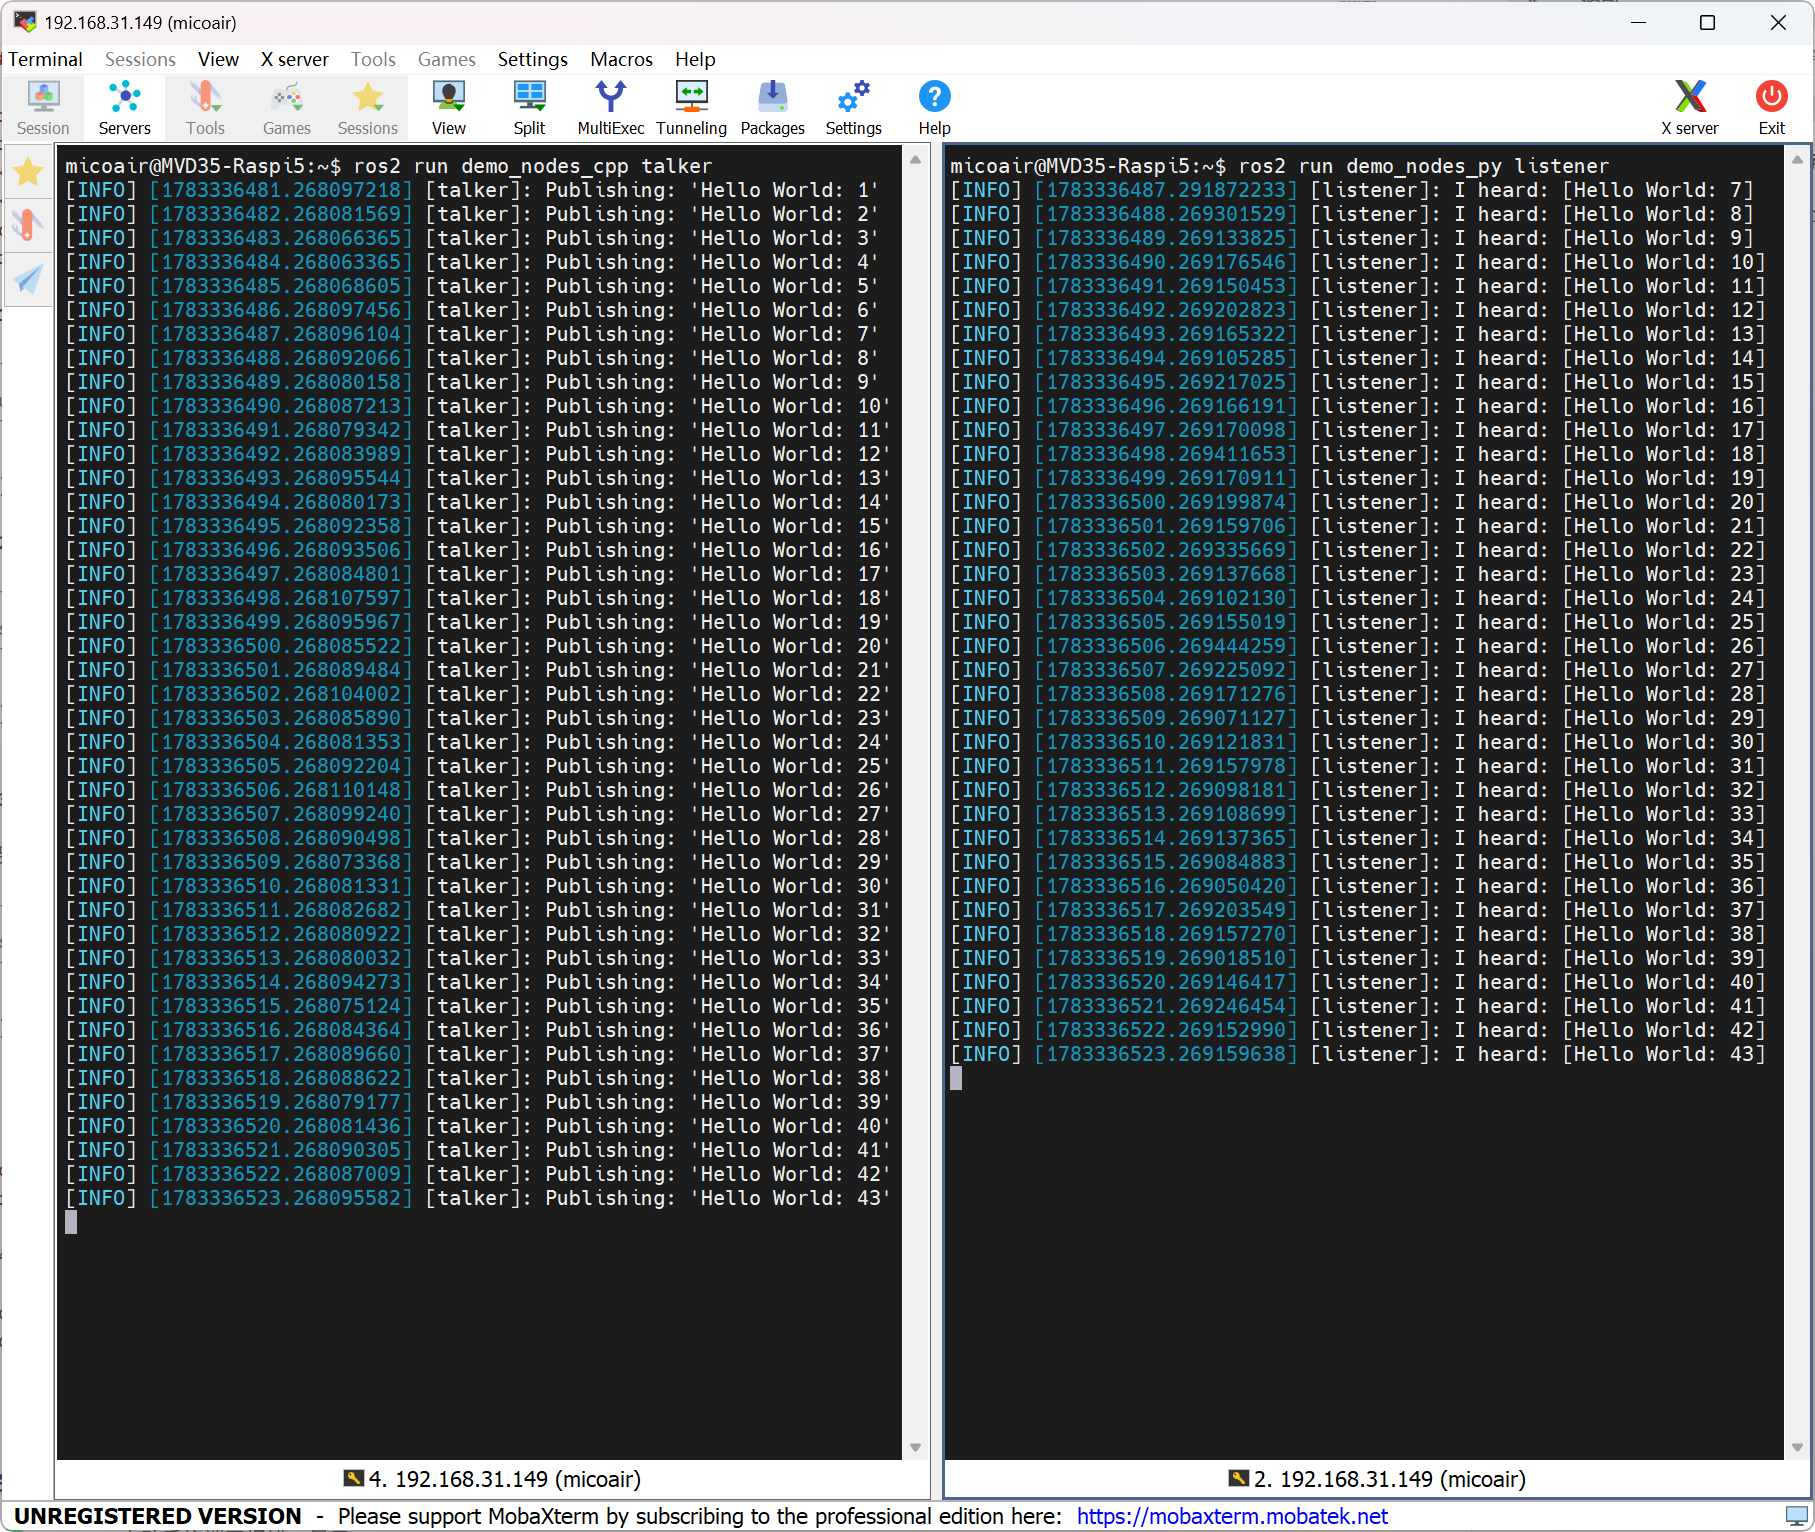
- 在终端运行发布节点:
ros2 run demo_nodes_cpp talker
- 在另一个终端运行订阅节点:
ros2 run demo_nodes_py listener
完成后检查
✅ talker 终端持续输出
Publishing: 'Hello World: X'。✅ listener 终端持续输出
I heard: [Hello World: X],消息序号与 talker 同步。
常见错误
⚠️
ros2: command not found报错:source ~/.bashrc未执行或添加路径写错,检查~/.bashrc文件末尾内容。⚠️
rosdep init超时:hosts 文件中的 GitHub IP 已失效或网络不通,更新 IP 后重试。
RealSense SDK 安装与验证
Intel RealSense D430 是 MVD35 的双目红外相机,为后续的视觉惯性里程计(VIO)提供双目图像输入。本步骤完成 RealSense ROS 2 驱动安装与发布配置,获取双目摄像头数据并发布到 ROS 2 网络中。
确认设备连接状态
-
检查 D430 已经通过 USB 3.0 数据线连接到树莓派。
-
查看树莓派 USB 口识别到的设备,确认已经识别到 D430。
lsusb

安装 RealSense ROS 2 包
sudo apt-get install ros-jazzy-librealsense2 ros-jazzy-realsense2-camera ros-jazzy-realsense2-camera-msgs ros-jazzy-realsense2-description -y
- 配置 udev 规则
sudo curl -sSL https://raw.githubusercontent.com/IntelRealSense/librealsense/master/config/99-realsense-libusb.rules -o /etc/udev/rules.d/99-realsense-libusb.rules
sudo udevadm control --reload-rules && sudo udevadm trigger
ℹ️ udev 规则用于授权非 root 用户访问 RealSense USB 设备,配置后无需
sudo即可启动相机节点。
配置双目数据发布脚本
创建自定义 launch 文件,仅开启 infra1 和 infra2 红外通道,关闭其余数据流以节省系统资源。
- 创建 launch 文件
cd /opt/ros/jazzy/share/realsense2_camera/launch/
sudo chmod 777 .
touch mvd35_d430_launch.py
sudo vim mvd35_d430_launch.py
- 写入并保存下面内容
# Copyright 2023 Intel Corporation. All Rights Reserved.
#
# Licensed under the Apache License, Version 2.0 (the "License");
# you may not use this file except in compliance with the License.
# You may obtain a copy of the License at
#
#     http://www.apache.org/licenses/LICENSE-2.0
#
# Unless required by applicable law or agreed to in writing, software
# distributed under the License is distributed on an "AS IS" BASIS,
# WITHOUT WARRANTIES OR CONDITIONS OF ANY KIND, either express or implied.
# See the License for the specific language governing permissions and
# limitations under the License.

"""Launch realsense2_camera node."""
import os
import yaml
from launch import LaunchDescription
import launch_ros.actions
from launch.actions import DeclareLaunchArgument, OpaqueFunction
from launch.substitutions import LaunchConfiguration


configurable_parameters = [{'name': 'camera_name',               'default': 'D430', 'description': 'camera unique name'},
                        {'name': 'camera_namespace',             'default': 'camera', 'description': 'namespace for camera'},
                        {'name': 'serial_no',                    'default': "''", 'description': 'choose device by serial number'},
                        {'name': 'usb_port_id',                  'default': "''", 'description': 'choose device by usb port id'},
                        {'name': 'device_type',                  'default': "''", 'description': 'choose device by type'},
                        {'name': 'config_file',                  'default': "''", 'description': 'yaml config file'},
                        {'name': 'json_file_path',               'default': "''", 'description': 'allows advanced configuration'},
                        {'name': 'initial_reset',                'default': 'false', 'description': "''"},
                        {'name': 'accelerate_gpu_with_glsl',     'default': "false", 'description': 'enable GPU acceleration with GLSL'},
                        {'name': 'rosbag_filename',              'default': "''", 'description': 'A realsense bagfile to run from as a device'},
                        {'name': 'log_level',                    'default': 'info', 'description': 'debug log level [DEBUG|INFO|WARN|ERROR|FATAL]'},
                        {'name': 'output',                       'default': 'screen', 'description': 'pipe node output [screen|log]'},
                        {'name': 'enable_color',                 'default': 'false', 'description': 'enable color stream'},
                        {'name': 'rgb_camera.color_profile',     'default': '0,0,0', 'description': 'color stream profile'},
                        {'name': 'rgb_camera.color_format',      'default': 'RGB8', 'description': 'color stream format'},
                        {'name': 'rgb_camera.enable_auto_exposure', 'default': 'false', 'description': 'enable/disable auto exposure for color image'},
                        {'name': 'enable_depth',                 'default': 'false', 'description': 'enable depth stream'},
                        {'name': 'enable_infra',                 'default': 'true', 'description': 'enable infra0 stream'},
                        {'name': 'enable_infra1',                'default': 'true', 'description': 'enable infra1 stream'},
                        {'name': 'enable_infra2',                'default': 'true', 'description': 'enable infra2 stream'},
                        {'name': 'depth_module.depth_profile',   'default': '0,0,0', 'description': 'depth stream profile'},
                        {'name': 'depth_module.depth_format',    'default': 'Z16', 'description': 'depth stream format'},
                        {'name': 'depth_module.infra_profile',   'default': '480,270,30', 'description': 'infra streams (0/1/2) profile'},
                        {'name': 'depth_module.infra_format',    'default': 'Y8', 'description': 'infra0 stream format'},
                        {'name': 'depth_module.infra1_format',   'default': 'Y8', 'description': 'infra1 stream format'},
                        {'name': 'depth_module.infra2_format',   'default': 'Y8', 'description': 'infra2 stream format'},
                        {'name': 'depth_module.emitter_enabled', 'default': '0', 'description': 'Depth module laser setup'},
                        {'name': 'depth_module.exposure',        'default': '8500', 'description': 'Depth module manual exposure value'},
                        {'name': 'depth_module.gain',            'default': '16', 'description': 'Depth module manual gain value'},
                        {'name': 'depth_module.hdr_enabled',     'default': 'false', 'description': 'Depth module hdr enablement flag. Used for hdr_merge filter'},
                        {'name': 'depth_module.enable_auto_exposure', 'default': 'true', 'description': 'enable/disable auto exposure for depth image'},
                        {'name': 'depth_module.infra1.enable_auto_exposure', 'default': 'true', 'description': 'enable/disable auto exposure for infra1 image'},
                        {'name': 'depth_module.infra2.enable_auto_exposure', 'default': 'true', 'description': 'enable/disable auto exposure for infra2 image'},
                        {'name': 'depth_module.exposure.1',      'default': '7500', 'description': 'Depth module first exposure value. Used for hdr_merge filter'},
                        {'name': 'depth_module.gain.1',          'default': '16', 'description': 'Depth module first gain value. Used for hdr_merge filter'},
                        {'name': 'depth_module.exposure.2',      'default': '1', 'description': 'Depth module second exposure value. Used for hdr_merge filter'},
                        {'name': 'depth_module.gain.2',          'default': '16', 'description': 'Depth module second gain value. Used for hdr_merge filter'},
                        {'name': 'enable_sync',                  'default': 'false', 'description': "'enable sync mode'"},
                        {'name': 'enable_rgbd',                  'default': 'false', 'description': "'enable rgbd topic'"},
                        {'name': 'enable_gyro',                  'default': 'false', 'description': "'enable gyro stream'"},
                        {'name': 'enable_accel',                 'default': 'false', 'description': "'enable accel stream'"},
                        {'name': 'gyro_fps',                     'default': '0', 'description': "''"},
                        {'name': 'accel_fps',                    'default': '0', 'description': "''"},
                        {'name': 'unite_imu_method',             'default': "0", 'description': '[0-None, 1-copy, 2-linear_interpolation]'},
                        {'name': 'clip_distance',                'default': '-2.', 'description': "''"},
                        {'name': 'angular_velocity_cov',         'default': '0.01', 'description': "''"},
                        {'name': 'linear_accel_cov',             'default': '0.01', 'description': "''"},
                        {'name': 'diagnostics_period',           'default': '0.0', 'description': 'Rate of publishing diagnostics. 0=Disabled'},
                        {'name': 'publish_tf',                   'default': 'false', 'description': '[bool] enable/disable publishing static & dynamic TF'},
                        {'name': 'tf_publish_rate',              'default': '0.0', 'description': '[double] rate in Hz for publishing dynamic TF'},
                        {'name': 'pointcloud.enable',            'default': 'false', 'description': ''},
                        {'name': 'pointcloud.stream_filter',     'default': '2', 'description': 'texture stream for pointcloud'},
                        {'name': 'pointcloud.stream_index_filter','default': '0', 'description': 'texture stream index for pointcloud'},
                        {'name': 'pointcloud.ordered_pc',        'default': 'false', 'description': ''},
                        {'name': 'pointcloud.allow_no_texture_points', 'default': 'false', 'description': "''"},
                        {'name': 'align_depth.enable',           'default': 'false', 'description': 'enable align depth filter'},
                        {'name': 'colorizer.enable',             'default': 'false', 'description': 'enable colorizer filter'},
                        {'name': 'decimation_filter.enable',     'default': 'false', 'description': 'enable_decimation_filter'},
                        {'name': 'spatial_filter.enable',        'default': 'false', 'description': 'enable_spatial_filter'},
                        {'name': 'temporal_filter.enable',       'default': 'false', 'description': 'enable_temporal_filter'},
                        {'name': 'disparity_filter.enable',      'default': 'false', 'description': 'enable_disparity_filter'},
                        {'name': 'hole_filling_filter.enable',   'default': 'false', 'description': 'enable_hole_filling_filter'},
                        {'name': 'hdr_merge.enable',             'default': 'false', 'description': 'hdr_merge filter enablement flag'},
                        {'name': 'wait_for_device_timeout',      'default': '-1.', 'description': 'Timeout for waiting for device to connect (Seconds)'},
                        {'name': 'reconnect_timeout',            'default': '6.', 'description': 'Timeout(seconds) between consequtive reconnection attempts'},
                        ]

def declare_configurable_parameters(parameters):
    return [DeclareLaunchArgument(param['name'], default_value=param['default'], description=param['description']) for param in parameters]

def set_configurable_parameters(parameters):
    return dict([(param['name'], LaunchConfiguration(param['name'])) for param in parameters])

def yaml_to_dict(path_to_yaml):
    with open(path_to_yaml, "r") as f:
        return yaml.load(f, Loader=yaml.SafeLoader)

def launch_setup(context, params, param_name_suffix=''):
    _config_file = LaunchConfiguration('config_file' + param_name_suffix).perform(context)
    params_from_file = {} if _config_file == "''" else yaml_to_dict(_config_file)

    _output = LaunchConfiguration('output' + param_name_suffix)
    if(os.getenv('ROS_DISTRO') == 'foxy'):
        _output = context.perform_substitution(_output)

    return [
        launch_ros.actions.Node(
            package='realsense2_camera',
            namespace=LaunchConfiguration('camera_namespace' + param_name_suffix),
            name=LaunchConfiguration('camera_name' + param_name_suffix),
            executable='realsense2_camera_node',
            parameters=[params, params_from_file],
            output=_output,
            arguments=['--ros-args', '--log-level', LaunchConfiguration('log_level' + param_name_suffix)],
            emulate_tty=True,
            )
    ]

def generate_launch_description():
    return LaunchDescription(declare_configurable_parameters(configurable_parameters) + [
        OpaqueFunction(function=launch_setup, kwargs = {'params' : set_configurable_parameters(configurable_parameters)})
    ])
ℹ️ launch 文件关键配置说明:
enable_depth: false/enable_color: false:关闭深度和彩色流,降低带宽占用。enable_infra1: true/enable_infra2: true:仅开启双目红外流,用于 VIO。depth_module.infra_profile: 480,270,30:分辨率 480×270,帧率 30Hz。depth_module.emitter_enabled: 0:关闭红外投射器,避免干扰 VIO 特征点提取。
验证双目数据
1. 查看设备状态
rs-enumerate-devices
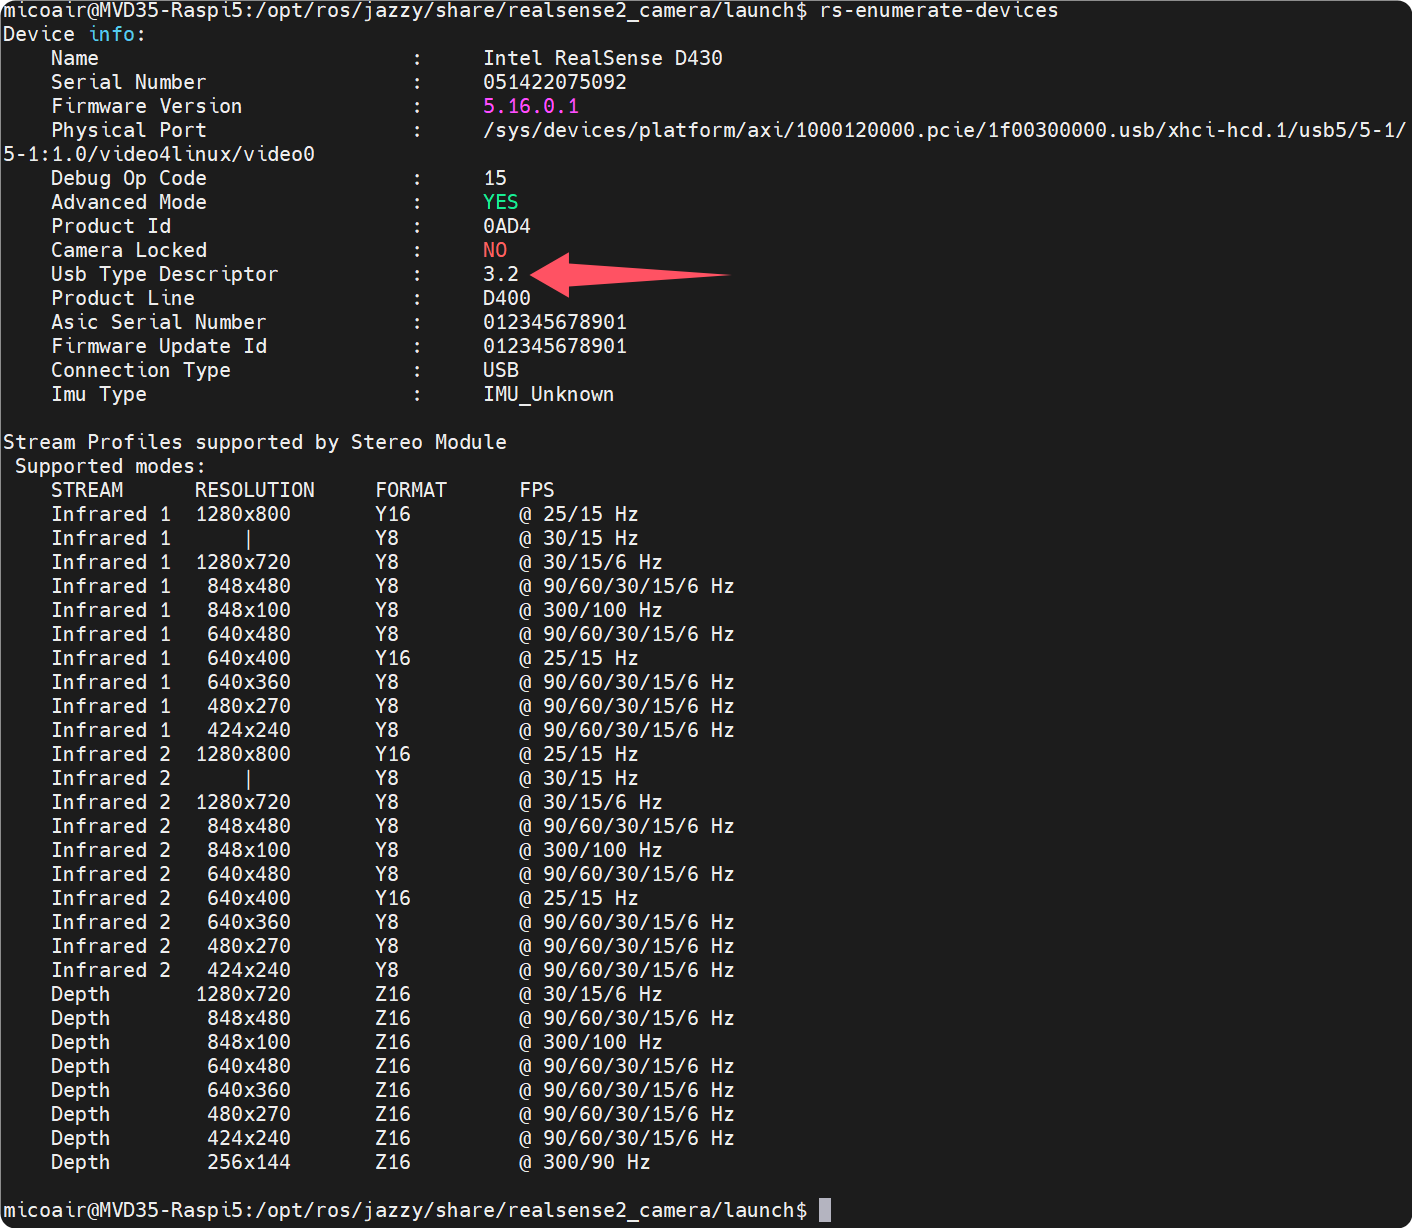
✅ 确认设备工作的 USB 协议版本:输出信息中的 Usb Type Descriptor 应显示为
3.2。如果显示为2.1,说明当前处于 USB 2.0 状态,请检查是否使用了 USB 3.0 高速数据线,并确认插在树莓派的蓝色 USB 3.0 接口上。
2. 启动相机节点
ros2 launch realsense2_camera mvd35_d430_launch.py
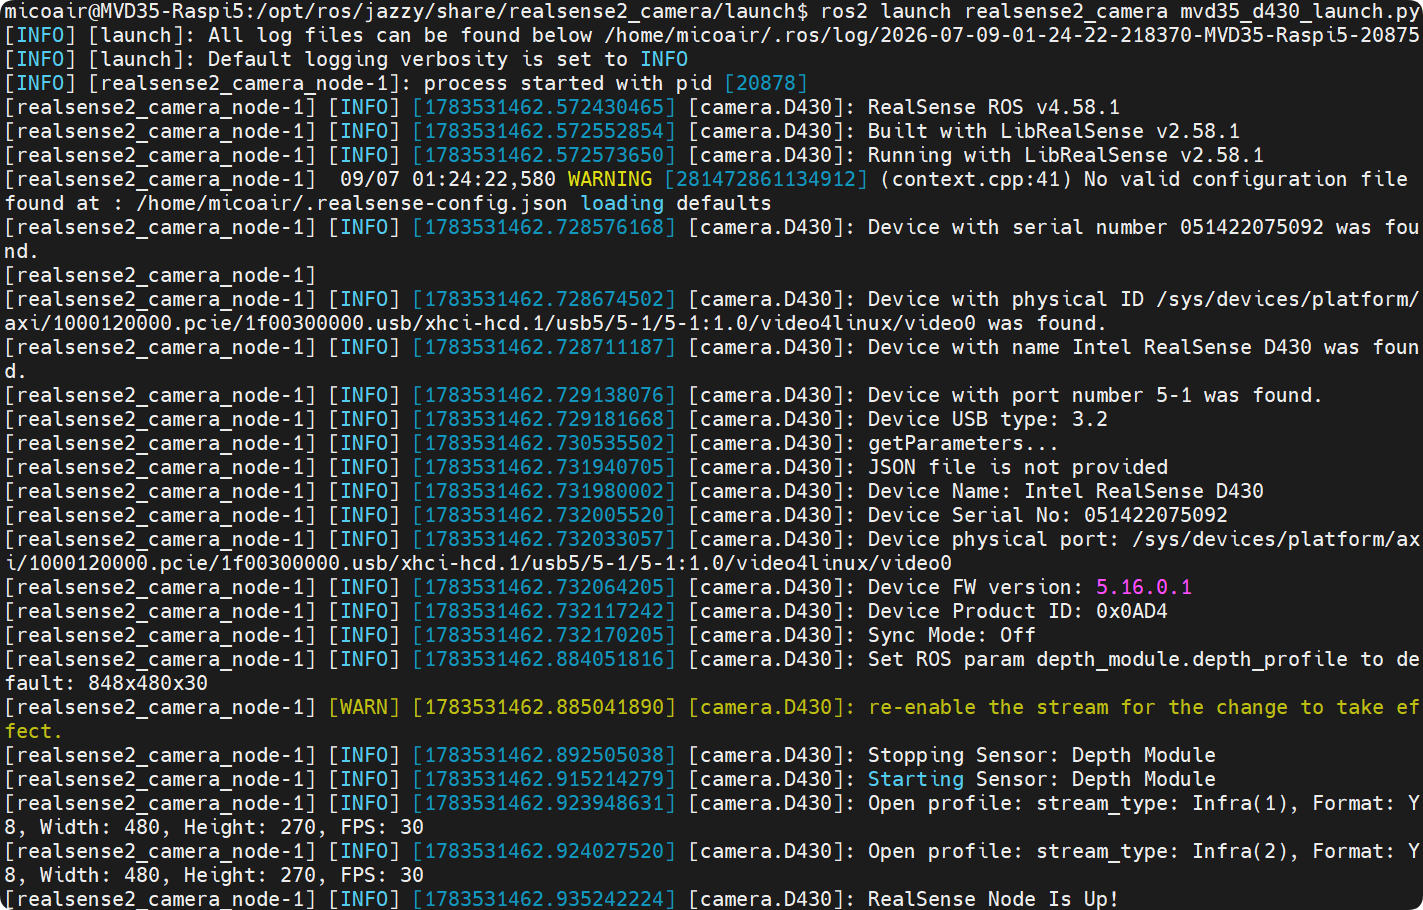
✅ 启动节点后能看到双目启动的信息及
RealSense Node Is Up!标识,则说明相机启动成功。
3. 查看话题数据
- 打开新的终端查看已发布的话题
ros2 topic list
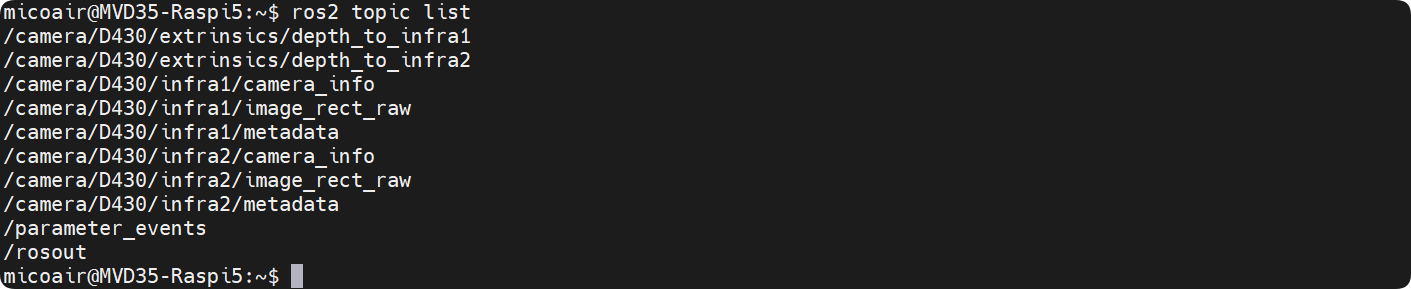
✅ 通过终端能看到
/camera/D430/infra1/image_rect_raw和/camera/D430/infra2/image_rect_raw等话题,则说明双目相机数据已成功发布。
- 查看图像分辨率
ros2 topic echo /camera/D430/infra1/camera_info --once
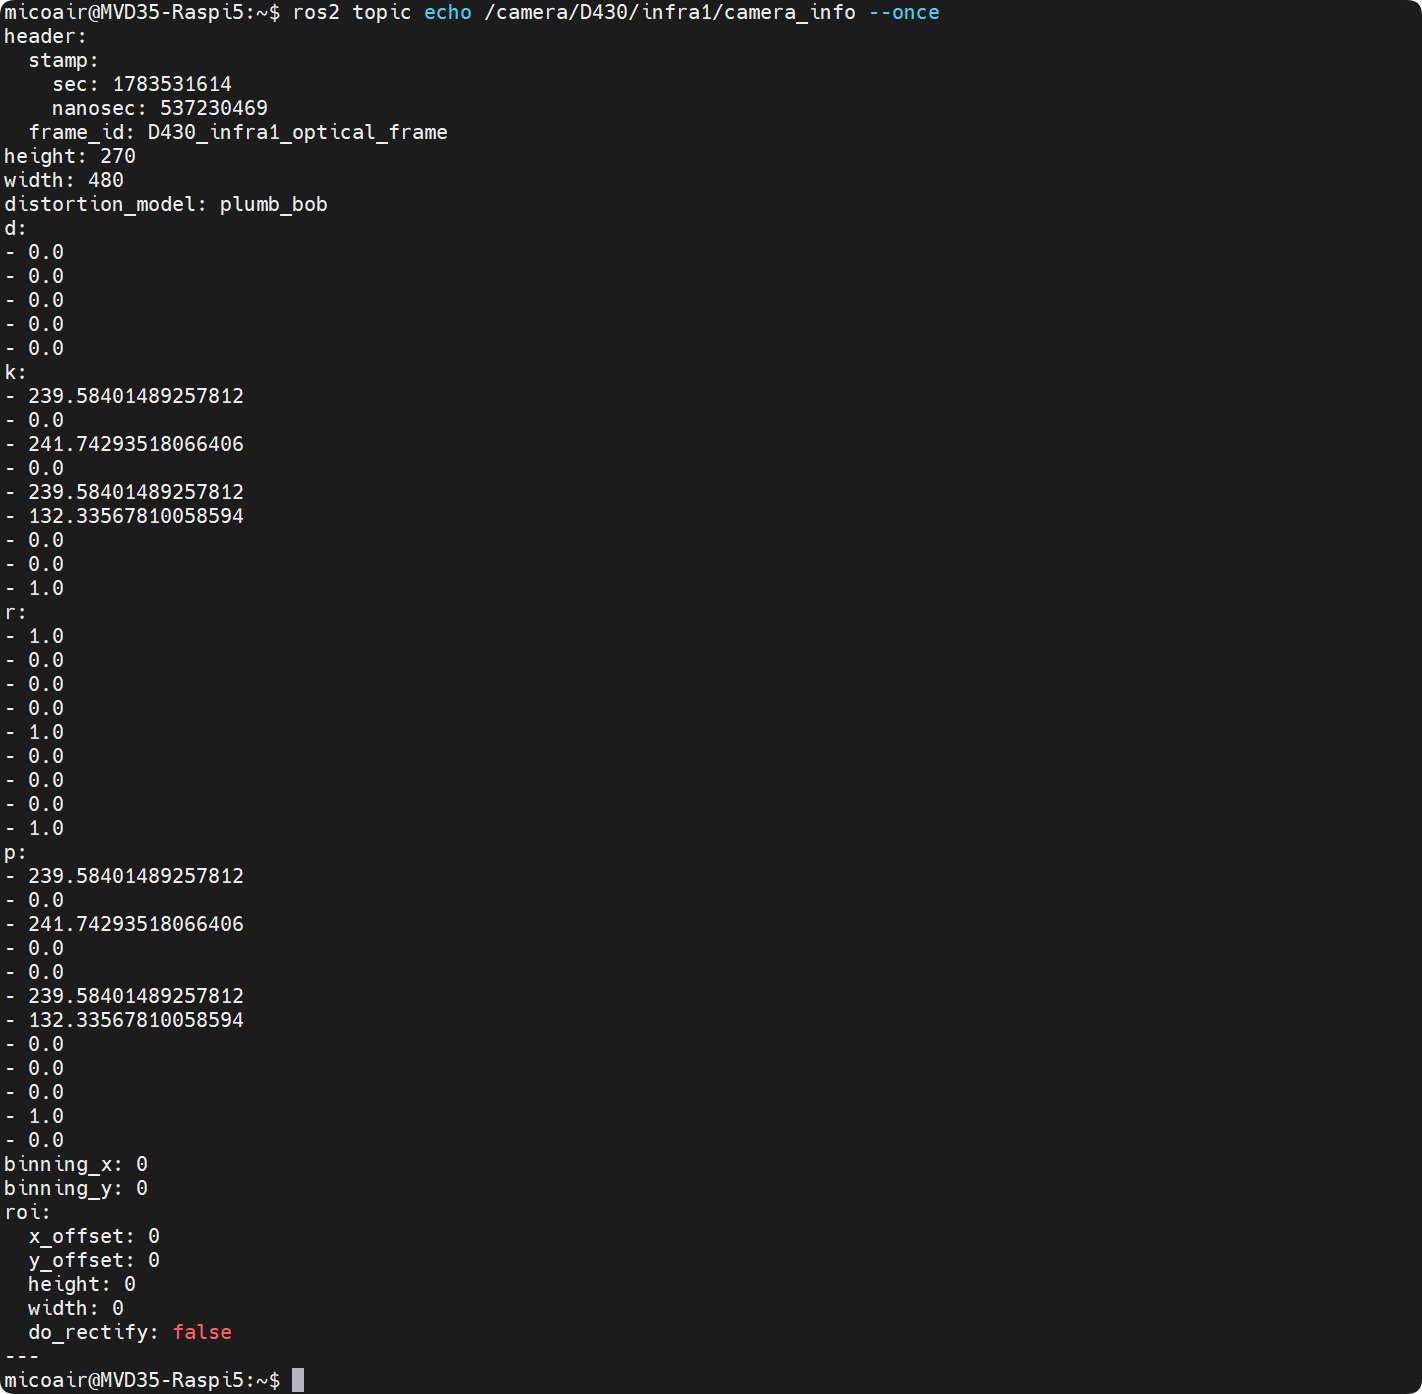
✅
camera_info话题中能看到width: 480和height: 270,则说明双目相机分辨率正常。
- 查看图像帧率
ros2 topic hz /camera/D430/infra1/image_rect_raw

✅
topic hz显示帧率稳定在 30Hz 左右,则说明双目相机帧率正常。
- 可视化查看图像
ros2 run rqt_image_view rqt_image_view
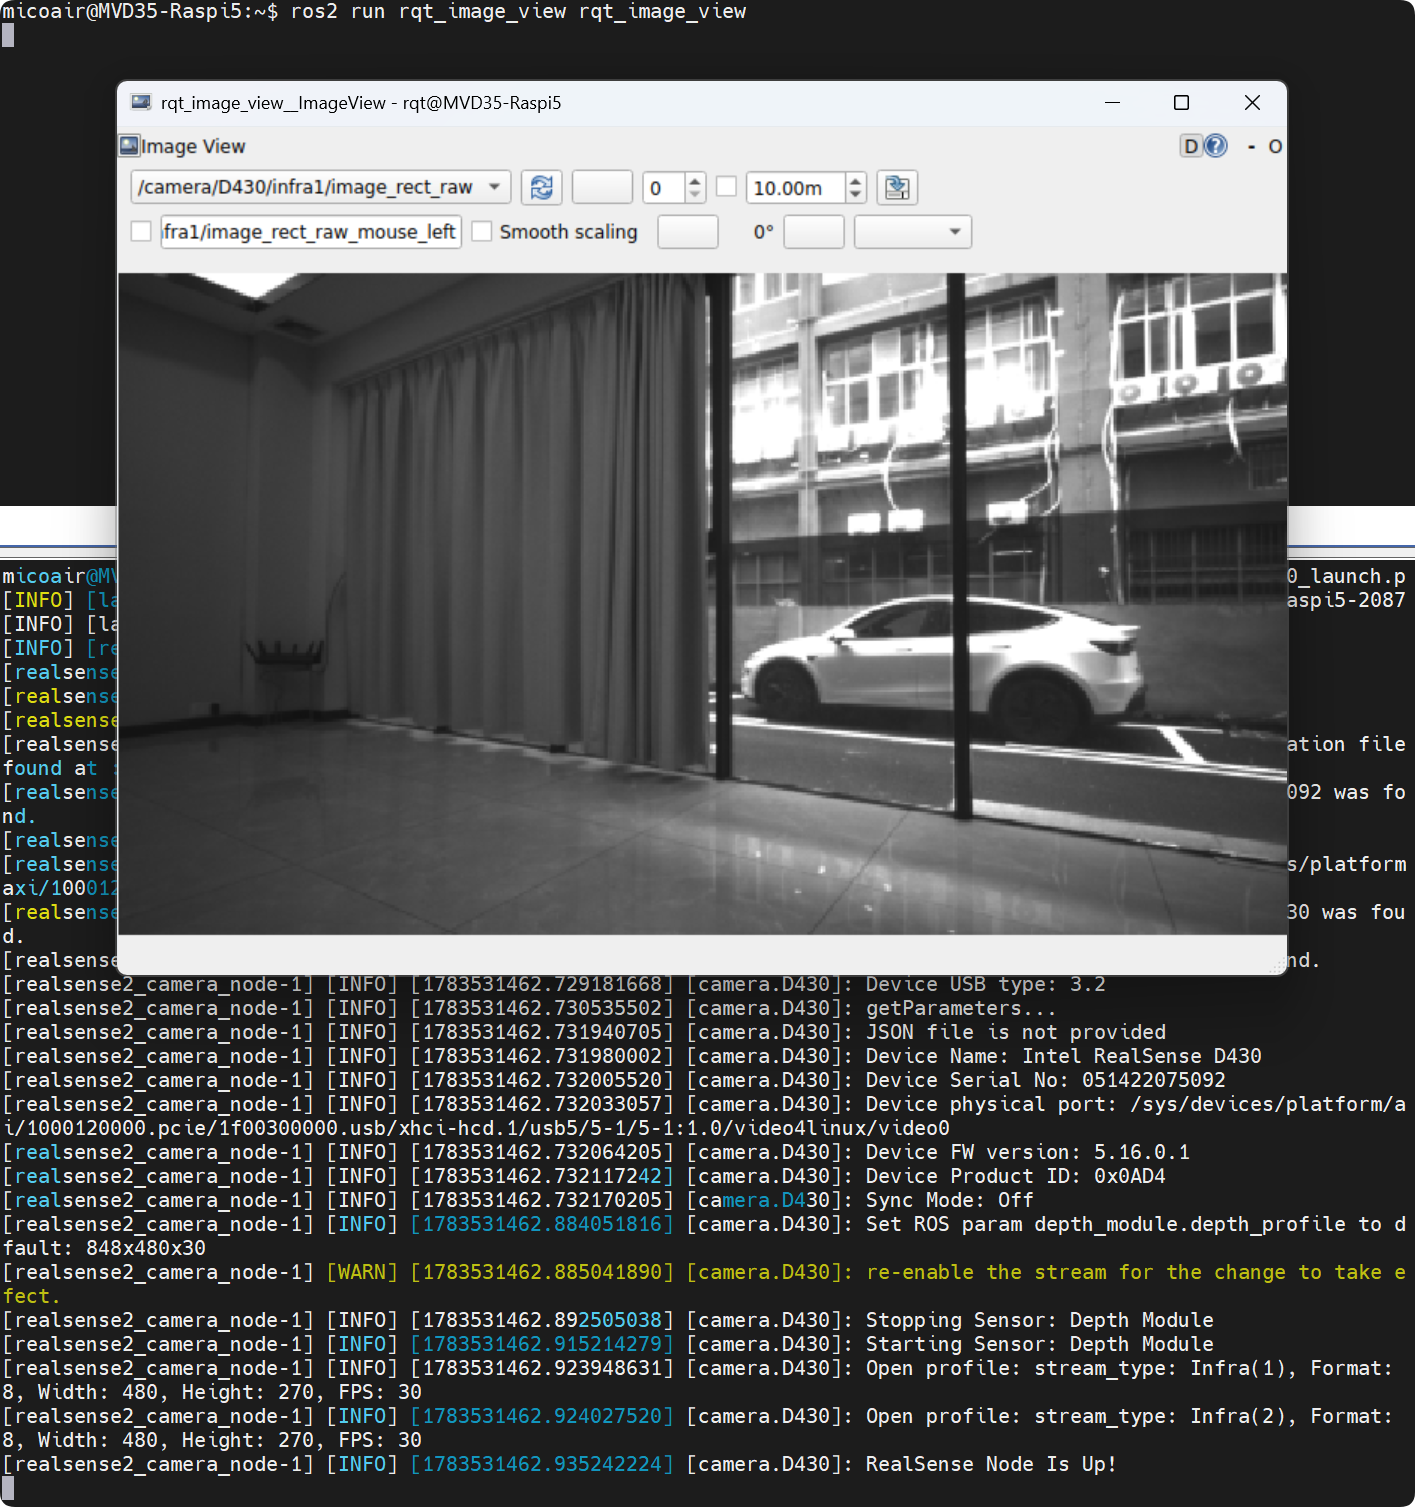
✅ 在
rqt_image_view窗口中能看到 infra1 和 infra2 的图像,则说明双目相机数据已成功可视化。
常见错误
⚠️ 没有找到 D430 设备:检查 D430 USB-C 线是否插好,确认连接的是树莓派 USB 3.0 端口(蓝色接口)。
⚠️ 帧率异常低(< 15Hz):USB 线可能不支持 3.0,或树莓派 CPU 温度过高。检查是否安装主动散热器及其是否正常转动。
⚠️
Permission denied:udev 规则未生效,重新执行 5.2 步骤后拔插 USB 线。
MAVROS 安装与飞控通信
MAVROS 是 ROS 2 中用于与 MAVLink 飞控通信的官方软件包。它将飞控的传感器数据、状态信息和控制接口封装为标准的 ROS 2 话题和服务,使上层算法能够方便地与飞控交互。本步骤完成 MAVROS 安装、飞控连接配置和通信验证。
设置飞控 IMU 发布频率
为满足后续 VIO 算法对高频 IMU 数据的需求,需要提高飞控的 MAVLink IMU 消息发布频率。
- 将飞控连接树莓派的 USB 线拔出,并连接到 MicoConfigurator
⚠️ 飞控通常仅有一个 USB 调试接口。在需要连接电脑使用 MicoConfigurator 调试时,必须先拔掉连接在树莓派上的 USB 数据线,再将其接入电脑。
- 在电脑中新建
message-intervals-chan0.txt文件,写入以下内容:
105 5
ℹ️ 105 表示 HIGHRES_IMU 消息 ID,5 表示发布时间间隔为 5ms,即 200Hz
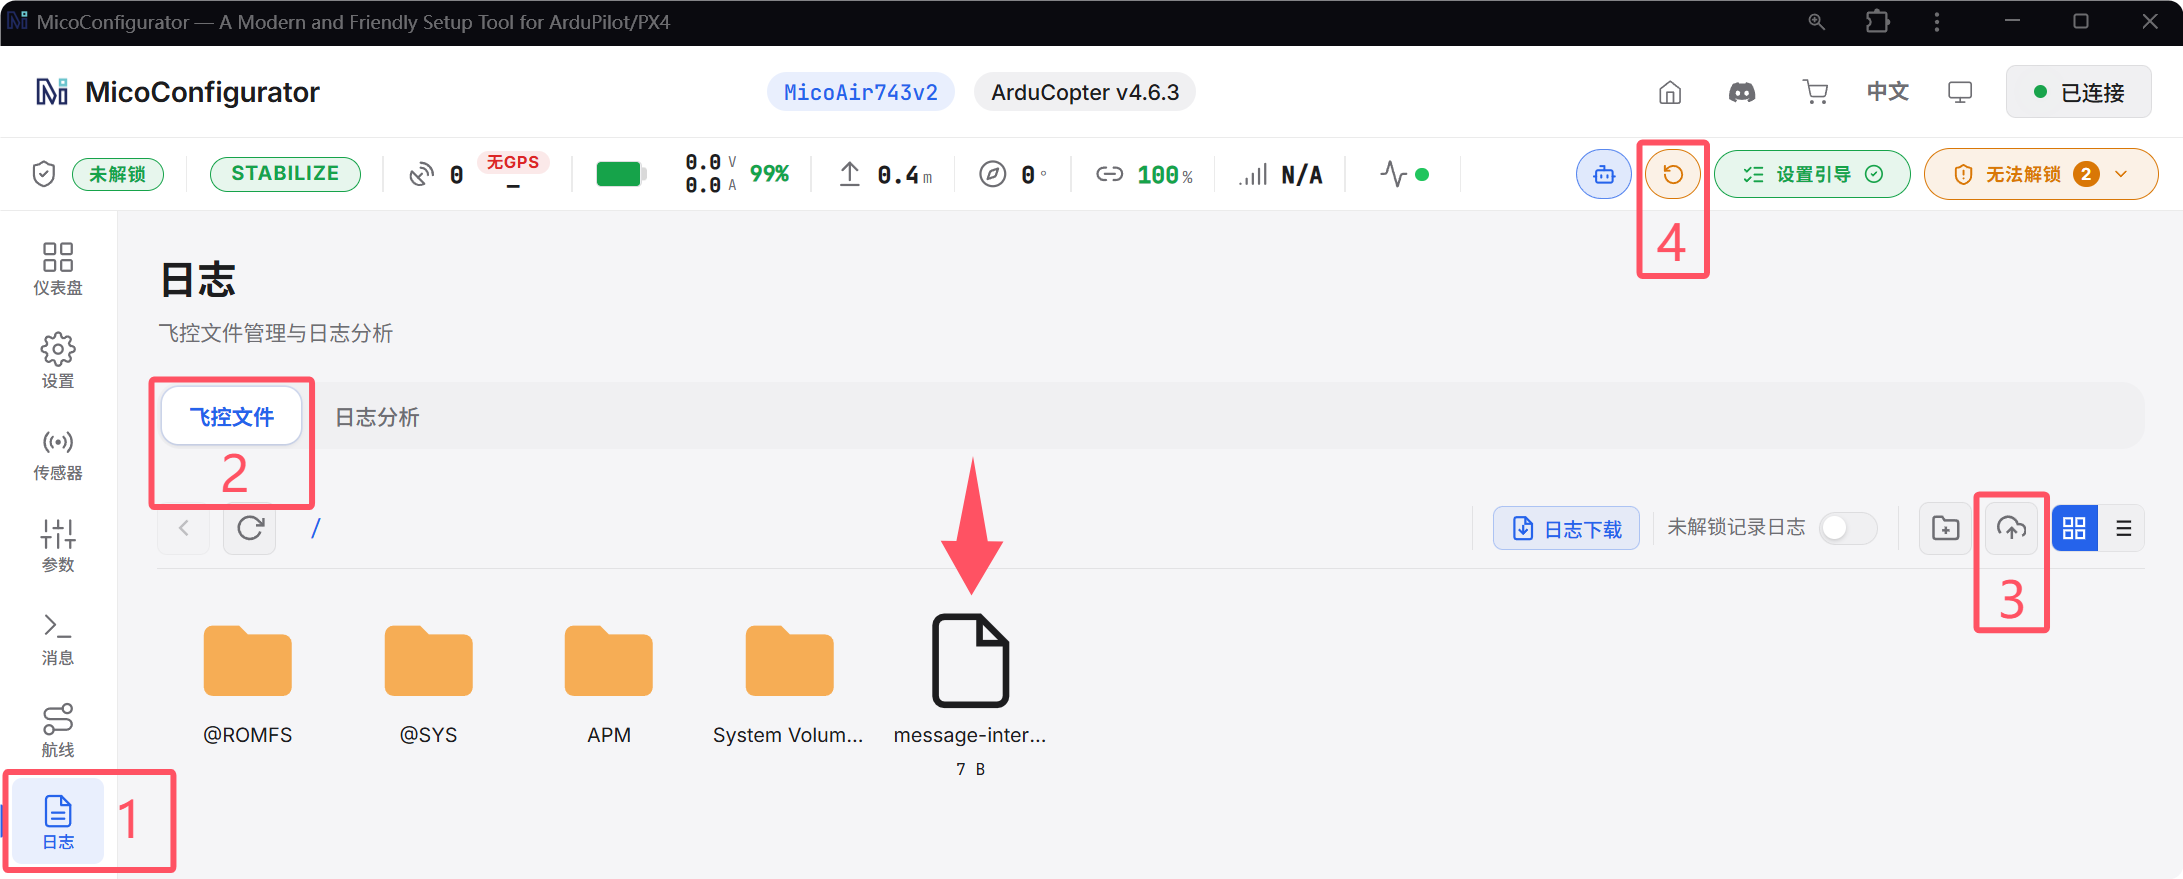
-
将该文件上传到飞控 TF 卡根目录下:
日志->飞控文件-> 上传message-intervals-chan0.txt -
⚠️ 重启飞控
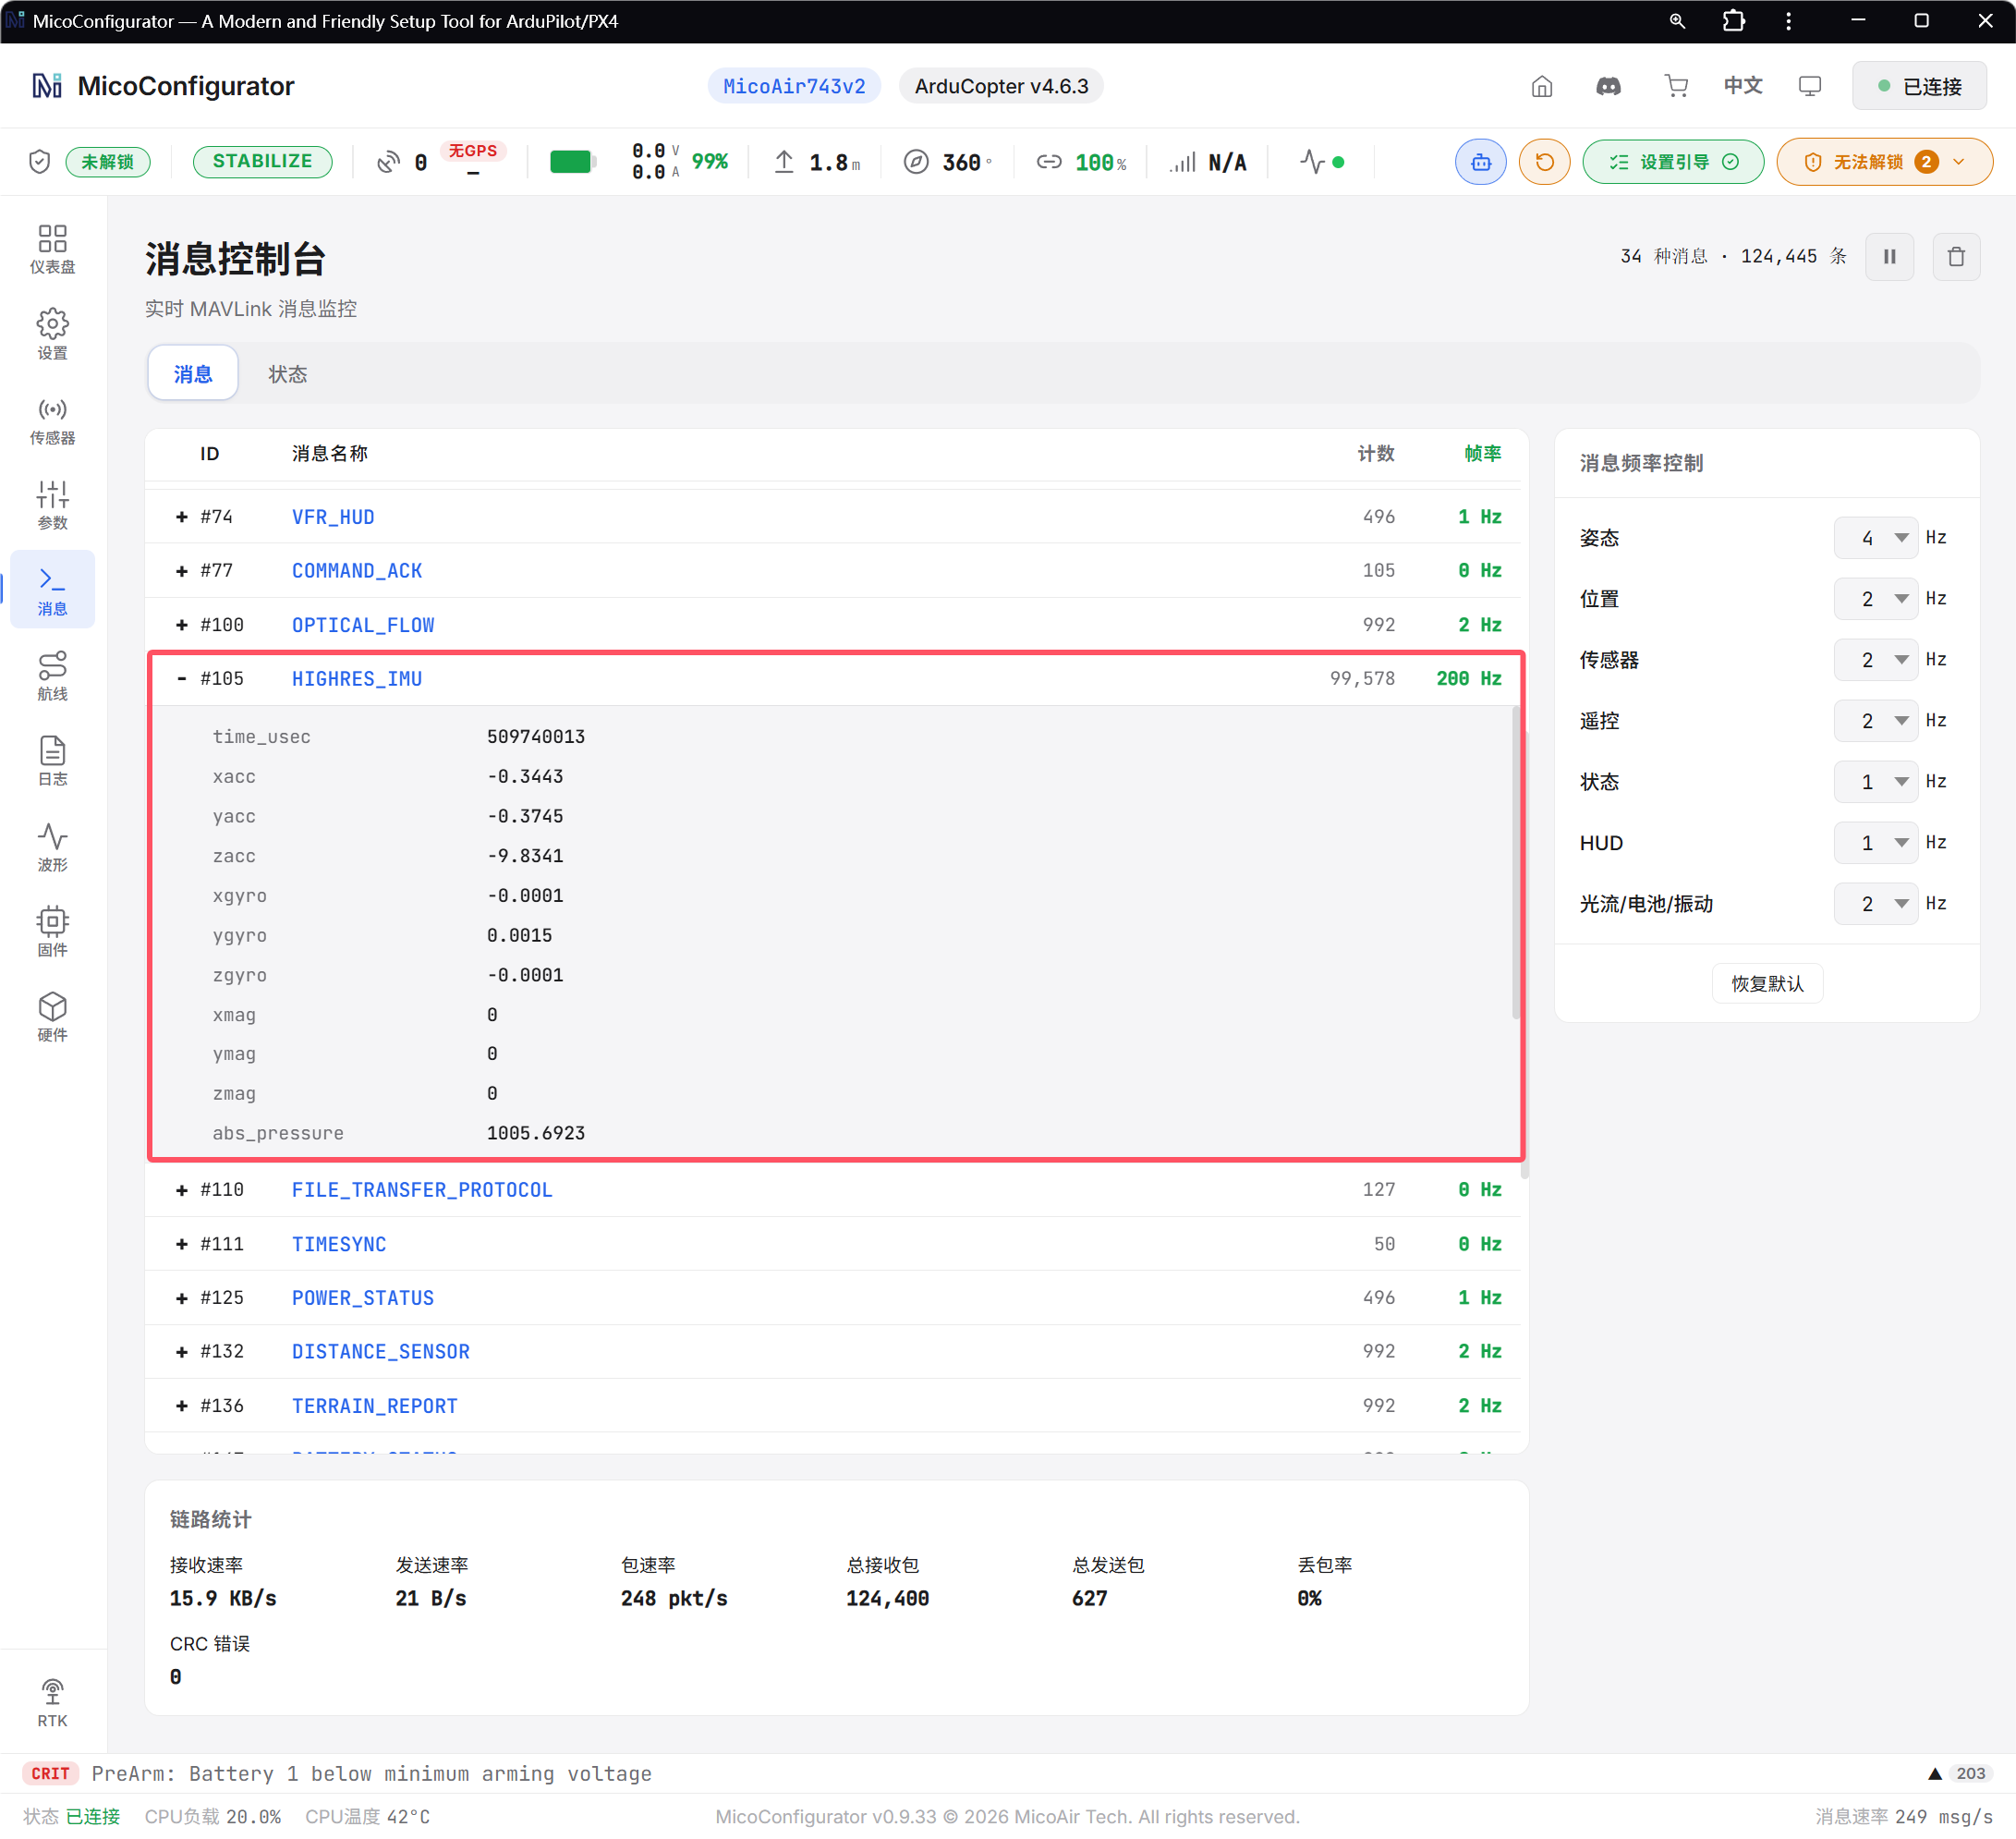
- 在
消息界面中确认 HIGHRES_IMU 的发布频率为200Hz
更新补充中……
- 确认成功修改飞控 IMU 发布频率后,断开飞控与电脑的连接,重新将飞控连接到树莓派
安装 MAVROS
- 安装 MAVROS 包
sudo apt-get install ros-jazzy-mavros ros-jazzy-mavros-extras -y
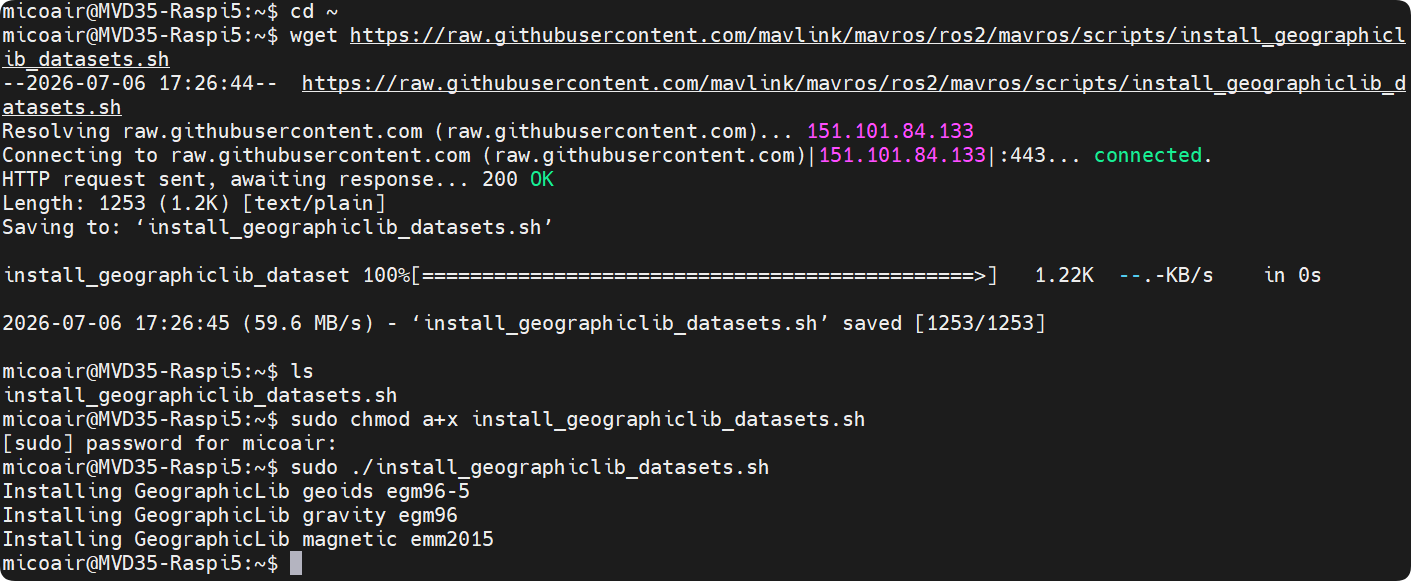
- 安装 GeographicLib 数据集
cd ~
wget https://raw.githubusercontent.com/mavlink/mavros/ros2/mavros/scripts/install_geographiclib_datasets.sh
sudo chmod a+x install_geographiclib_datasets.sh
sudo ./install_geographiclib_datasets.sh
- 修改启动文件
- 修改 MAVROS 的 apm.launch 文件,将串口波特率设置为 921600 以匹配飞控 USB 通信速率:
sudo sed -i 's#default="/dev/ttyACM0:57600" />$#default="/dev/ttyACM0:921600" />#' /opt/ros/jazzy/share/mavros/launch/apm.launch
修改 MAVROS 的 px4.launch 文件,将串口波特率设置为 921600 以匹配飞控 USB 通信速率:
sudo sed -i 's#default="/dev/ttyACM0:57600" />$#default="/dev/ttyACM0:921600" />#' /opt/ros/jazzy/share/mavros/launch/px4.launch
验证飞控通信
1. 查看 USB 接口识别到的设备
lsusb
✅ 确认树莓派已成功识别到飞控并显示飞控型号
Generic MicoAir743v2
2. 启动 MAVROS 节点
ros2 launch mavros apm.launch
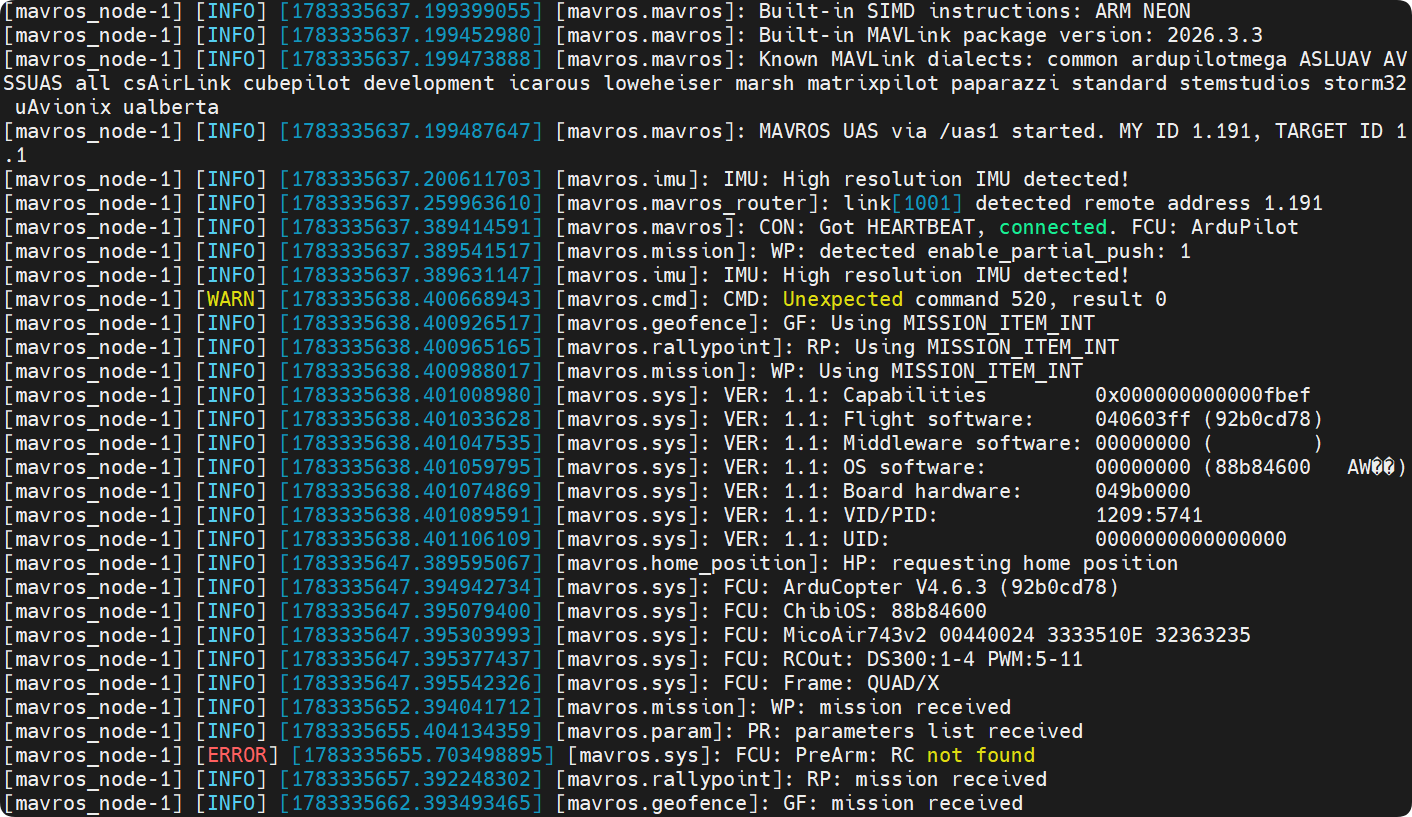
✅ 启动节点后,能看到 MAVROS 的日志输出,包括
飞控固件版本、飞控型号等信息,表示 MAVROS 已成功连接到飞控。
3. 查看飞控状态
在另一个终端执行:
ros2 topic echo /mavros/state --once
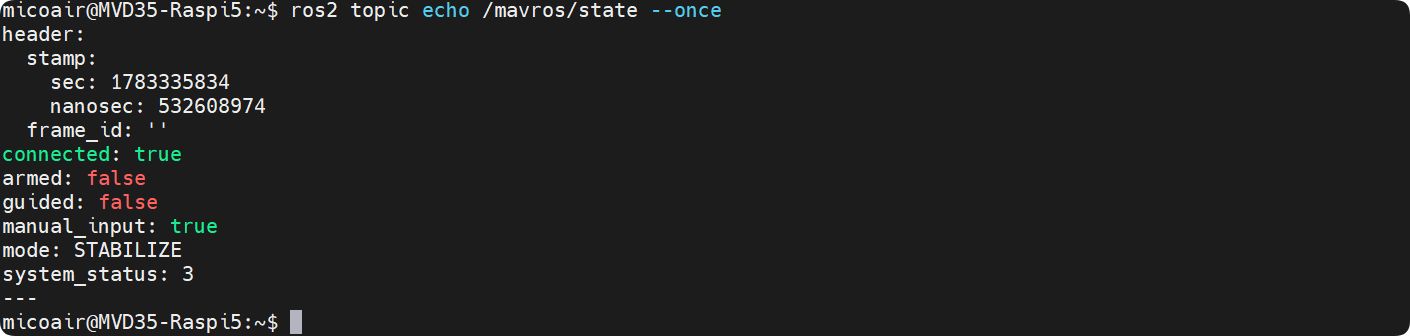
✅ 成功连接后,能看到飞控的状态信息,包括
connected: true、mode、armed等状态信息。
4. 验证 IMU 数据频率
ros2 topic hz /mavros/imu/data_raw

✅ 成功验证 IMU 数据频率,频率应为
200Hz。
更新补充中……
常见错误
⚠️
lsusb未识别到飞控:检查飞控 USB 线序是否焊接正确且稳固;检查飞控是否上电。⚠️ MAVROS 节点启动失败:重新拔插 USB线或重新给 MVD35 上电。
附录
ROS 多机通信
通过 ROS 2 多机通信实现数据互通,利用 DDS 自动发现机制(无需配置环境变量),在同一局域网下的远程 PC 上无线运行 RViz 等可视化工具。这在免去繁琐配置的同时,能将图形渲染等高负载任务移至地面,有效减轻机载电脑的算力负荷,提高调试效率与安全性。
1. 系统配置
| 设备 | 硬件类型 / 说明 | 操作系统 | ROS 版本 |
|---|---|---|---|
| 机载电脑 | 树莓派 5 | Ubuntu 24.04 | ROS 2 Jazzy |
| 远程 PC | 虚拟机或直接运行 Ubuntu 系统的电脑 | Ubuntu 24.04 | ROS 2 Jazzy |
2. 远程 PC 配置步骤
-
安装 ROS 2 Jazzy Desktop 版本(参考本章第 4 节)。
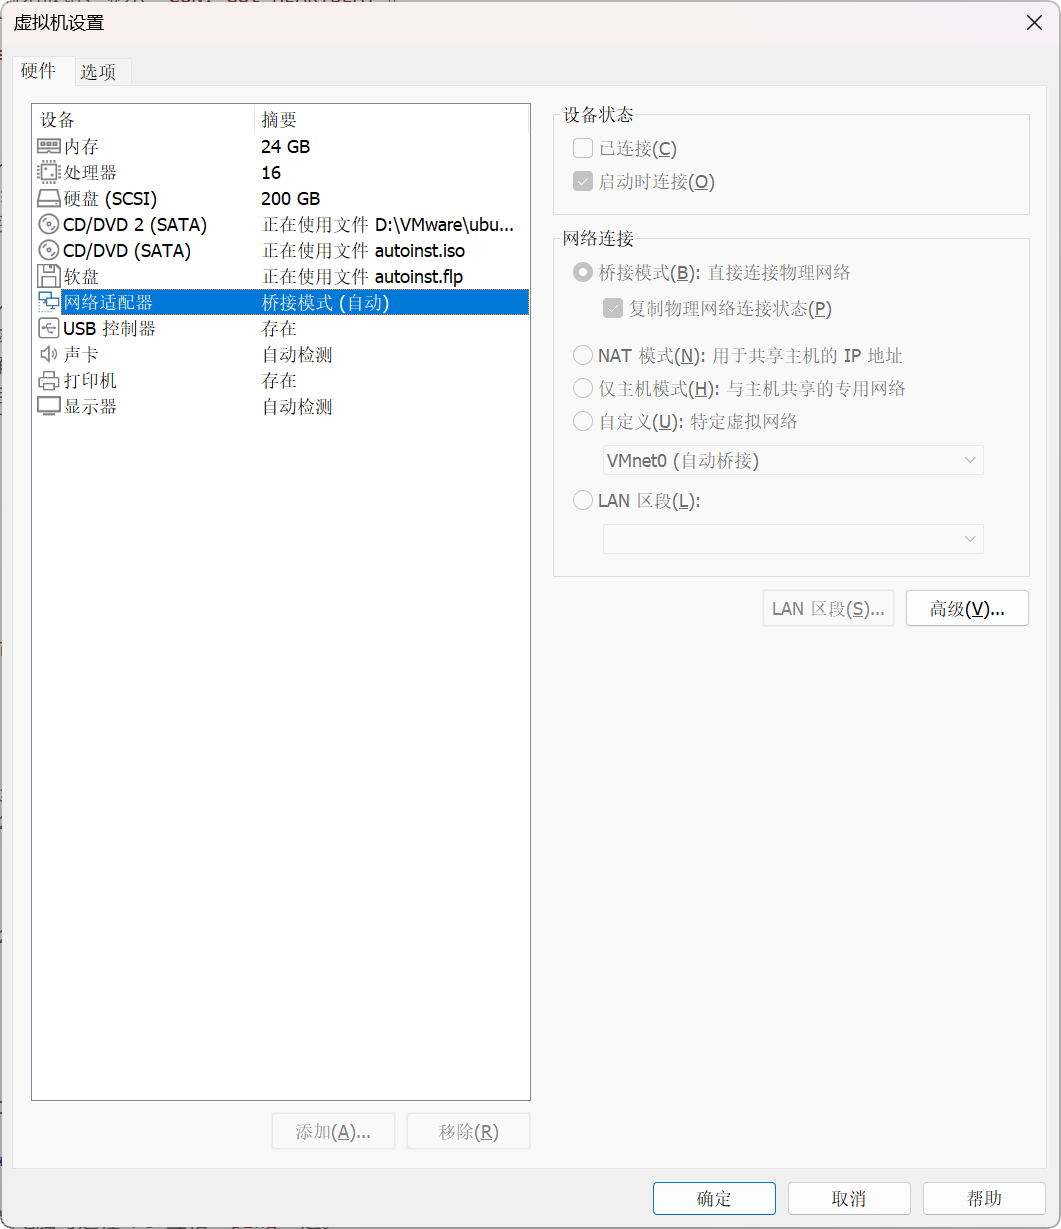
-
虚拟机网络设置为 桥接模式,确保与树莓派在同一网段。
-
测试网络连通性:机载电脑与远程 PC 互相
ping通。 -
验证 ROS 2 多机通信:在机载电脑运行
talker,在远程 PC 运行listener,确认能收到消息。
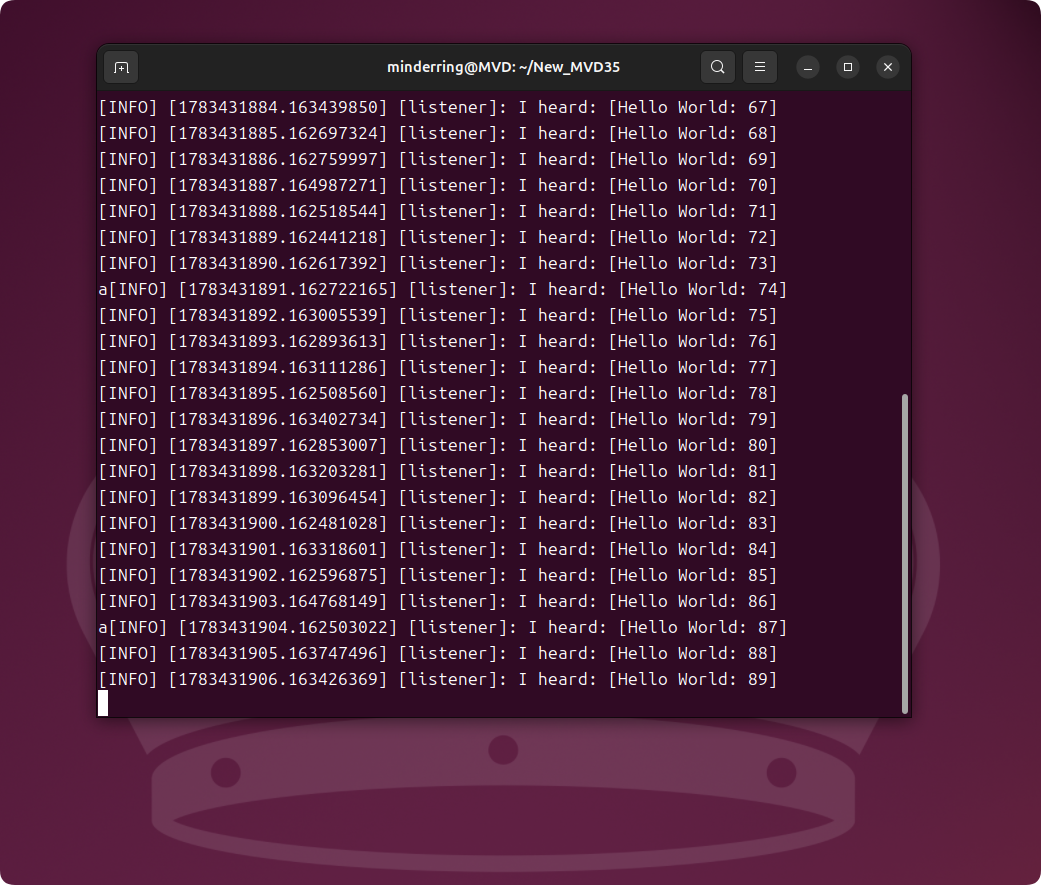
ℹ️ ROS 2 Jazzy 默认使用 DDS 进行多机通信,同一局域网内的节点会自动发现彼此,无需额外配置
ROS_MASTER_URI。
常用 MAVROS 话题
| 话题 | 类型 | 说明 |
|---|---|---|
/mavros/state | 订阅 | 飞控连接状态、飞行模式 |
/mavros/imu/data | 订阅 | IMU 数据(加速度、角速度、姿态) |
/mavros/local_position/pose | 订阅 | 本地坐标系位姿 |
/mavros/setpoint_position/local | 发布 | 发送位置控制指令 |
/mavros/set_mode | 服务 | 切换飞行模式 |
/mavros/cmd/arming | 服务 | 解锁/锁定电机 |
/mavros/vision_pose/pose | 发布 | 外部视觉定位数据输入 |
常用 ROS 2 调试指令
# ===== 话题相关 (Topic) =====
ros2 topic list                               # 列出当前所有活动话题
ros2 topic list -t                            # 列出话题及其消息类型
ros2 topic echo /mavros/imu/data_raw          # 实时打印并查看话题内容
ros2 topic hz /mavros/imu/data_raw            # 查看话题的实际发布频率
ros2 topic bw /camera/D430/infra1/image_rect  # 查看话题的数据带宽占用
ros2 topic info /mavros/imu/data_raw -v       # 查看话题的详细发布与订阅连接信息
ros2 topic pub /topic_name std_msgs/msg/String "data: 'test'" # 命令行向话题手动发布一次消息

# ===== 节点相关 (Node) =====
ros2 node list                                # 列出当前系统内所有运行的节点
ros2 node info /mavros                        # 查看指定节点的发布、订阅话题和服务接口

# ===== 服务相关 (Service) =====
ros2 service list                             # 列出当前所有可用的服务
ros2 service call /mavros/cmd/arming mavros_msgs/srv/CommandBool "{value: true}" # 命令行调用服务(如解锁电机)

# ===== 接口与数据类型 (Interface) =====
ros2 interface show sensor_msgs/msg/Imu       # 查看指定消息或服务类型的具体数据结构定义

# ===== 数据记录与回放 (Bag) =====
ros2 bag record /mavros/imu/data_raw -o test_imu  # 录制指定话题的数据至本地文件(用于算法调试)
ros2 bag play test_imu                        # 回放录制的历史话题数据